6G v2.0

Post pics and info of your current projects.
User avatar
tobyw
Posts: 1886
Joined: Wed Mar 14, 2007 10:00 am
Location: Under the hood...

6G v2.0

Postby tobyw » Mon Mar 18, 2024 7:13 am

Well, what can I say... another year, another rig :roll: :oops: :lol:

This will be our second dive into the world of the 6th generation Bronco, and having learnt a few things from the first go-round ( http://www.peakputters.com/forum/viewtopic.php?f=14&t=7190 ) I'm hopeful this one will turn out even better.

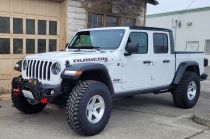
First, some basic specs: it's a 2022 Wildtrak with the High package wearing Area 51 blue. The Wildtrak variant automatically czeks the boxes for the 2.7L twin turbo V6 and the Sasquatch package, neither of which really excite me but they also are not deal breakers, particularly with he days of the early 2.7L's dropping valves well behind us. There are (5) other key differences between this Wildrak and our previous Badlands:

* This one has the High package, which does not include adaptive cruise like the Lux package did in our Badlands. This is critical to allowing a winch to be mounted in what's to be considered a normal location, which is key...
* This one has the upgraded power leather seats, which net you unlimited adjustability (including the headrest, which was in a terrible fixed position on the Badlands with MGV seats), and rear seat cupolders :thu:
* This one has the factory soft top. We found the OEM hardtop to be, essentially, miserable. It squeaked and rattled and was shockingly loud at road speeds. Not to mention cumbersome to store when removed. The factory soft top is not without it's issues, but I look forward to the change.
* This one is not equipped with an electronic disconnecting front swaybar like the Badlands... This took some consideration, as the e-bar in the Badlands and Rubicon Jeeps is just lovely. We'll just have to address this later :?
* This one has the factory tow package. This is key because it means I can much more easily install a legit brake controller instead of carrying around the Bluetooth controller that plugs into the cigarette lighter and requires a separate box to be mounted on the tongue of the trailer. It's a fantastic unit and works perfectly, but it is admittedly cumbersome and really sucks if you have multiple trailers...

Anyhoo, on to the pics:

IMG_6167.JPG
IMG_6167.JPG (1.4 MiB) Viewed 326 times


IMG_6135.JPG
IMG_6135.JPG (1.15 MiB) Viewed 328 times


:thu:
Yep, I've wheeled one of those, too...
Image

User avatar
tobyw
Posts: 1886
Joined: Wed Mar 14, 2007 10:00 am
Location: Under the hood...

Re: 6G v2.0

Postby tobyw » Mon Mar 18, 2024 7:41 am

The first step was to remove all of the ugly that I could from the previous owner's life choices. Off came the step bars, mudflaps, and I swapped the factory Sasquatch flares for some factory narrow flares for a much sleeker look:

IMG_6127.JPG
IMG_6127.JPG (1.31 MiB) Viewed 326 times


IMG_6176.JPG
IMG_6176.JPG (1.28 MiB) Viewed 326 times


IMG_6257.JPG
IMG_6257.JPG (1.42 MiB) Viewed 326 times


With that handlt, it's time to get down to business. One thing the PO did right was the front bumper; it has good lines and is reasonably well built. As much as I love to fab, I can't really justify starting all over on this one... With that said, I do need a winch... And here is a lesson from v1.0: I don't want the winch completely hidden. The Lux package forced me to mount the winch way down low to avoid interfering with the adaptive cruise module, which is mounted front and center between the frame rails, ie the ideal location for a winch :roll: Since the High package does not have this feature, that real estate becomes mine 8) After a few tape measure sessions and with a little blind faith that I could just pharmer my way through it, I dove in:

IMG_6178.JPG
IMG_6178.JPG (1.32 MiB) Viewed 326 times


IMG_6186.JPG
IMG_6186.JPG (1.42 MiB) Viewed 326 times


IMG_6200.JPG
IMG_6200.JPG (1.3 MiB) Viewed 326 times


IMG_6207.JPG
IMG_6207.JPG (1.43 MiB) Viewed 326 times


IMG_6232.JPG
IMG_6232.JPG (1.2 MiB) Viewed 326 times


IMG_6238.JPG
IMG_6238.JPG (1.59 MiB) Viewed 326 times


IMG_6240.JPG
IMG_6240.JPG (1.76 MiB) Viewed 326 times


IMG_6242.JPG
IMG_6242.JPG (1.73 MiB) Viewed 326 times


IMG_6251.JPG
IMG_6251.JPG (1.39 MiB) Viewed 326 times


IMG_6252.JPG
IMG_6252.JPG (1.17 MiB) Viewed 326 times


IMG_6290.JPG
IMG_6290.JPG (1.68 MiB) Viewed 326 times


IMG_6292.JPG
IMG_6292.JPG (2.22 MiB) Viewed 326 times


IMG_6300.JPG
IMG_6300.JPG (1.1 MiB) Viewed 326 times


I made a little bracket to mount the control module in engine compartment:

IMG_6298.JPG
IMG_6298.JPG (1.37 MiB) Viewed 326 times


Overall it's a very tidy setup that keeps the winch tucked away enough to maintain approach angle, yet allows me to actually see it to ensure the rope is winding properly and allows easy access to the clutch lever. I'm still debating on wireless versus a simple extension harness for the handheld controller, but for now we at least have functional self-recovery czeked off the list :thu:
Yep, I've wheeled one of those, too...

Image

User avatar
tobyw
Posts: 1886
Joined: Wed Mar 14, 2007 10:00 am
Location: Under the hood...

Re: 6G v2.0

Postby tobyw » Wed Mar 27, 2024 7:53 am

After some internal debate and pondering, I ended up going the wireless route for the winch controls. I picked up one of the inexpensive wireless controllers from Harbor Freight, which I used over 10-years ago on an XJ build where I hid the winch behind the factory front bumper (this seems to be a familiar theme :? ). Another quickie mounting plate and voila:

IMG_6331.JPG
IMG_6331.JPG (1.35 MiB) Viewed 292 times


Next up was to address onboard air. Again taking lessons from v1.0, I built a quick mount to hang the compressor in the engine bay and was able to wire it up to one of the factory auxiliary switches:

IMG_6325.JPG
IMG_6325.JPG (1.46 MiB) Viewed 292 times


IMG_6328.JPG
IMG_6328.JPG (1.62 MiB) Viewed 292 times


IMG_6375.JPG
IMG_6375.JPG (1.31 MiB) Viewed 292 times


Although the compressor ended up in the same location as before, one thing I never liked about v1.0 was that I was lazy and never found a good external location for the air coupler, which meant I had to pop the hood to connect the air hose. Simply barbaric :roll: This time, I was determined to find an suitable location for the coupler, and settled upon this:

IMG_6363.JPG
IMG_6363.JPG (1.24 MiB) Viewed 292 times


IMG_6366.JPG
IMG_6366.JPG (1.21 MiB) Viewed 292 times


IMG_6364.JPG
IMG_6364.JPG (1.17 MiB) Viewed 292 times


IMG_6389.JPG
IMG_6389.JPG (1.35 MiB) Viewed 292 times
Yep, I've wheeled one of those, too...

Image

User avatar
tobyw
Posts: 1886
Joined: Wed Mar 14, 2007 10:00 am
Location: Under the hood...

Re: 6G v2.0

Postby tobyw » Wed Mar 27, 2024 8:06 am

With recovery and air under control, it's time to address rocker protection. I have two distinct schools of thought here, and have had good success with both so it was a toss up on which way to go... In one camp is the theory that you can't hit what isn't there, meaning keep things high and tight and you'll essentially eliminate the clanking and banging associated with most overly done options out there (this directly applies to rear bumpers as well, but we'll get to that later...). The other side of the coin is to add protection in such a way that it self sacrifices above all else, meaning it's essentially guaranteed to get in the way but at the same time protect the precious bits they are intended to. After much internal debate, I decided to go with the latter on this build because of the platform itself: the 6G isn't a rockcrawler, and it's big. The suspension and belly clearance just aren't as good as a comparable Jeep for big rocks, and unlike the JK/JL platform where the fender flares are several inches wider than the body, the Bronco door skins are barely inset from its flares... I did what I could to keep the sliders low profile from a ground clearance perspective, but made them intentionally wide to keep shopping carts at bay. I also incorporated a bump-out at the rear section to try and further push any errant rocks/roots away:

IMG_6264.JPG
IMG_6264.JPG (1.27 MiB) Viewed 292 times


IMG_6273.JPG
IMG_6273.JPG (1.42 MiB) Viewed 292 times


IMG_6275.JPG
IMG_6275.JPG (1.13 MiB) Viewed 292 times


IMG_6349.JPG
IMG_6349.JPG (1.52 MiB) Viewed 292 times


IMG_6361.JPG
IMG_6361.JPG (1.3 MiB) Viewed 292 times


IMG_6385.JPG
IMG_6385.JPG (1.46 MiB) Viewed 292 times


IMG_6386.JPG
IMG_6386.JPG (1.33 MiB) Viewed 292 times


:thu:
Yep, I've wheeled one of those, too...

Image

User avatar
tobyw
Posts: 1886
Joined: Wed Mar 14, 2007 10:00 am
Location: Under the hood...

Re: 6G v2.0

Postby tobyw » Wed Mar 27, 2024 8:12 am

Keene eyed viewers may have already noticed, but I yarded out the front sway bar since the Wildtrak doesn't have the electronic disconnecting version from the Badlands. As it turns out, I have noticed very little additional sway, and don't miss it in the slightest:

IMG_6126.JPG
IMG_6126.JPG (1.31 MiB) Viewed 292 times


One other thing that bothered me about the overall aesthetic was the all black wheels. They just scream LEO, or perhaps your neighbors 1993 Camry that lost it's plastic hub cap... A quick spritz with some appropriately colored paint, and we are in business:

IMG_6286.JPG
IMG_6286.JPG (2.21 MiB) Viewed 292 times


IMG_6291.JPG
IMG_6291.JPG (1.38 MiB) Viewed 292 times


Soooooooo much mobetta:

IMG_6301.JPG
IMG_6301.JPG (1.75 MiB) Viewed 292 times


8)
Yep, I've wheeled one of those, too...

Image

User avatar
Roman
Peak Putters President
Posts: 2761
Joined: Wed Mar 14, 2007 5:30 pm
Location: Kennewick, WA

Re: 6G v2.0

Postby Roman » Fri Mar 29, 2024 2:56 pm

Those sliders are slick!

How have you been liking the Badlands? Winch enough?

User avatar
tobyw
Posts: 1886
Joined: Wed Mar 14, 2007 10:00 am
Location: Under the hood...

Re: 6G v2.0

Postby tobyw » Mon Apr 01, 2024 6:43 am

Roman wrote:Those sliders are slick!

How have you been liking the Badlands? Winch enough?


Thank you, sir :hi

This is my second Badland winch, and I haven't fired it up other than to spool the winch rope on. However, my first was the Badland APEX 12k that saw plenty of use on the first 6G Bronco and then on the Gladiator. I will openly admit my initial skepticism, but was more than pleasantly surprised with consistent operation that never let me down. It was quiet, pulled hard, and worked every time (and that was a lot :oops: ). Given the price point and local availability, it's hard to look elsewhere these days...
Yep, I've wheeled one of those, too...

Image

User avatar
tobyw
Posts: 1886
Joined: Wed Mar 14, 2007 10:00 am
Location: Under the hood...

Re: 6G v2.0

Postby tobyw » Mon Apr 01, 2024 7:17 am

I spent a few minutes conjuring up a mounting system for my patented Harbor Freight interior storage rack. I've used this sort of arrangement in numerous other builds, but the mounting provisions have always been a bit of a hinderance for one reason or another. This time, I chose to utilize the existing threaded inserts in the factory C-pillars and just made some Z-shaped brackets to hang the rack:

IMG_6417.JPG
IMG_6417.JPG (1.21 MiB) Viewed 235 times


IMG_6419.JPG
IMG_6419.JPG (1.16 MiB) Viewed 235 times


IMG_6420.JPG
IMG_6420.JPG (1.38 MiB) Viewed 235 times


IMG_6422.JPG
IMG_6422.JPG (1.36 MiB) Viewed 235 times


IMG_6426.JPG
IMG_6426.JPG (1.25 MiB) Viewed 235 times


This way, nothing protrudes below or beside the rack and I don't lose any other available stuff space in the direct vicinity :thu:
Yep, I've wheeled one of those, too...

Image

User avatar
tobyw
Posts: 1886
Joined: Wed Mar 14, 2007 10:00 am
Location: Under the hood...

Re: 6G v2.0

Postby tobyw » Sun Apr 07, 2024 4:55 am

Time for a slight altitude adjustment. Because of the rather finicky IFS, meaning there is A LOT of geometry going on that needs to be kept in czek, lifting the 6G properly is a bit of a thing. The biggest concern is with the angle of the CV shafts at full droop, particularly so on the Sasquatch package because FoMoCo already took it to the razors edge to allow the fitment of the factory 35's... The right answer is to maintain the factory travel limits, but add height via introducing additional preload on the coil spring. This keeps everyone happy in geometry class, adds some height, and the preload also helps compensate for sag due to the winch/bumper as well as combat brake dive. It's as simple as dismantling the coilover and sliding on a machined collar that raises the lower spring perch:

IMG_6458.JPG
IMG_6458.JPG (1.32 MiB) Viewed 204 times


IMG_6473.JPG
IMG_6473.JPG (1.29 MiB) Viewed 204 times


IMG_6474.JPG
IMG_6474.JPG (1.65 MiB) Viewed 204 times


IMG_6525.JPG
IMG_6525.JPG (1.39 MiB) Viewed 204 times


IMG_6526.JPG
IMG_6526.JPG (1.22 MiB) Viewed 204 times


With the easy part taken care of, it was time to address my twitching left eye... I'm not a fan of living on the aforementioned razors edge, and I also want the ability to add a little more lift up front if I should find it necessary. The easy way to add lift is a spacer above and/or below the coilover, which obviously adds height but also changes overall geometry and more importantly the location of the range of travel relative to the stationary differential center section. Translation: droop travel happens lower relative to the pumpkin, increasing the CV angle. No bueano... Hence the eye twitch :? Thankfully there is a solution, and that is to drop the differential center section. There are currently only a couple of aftermarket kits to address this, none of which enticed me, so I decided to develop my own brackets. Sounds easy, but it's really not :oops: But since I'm a pharmer, I dove it and did it anyway:

IMG_6522.JPG
IMG_6522.JPG (1.31 MiB) Viewed 204 times


IMG_6524.JPG
IMG_6524.JPG (1.39 MiB) Viewed 204 times


With the differential brackets removed I could put an eye on what I needed to come up to lower it down a bit. Here is the primary factory bracket:

IMG_6498.JPG
IMG_6498.JPG (1.38 MiB) Viewed 204 times


After a bit of Cardboard Aided Design and general tom foolery, I came up with this:

IMG_6500.JPG
IMG_6500.JPG (1.54 MiB) Viewed 204 times


IMG_6503.JPG
IMG_6503.JPG (1.34 MiB) Viewed 204 times


And here it is installed:

IMG_6532.JPG
IMG_6532.JPG (1.37 MiB) Viewed 204 times


IMG_6533.JPG
IMG_6533.JPG (1.23 MiB) Viewed 204 times


IMG_6534.JPG
IMG_6534.JPG (1.33 MiB) Viewed 204 times


There's quite a bit more involved here, but it's difficult to get good pictures in the tight confines below deck. If anyone has specific questions I'd be happy to answer them, but the bottom line is my pumpkin centerline is now just shy of 1" lower than where it used to live, which translates to a tidy improvement to CV angles under all conditions :thu:
Yep, I've wheeled one of those, too...

Image

User avatar
tobyw
Posts: 1886
Joined: Wed Mar 14, 2007 10:00 am
Location: Under the hood...

Re: 6G v2.0

Postby tobyw » Tue Apr 09, 2024 4:16 am

Out back, FoMoCo ran into some packaging issues trying to get reasonable wheel travel while keeping interior space unobstructed. What that translates to is axle end mounting brackets that hang way low:

IMG_6555.JPG
IMG_6555.JPG (1.37 MiB) Viewed 168 times


Holy rock magents, Batman!! You can clearly see the coilover mounting bracket is a significantly lower than the adjacent lower control arm brackets :? To address this, and at the same time add the elevation I was after, my solution was to drill a new holes for the coilover mounting bolt higher up inside the existing bracket, and then simply trim off the lower excess:

IMG_6558.JPG
IMG_6558.JPG (973.95 KiB) Viewed 168 times


IMG_6560.JPG
IMG_6560.JPG (1.22 MiB) Viewed 168 times


IMG_6562.JPG
IMG_6562.JPG (1.28 MiB) Viewed 168 times


IMG_6569.JPG
IMG_6569.JPG (1.38 MiB) Viewed 168 times


That's better 8)

Once all the grinding dust and paint fumes had cleared out a bit, I lowered it down and took a look at what I'd done... Here is a before/after comparison:

IMG_6452.JPG
IMG_6452.JPG (1.28 MiB) Viewed 168 times


IMG_6581.JPG
IMG_6581.JPG (1.31 MiB) Viewed 168 times


And another:

IMG_6302.JPG
IMG_6302.JPG (1.73 MiB) Viewed 168 times


IMG_6586.JPG
IMG_6586.JPG (1.57 MiB) Viewed 168 times


It's actually a bit higher than I'd like and I'm hoping it will settle a bit with a few miles, but we are headed in the right direction :thu:
Yep, I've wheeled one of those, too...

Image

User avatar
TJDave
Peak Putters VP
Peak Putters VP
Posts: 2808
Joined: Sat Jan 12, 2008 11:47 am
Location: East Richland

Re: 6G v2.0

Postby TJDave » Thu Apr 11, 2024 3:48 pm

:thu: Nice! I may or may not have seen the lower version go by the jobsite recently.
2018 JLU Rubicon
Tow bar mount
Trailer hitch


Return to “Projects and Build-Ups”

Who is online

Users browsing this forum: No registered users and 81 guests