The Minion XJ aka GGv3.0

Post pics and info of your current projects.
User avatar
tobyw
Posts: 1974
Joined: Wed Mar 14, 2007 10:00 am
Location: Under the hood...

The Minion XJ aka GGv3.0

Postby tobyw » Mon Oct 04, 2021 12:20 pm

For those of you following along, you have already seen several pictures and the progression of the XJ that my boy pilots around the hills. With him nearing the magical age of 16, the little rig is about ready to hit the road full time, and I figured it was a good time to document the current state of affairs before the inevitable becomes reality :?

We picked up this little gem back in June of 2020, off a tip we got from everyone’s buddy Don Healy. Turns out that Don’s father in-law runs a local dealership, and when they took this Cherokee in on trade the FIL immediately called Don to see if he was interested. Don called me because we had recently discussed my love of the platform and desire to find one for the minion(s). Next thing you know, we were driving it home!

It’s a 1999 Cherokee Sport, with the venerable 4.0L, AW-4 automatic and NP-231 transfer case. The front is a high-pinion Dana 30 and the rear is a Dana 35, both sporting open diffs and 3.55 gearing. Ordinarily the D35 would be considered a negative, but it was the only rear axle offered with anti-lock brakes, and that is actually a HUGE positive in terms of insurance for a teenager so we’re going to run it. The Jeep had about 162k miles on it but did not show its age; the older couple had owned it since new and used it as a towed vehicle behind their motorhome. The glovebox and center console were stuffed with receipts and service records, and the paint was smooth as a baby’s you know what. It was actually far too nice of a vehicle considering what lie in its future…
IMG_7415.JPG
IMG_7415.JPG (69.26 KiB) Viewed 11003 times

IMG_7414.JPG
IMG_7414.JPG (60.48 KiB) Viewed 11003 times


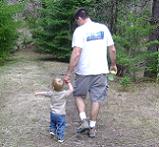
The first order of business was to ditch the plastic hub caps, replace a couple of burnt-out bulbs, and get the flat tow wiring reconfigured to match my fleet of tow pigs. There was also a rear wheel cylinder that was leaking so a quick rear brake job was accomplished along with an oil change and an overall once-over. With everything tidied up, we spent the summer using it for baseball games behind our motorhome, and even took it to the hills a couple times:
IMG_7373.JPG
IMG_7373.JPG (1.16 MiB) Viewed 11003 times

IMG_0048.JPG
IMG_0048.JPG (1.3 MiB) Viewed 11003 times

IMG_8085.JPG
IMG_8085.JPG (1.64 MiB) Viewed 11003 times

IMG_8096.JPG
IMG_8096.JPG (1.11 MiB) Viewed 11003 times


Parts availability in the summer and fall of 2020 was not great, but we managed to source a few bits and pieces to meet our needs. Namely, a 3” suspension kit from Rusty’s and a Smittybilt 9,500lb winch. The lift was very straightforward and installed with nary an issue. We found a set of 33” Wildcat MT’s and put them on, and while they looked cool in the parking lot they ended up being a pretty miserable set of tires, both on the road and off:
IMG_8103.JPG
IMG_8103.JPG (1.32 MiB) Viewed 11003 times

IMG_8284.JPG
IMG_8284.JPG (1.82 MiB) Viewed 11003 times

IMG_0108.JPG
IMG_0108.JPG (1.73 MiB) Viewed 11003 times


We gave him the winch as a Christmas present, and we spent some time around the holidays building a front bumper and a set of rock sliders:
IMG_0460.JPG
IMG_0460.JPG (1.09 MiB) Viewed 11003 times

IMG_0462.JPG
IMG_0462.JPG (1.23 MiB) Viewed 11003 times

IMG_0696.JPG
IMG_0696.JPG (1.45 MiB) Viewed 11003 times


Snow wheeling absolutely highlighted the terrible performance of the old Wildcat tires, and as luck would have it a nice set of 33" BFG A/T’s popped up for sale, and I snagged them. The overall improvement was nothing short of remarkable:
IMG_1442.JPG
IMG_1442.JPG (1.76 MiB) Viewed 11003 times

IMG_2085.JPG
IMG_2085.JPG (1.65 MiB) Viewed 11003 times


The next round of upgrades were all minion-inspired. He wanted a cool set of headlights and an LED light bar. The OEM headlights were, in fact, terrible compared to what is considered acceptable today and our friends at Amazon provided an impressive pair of aftermarket units that have a cool halo option that acts as a daytime running light, further improving some semblance of safety:
IMG_2995.JPG
IMG_2995.JPG (1.17 MiB) Viewed 11003 times


The light bar required a quick arts and crafts session to fab up some mounts, and overall it turned out pretty clean:
IMG_3098.JPG
IMG_3098.JPG (1.62 MiB) Viewed 11003 times

IMG_3103.JPG
IMG_3103.JPG (1.07 MiB) Viewed 11003 times

IMG_3099.JPG
IMG_3099.JPG (1.76 MiB) Viewed 11003 times


So that brings us up to date. For his 16th birthday, he has requested a trip to Moab so we will be making the pilgrimage to the promised land later this fall. Stay tuned for a run report on that 8)
Yep, I've wheeled one of those, too...
Image

User avatar
tobyw
Posts: 1974
Joined: Wed Mar 14, 2007 10:00 am
Location: Under the hood...

Re: The Minion XJ aka GGv3.0

Postby tobyw » Mon Jul 28, 2025 11:56 am

Fast forward nearly 4-years, and the little XJ has dutifully done battle everywhere from the high-school parking lot to Moab, the Rubicon Trail, and countless other adventures in between. It’s seen everything from routine maintenance to tire and wheel upgrades, suspension changes, and even an engine swap. Having served as the minion’s only form of transport since being put into service full-time in November of 2021, accumulating nearly 30k miles during that tenure, it’s been a heckuva run for a 20+ year old rig:

IMG_3845.JPG
IMG_3845.JPG (1.65 MiB) Viewed 658 times


IMG_4346.JPG
IMG_4346.JPG (1.32 MiB) Viewed 658 times


IMG_1784.JPG
IMG_1784.JPG (1.49 MiB) Viewed 658 times


IMG_5914.JPG
IMG_5914.JPG (1 MiB) Viewed 658 times


IMG_4541.JPG
IMG_4541.JPG (1.11 MiB) Viewed 658 times


IMG_7073.JPG
IMG_7073.JPG (1.35 MiB) Viewed 658 times


IMG_7488.JPG
IMG_7488.JPG (1.71 MiB) Viewed 658 times


IMG_1729.JPG
IMG_1729.JPG (2.06 MiB) Viewed 658 times


Sadly, one fateful evening in December of 2024, black ice got the better of the situation at hand and the XJ finally met its match:

IMG_2526.JPEG
IMG_2526.JPEG (1.41 MiB) Viewed 658 times


Fortunately, the boy walked away unscathed but the XJ was in pretty rough shape, and without (at the very least) a windshield it simply wasn’t a roadworthy vehicle any longer:

IMG_9230.JPG
IMG_9230.JPG (1.55 MiB) Viewed 658 times


IMG_9231.JPG
IMG_9231.JPG (1.52 MiB) Viewed 658 times


IMG_9236.JPG
IMG_9236.JPG (1.23 MiB) Viewed 658 times


Taking everything into consideration, with the minion having a full-time job and the simple fact that the XJ, even when in good condition, wasn't really the right tool for the job, the hunt began for alternative transport. The boy picked himself up a an F-150, we taped up the busted windows on the XJ to keep the rain out, and we pushed it off the trailer beside the shop to let things marinate :?
Yep, I've wheeled one of those, too...

Image

User avatar
tobyw
Posts: 1974
Joined: Wed Mar 14, 2007 10:00 am
Location: Under the hood...

Re: The Minion XJ aka GGv3.0

Postby tobyw » Mon Jul 28, 2025 12:36 pm

As the weeks and months rolled by and spring came back around, the boy was itching to get something going with his beloved XJ. We spent a few hours one afternoon getting it running again and doing some cleanup of the engine bay and interior, and then started to put a plan together for it's resurrection 8) The first order of business would be to see if we could get the roof and A-pillars pushed around enough to where it would take a windshield again. So we got the old glass out, applied hydraulic pressure and strategic BFH, rolled it outside to get some overall squint-shots to see if our proportions were anywhere near close, and then hauled it to the glass shoppe. We got lucky, and the new glass fit like a glove:

IMG_0162.JPG
IMG_0162.JPG (1.49 MiB) Viewed 655 times


IMG_0168.JPG
IMG_0168.JPG (1.5 MiB) Viewed 655 times


IMG_0171.JPG
IMG_0171.JPG (1.46 MiB) Viewed 655 times


IMG_0457.JPG
IMG_0457.JPG (2.16 MiB) Viewed 655 times


IMG_0655.JPG
IMG_0655.JPG (1.35 MiB) Viewed 655 times


While it still looked like a wrinkled up beer can, it's leak-free and that meant we could move forward with getting it back on the trails :thu:

Those of you paying attention may recall that the XJ suffered a catastrophic rear axle failure on the Rubicon run last spring (viewtopic.php?f=2&t=7569). When we got home from the Rubicon, I swapped in a spare D35 center section I had laying around and the XJ was back on the road in a matter of minutes, and drove around for the next several months doing what it did. In the meantime, I was busy doing an axle swap on the LJ (viewtopic.php?f=14&t=7171), which left me with a D30/D44 combo laying in the corner of the shop... As the plan for the XJ rebuild started to take shape, chief among the list of upgrades was axle strength and better brakes. As if it had been planned all along, the LJ D30/D44 combo was dusted off and slapped under the XJ using a leaf spring hanger kit from Barnes. At the same time, we swapped the worn out 33" BFG's for the factory 35's that came off the Donkey:

IMG_0175.JPG
IMG_0175.JPG (1.52 MiB) Viewed 655 times


IMG_0456.JPG
IMG_0456.JPG (1.88 MiB) Viewed 655 times


Technically, the LJ's front D30 is a downgrade from what had been in the XJ because of it's low pinion design. However, upon inspection, the XJ's high-pinion D30 was long overdue for replacement:

IMG_0179.JPG
IMG_0179.JPG (1.45 MiB) Viewed 655 times


IMG_0182.JPG
IMG_0182.JPG (1.23 MiB) Viewed 655 times


IMG_0183.JPG
IMG_0183.JPG (1.2 MiB) Viewed 655 times


Additionally, the D30/44 combo was already geared to match with 3.73's, better than the 3.54's that the XJ had been rolling around on. Plus, the D44 was equipped with disc brakes, which would make a marked improvement. Finally, I had already collected the parts necessary to seriously upgrade the brakes on the D30 using WJ Grand Cherokee components. Overall, this axle swap made a ton of sense 8)
Yep, I've wheeled one of those, too...

Image

User avatar
tobyw
Posts: 1974
Joined: Wed Mar 14, 2007 10:00 am
Location: Under the hood...

Re: The Minion XJ aka GGv3.0

Postby tobyw » Mon Jul 28, 2025 12:55 pm

With the axle and brake upgrades figured out, albeit not completed, the next item on the list was a cage. With the XJ no longer serving daily driver duty, its future as a dedicated wheeler has been carved in proverbial stone, and thus some substantial increase in protection is warranted. I've never been a fan of exo-cages in general, but if we are being honest a lot of that comes down to execution. I cannot argue the logic of an exo-cage on a rig like an XJ, with very tight interior space and the need to protect the body in addition to keeping occupants safer. The key, in my opinion, comes down to tubing size and the layout of the A-pillars, as these set the overall height of the "halo" above the roofline and completely make or break the aesthetic of the whole thing. After some mockup, we decided on 1-1/2" x 0.120" tube and to run a bend at the top of the A-pillar rather than a notch:

IMG_0656.JPG
IMG_0656.JPG (1.62 MiB) Viewed 652 times


IMG_0658.JPG
IMG_0658.JPG (1.39 MiB) Viewed 652 times


IMG_0672.JPG
IMG_0672.JPG (1.67 MiB) Viewed 652 times


IMG_0679.JPG
IMG_0679.JPG (1.66 MiB) Viewed 652 times


IMG_0685.JPG
IMG_0685.JPG (1.61 MiB) Viewed 652 times


Still have a loooooooong ways to go on the cage, not to mention finishing up the axle swap and then moving on to the rest of the list, but I have to admit it feels good just knowing the XJ is getting a second chance :thu:
Yep, I've wheeled one of those, too...

Image

User avatar
tobyw
Posts: 1974
Joined: Wed Mar 14, 2007 10:00 am
Location: Under the hood...

Re: The Minion XJ aka GGv3.0

Postby tobyw » Mon Sep 29, 2025 6:57 am

Still plugging away on the cage:

IMG_0725.JPG
IMG_0725.JPG (1.43 MiB) Viewed 211 times


IMG_0737.JPG
IMG_0737.JPG (1.63 MiB) Viewed 211 times


While the cage is getting cleaned up and ready for paint, we took the opportunity to add some rear departure clearance via the cut-n-fold method:

IMG_1054.JPG
IMG_1054.JPG (1.19 MiB) Viewed 211 times


IMG_1061.JPG
IMG_1061.JPG (1.36 MiB) Viewed 211 times


IMG_1064.JPG
IMG_1064.JPG (1.95 MiB) Viewed 211 times


Then it was time to whip up a quickie rear bumper to replace the smashed up stock unit:

IMG_1085.JPG
IMG_1085.JPG (1.68 MiB) Viewed 211 times


IMG_1090.JPG
IMG_1090.JPG (1.24 MiB) Viewed 211 times


IMG_1089.JPG
IMG_1089.JPG (1.45 MiB) Viewed 211 times


Next up was to clean up the last remaining broken window and replace it with an access panel to eliminate the need to open the rear hatch for quick-grab items like recovery gear and the like. Still have some finishing touches to put in place but the bones are there:

IMG_1076.JPG
IMG_1076.JPG (1.35 MiB) Viewed 211 times


IMG_1077.JPG
IMG_1077.JPG (1.34 MiB) Viewed 211 times


The last bit of heavy fab work for this round of modifications centers around the front axle. Since we are upgrading to WJ knuckles and the associated high-steer arrangement, I'll need to come up with a raised trac bar mount for the axle end, but first I wanted to get a truss in place to add some strength. Starting with some 2"x3" box tewb and a few minutes of time, the beginnings are in place:

IMG_1078.JPG
IMG_1078.JPG (1.57 MiB) Viewed 211 times


IMG_1080.JPG
IMG_1080.JPG (1.53 MiB) Viewed 211 times


There is a soft deadline looming to get this pooch out of my shop and onto the trails, so fingers crossed I can keep my laziness in czek and push to the finish line :|
Yep, I've wheeled one of those, too...

Image

User avatar
tobyw
Posts: 1974
Joined: Wed Mar 14, 2007 10:00 am
Location: Under the hood...

Re: The Minion XJ aka GGv3.0

Postby tobyw » Thu Oct 09, 2025 3:09 pm

Cage is painted and ready for final install:

IMG_1141.JPG
IMG_1141.JPG (2.25 MiB) Viewed 69 times


IMG_1143.JPG
IMG_1143.JPG (2.25 MiB) Viewed 69 times


Broke down the front axle and replaced the ball joints with the ones necessary for the WJ knuckles, installed said WJ knuckles, and new unit bearings:

IMG_1133.JPG
IMG_1133.JPG (1.3 MiB) Viewed 69 times


The whole idea behind the WJ knuckle swap is to get better brakes... The WJ uses larger diameter rotors and dual piston calipers, and I opted to get drilled/slotted rotors to try and squeak out just a touch more. However, to make it all come together, you have to drill the 5x4.5 bolt pattern into the 5x5 pattern WJ rotors:

IMG_1135.JPG
IMG_1135.JPG (1.82 MiB) Viewed 69 times


With that little chore taken care of, it was time to sling the front axle back under the XJ and start getting things mocked up to cipher on the steering geometry riddle:

IMG_1137.JPG
IMG_1137.JPG (1.52 MiB) Viewed 69 times


:thu:
Yep, I've wheeled one of those, too...

Image

User avatar
tobyw
Posts: 1974
Joined: Wed Mar 14, 2007 10:00 am
Location: Under the hood...

Re: The Minion XJ aka GGv3.0

Postby tobyw » Mon Oct 13, 2025 7:11 am

Good, bad, or otherwise the soft deadline that was looming is no more... While that does take the pressure off in terms of calendar days, I do still want to get this wadded up beer can out of my shop :roll: I spent a few more hours on it this weekend and managed to get it to roller status, which means it can now live outside again and just be pulled into the shop when its convenient for me to tinker :thu:

First up was to get the cage installed for good:

IMG_1152.JPG
IMG_1152.JPG (1.42 MiB) Viewed 18 times


IMG_1155.JPG
IMG_1155.JPG (1.18 MiB) Viewed 18 times


In order to make the cage removable in the event we need to put a windshield in it again or something along those lines, I cut in some tube connectors on the A-pillars and also added some gussets to tie the A-pillars to the unitbody of the XJ:

IMG_1161.JPG
IMG_1161.JPG (1.24 MiB) Viewed 18 times


IMG_1162.JPG
IMG_1162.JPG (1.14 MiB) Viewed 18 times


The initial steering mockup trying to utilize the XJ's native Y-linkage with the WJ knuckles and 4-1/2" suspension lift was a recipe for disaster. The TRE's were maxed out long before full droop, and the change in toe during suspension cycling was horrific to watch. It honestly didn't even look good at ride height:

IMG_1149.JPG
IMG_1149.JPG (1.59 MiB) Viewed 18 times


So, the options were to drill out the knuckles and pitman arm to utilize heim joints, or buy one of the bevvy of aftermarket "1-ton" steering upgrade kits specific to the WJ knuckle swap. Either option was going to approach $400 quickly, and I just couldn't really stomach the idea of having steering linkage that nearly doubles the value of the entire rig :roll: Once again my profound cheapness won out, and I spent a few minutes at the wrecking yard sourcing a tie-rod and drag link from a 99-04 WJ as a starting point to make my own crossover steering linkage. I was surprised to find out the WJ is nearly 6" wider than TJ/XJ/YJ spec, at least according to the tie-rod length, but after some quick work with the butter knife and hot glue gun I was able to get things lined up nicely. The factory WJ tie-rod and drag link were cut, sleeved, plug welded, and butt-welded back together for a pharmtastic fit:

IMG_1170.JPG
IMG_1170.JPG (1.63 MiB) Viewed 18 times


IMG_1176.JPG
IMG_1176.JPG (1.71 MiB) Viewed 18 times


I may have to address the track bar sometime down the road as the geometry isn't exactly perfect, but for now it's at least able to drive. Given that it's not really ever going to be on the road, some bumpsteer is perfectly acceptable but we'll definitely address it if necessary.

Last up for now was to get the front fenders mounted back up. This involved some trial and error to get the notches around the A-pillar tubes halfway clean, and overall I'm happy with how they turnt out:

IMG_1165.JPG
IMG_1165.JPG (1.34 MiB) Viewed 18 times


IMG_1167.JPG
IMG_1167.JPG (1.49 MiB) Viewed 18 times


:thu:
Yep, I've wheeled one of those, too...

Image


Return to “Projects and Build-Ups”

Who is online

Users browsing this forum: No registered users and 1 guest