Project Cheep

Post pics and info of your current projects.
Wrench
Peak Putters Member
Peak Putters Member
Posts: 1237
Joined: Sat May 30, 2009 7:23 am
Location: in a van down by the river

Project Cheep

Postby Wrench » Fri Nov 13, 2009 9:55 pm

So I figured I would do a little writeup on my wheeler project. I named it the Cheep, because it has been very low-cost, and I plan on melding the Cherokee and Jeep emblems once she gets painted.

Less than 2 years ago, I acquired (free) a bone-stock 1984 Jeep Cherokee 4-door with a 2.5 4-cylinder, AX5 tranny, and NP207 transfer case. At the time, it ran, but knocked very loudly. She was also given to me without a set of wheels.

Project #1: Engine rebuild
When assessing the damage to the engine, I discovered the cam chain tensioner had grenaded itself. The more I dug into it, the more damage I discovered. The rattling cam had eaten the distributor drive gear teeth, sacked out the distributor weight bushings, and even worn the cam drive woodruff key so it was sloppy. I decided that since I needed to pull the oil pan, I would remove the engine and go over it completely.

I had the cylinders bored another 0.010", so is now 0.040" over stock. I had the block decked about 0.070" to bring the squish clearance into the 0.035" range (who on earth uses a head gasket that freakishly thick????). I smoothed the rough edges of the combustion chamber and did some mild porting to the head. I installed a reground cam I sourced from a shop in Seattle. I sourced a long-runner stock intake from a MPI Jeep 2.5 engine, blocked off the injector holes, built a carb adapter plate, and installed a Weber 32/36 carb. I replaced the damaged parts in the distributor, and also added a Summit Digital Ignition to the mix.

To sum up: the engine is using all stock components except the cam, Weber carb, and ignition unit. UPDATE: NOW RUNNING STOCK CAM

Project #2: Wheels and suspension
I found a set of aluminum wheels and 31x10.50 mud terrain tires on CL, which fit very nicely.

The front suspension started out with lift springs from CL that supposedly lifted it 4". In reality, it lifted the front about 5.5", and rode like a jackhammer. I resold the springs on CL and built a set of 4" spring spacers and replaced the stock springs with a set from a 4.0l ZJ Cherokee (little stiffer). I also modified the suspension arms, track bar mount, dropped the pitman arm, and modified the drive shaft to account for the added flex.

The rear suspension got a dose of extra leaves from an extra Chevy spring pack, a couple inches more from square tube blocks, and even a little more from extended shackles. To keep the rear drive shaft from falling out of the 'case, I modifed the output yoke by bolting it to the output shaft and installed an extending driveshaft I had lying around.

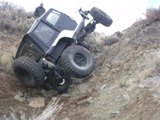
Overall suspension lift is around 6", with Rough Country 6" lift nitro shocks / stainless steel brake lines and she rides pretty plush. :D

Project #3: axle upgrades
So I raced the Cherokee last Spring in the Benton City Mud Bog, and ended up loosing a few teeth on the rear ring gear. Little did I know, the ring gear was missing teeth even before the races. :shock: I decided to go with 4:88's and install a Trac-Lok while I was in the rear. The little 4-bangar is MUCH happier on the freeway now than it was with the 3:73's.

While working of the front, I also built my own cable-operated manual disconnect for the front axle and eliminated the stock vacuum disconnect.

TO DO list:
- improve power (head port profile, fab better header)
- add some truss work to the axles
- fix bump-steer problem
-build long-arm front suspension
- get off my butt and actually take some pics of the progress :roll:

Done:
-cam timing optimized
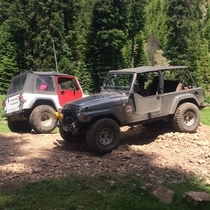
-exterior paint
-Bumpers/winch mount/hi-lift mount fabbed
-filled hole in dash with stereo system
-added a winch to the front

Just prior to paint:
Image
Image

After paint, and a little mud mixed in:
Image
Image
Image
Image

Hi-Lift quick-mount:
Image

Suspension:
Image
Image
Image
Image
Image

Engine:
Image

And now she has a name:
Image
Last edited by Wrench on Mon Mar 08, 2010 10:42 am, edited 12 times in total.
Paul
'84 XJ, '19JL

Toolegit86
Posts: 421
Joined: Wed Sep 17, 2008 8:56 am

Postby Toolegit86 » Sun Nov 15, 2009 11:08 pm

i think i have a spare axle shaft so you can get rid of that disconnect if not ill have a spare set of axles you can have soon i am going to 44/9inc
Camaro turbo lsx th400
06 Cummins "racetruck"
tj 1ton 40's 5.3 build

509 Crawlers on the facebook

Wrench
Peak Putters Member
Peak Putters Member
Posts: 1237
Joined: Sat May 30, 2009 7:23 am
Location: in a van down by the river

Postby Wrench » Mon Nov 16, 2009 7:12 am

My axles are in great shape (I just installed all new gears, bearings, and seals) and I like the benefits of the disconnect.

I'm sticking with 31's, so I'll just worry about upgrades if anything breaks. I just want to add a little bracing so the axles don't bend when I catch a little air.

Thanks anyway!
Paul
'84 XJ, '19JL

Wrench
Peak Putters Member
Peak Putters Member
Posts: 1237
Joined: Sat May 30, 2009 7:23 am
Location: in a van down by the river

Postby Wrench » Mon Dec 14, 2009 7:36 am

Update:
-cam timing completed with great success
-rear axle mildly trussed
-pics taken of fugly paint
-anti-fugly work in progress today...
Paul
'84 XJ, '19JL

Wrench
Peak Putters Member
Peak Putters Member
Posts: 1237
Joined: Sat May 30, 2009 7:23 am
Location: in a van down by the river

Postby Wrench » Mon Dec 21, 2009 10:39 pm

Update:
- paint job was a success! Good enough for a 4x4, at least.
- ditched the idea to build a spare tire carrier and picked up the factory spare tire mount setup from the junk yard
- replaced all the rotting window seals with ones from the junk yard. Lotta Cherokee's out there right now...

I also decided the front springs were a little too soft. Picked up a set from a '95 Grand Cherokee with the inline-6. They were a little larger coil wire diameter, but the same overall length. They lifted the front another 1" and are a tad higher spring rate. They work great!

I'll try to get some pics soon.
Paul
'84 XJ, '19JL

Wrench
Peak Putters Member
Peak Putters Member
Posts: 1237
Joined: Sat May 30, 2009 7:23 am
Location: in a van down by the river

Postby Wrench » Wed Dec 23, 2009 10:12 pm

Pics updated in original post.

So, now it's painted charcoal grey metallic, with quite a bit of green pearl and other various colors mixed in (mutt color, left over paint).

I also tore into the rear springs tonight and added another leaf. She really needed a little more lift in the rear and a stiffer spring rate. Took her out and tested, works very well now and matches the improved front suspension very well.
Last edited by Wrench on Sat Jan 09, 2010 2:58 pm, edited 1 time in total.
Paul
'84 XJ, '19JL

Wrench
Peak Putters Member
Peak Putters Member
Posts: 1237
Joined: Sat May 30, 2009 7:23 am
Location: in a van down by the river

Postby Wrench » Wed Dec 23, 2009 10:14 pm

...if you look real close on the rear, you can see she has now been christened, "Cheep"...

:P
Paul
'84 XJ, '19JL

User avatar
iaccocca
Peak Putters Member
Peak Putters Member
Posts: 3700
Joined: Thu Jul 05, 2007 8:38 am
Location: Kennewick, WA

Postby iaccocca » Wed Dec 23, 2009 10:18 pm

I love the mutt color paint job, especially with the mud trim.
Okay, we're a little crazy to have a Duramax for a daily driver. But if we go off our meds, we might wind up in a Prius.
If you want to hear God laugh, tell Him your plans.
N7EEL WROD249
8-) Image 8-)

sams88
Posts: 264
Joined: Sun Nov 11, 2007 2:51 pm
Location: Richland, WA

Postby sams88 » Thu Dec 24, 2009 7:43 am

Hi Paul,

I sent you a PM. Interesting project! :-) Looking good, and it's obviously given you a lot of hours of enjoyment working on it. :-)
90 MJ, 5.5" RE Long arm
88 yota p/u

User avatar
tobyw
Posts: 1887
Joined: Wed Mar 14, 2007 10:00 am
Location: Under the hood...

Postby tobyw » Thu Dec 24, 2009 7:46 am

Ummm, wow... Do you have any droop travel up front? Might want to address those control arm angles and then comment on the improvement?
Yep, I've wheeled one of those, too...
Image

User avatar
erslll
Posts: 62
Joined: Fri Mar 16, 2007 6:32 pm
Location: Hermiston OR

Postby erslll » Thu Dec 24, 2009 11:36 am

Jeep looks pretty good but......

Tobicon wrote:Ummm, wow... Do you have any droop travel up front? Might want to address those control arm angles and then comment on the improvement?


I have to agree. Your front suspension scares me a bit. 5.5" spacers doesn't really seem like a good idea. Do you have any pictures of them? Do you have some way of retaining your coils at the top?

Wrench
Peak Putters Member
Peak Putters Member
Posts: 1237
Joined: Sat May 30, 2009 7:23 am
Location: in a van down by the river

Postby Wrench » Thu Dec 24, 2009 4:36 pm

Tobicon wrote:Ummm, wow... Do you have any droop travel up front? Might want to address those control arm angles and then comment on the improvement?


Go for a ride in it some time and see for yourself. :D

The control arm angles are deceiving, kind of like a gull-arm swingarm on a motorcycle. The actual angle between the bolt holes is a bit less. I angled them at the front so they dont bind on the shock mount brackets when they are at full droop. They are also about 1.5" longer than stock.

And yes, there is droop. I have the ride height at 3" of shock compression. Total travel on the shocks is about 10.5", so the ride height is a tad over 1/4 into the total travel distance.
Last edited by Wrench on Thu Dec 24, 2009 5:51 pm, edited 2 times in total.
Paul
'84 XJ, '19JL

Wrench
Peak Putters Member
Peak Putters Member
Posts: 1237
Joined: Sat May 30, 2009 7:23 am
Location: in a van down by the river

Postby Wrench » Thu Dec 24, 2009 4:42 pm

erslll wrote:Jeep looks pretty good but......

Tobicon wrote:Ummm, wow... Do you have any droop travel up front? Might want to address those control arm angles and then comment on the improvement?


I have to agree. Your front suspension scares me a bit. 5.5" spacers doesn't really seem like a good idea. Do you have any pictures of them? Do you have some way of retaining your coils at the top?


Even with these spacers, they never bottom out the coil to the point of coil bind. Not sure why it scares you, can you explain more? I have over 10" of travel and there is no binding of any suspension or drive lines. The only issue I still have is a little bump-steer, which I have plans to work out.

Yes, they do have a centering device. The whole spacer is fabbed to incorporate a spring centering device (that the stock rubber spring seat sits on) and a bottoming cone that is extended from the stock location (so I can take them off real easy and put them on another rig if this one gets totaled) . I made the whole spacer as one piece that screws onto the stock bump-stop bolt hole and seats onto the stock spring seat location. 8)
Last edited by Wrench on Thu Dec 24, 2009 6:45 pm, edited 2 times in total.
Paul
'84 XJ, '19JL

Wrench
Peak Putters Member
Peak Putters Member
Posts: 1237
Joined: Sat May 30, 2009 7:23 am
Location: in a van down by the river

Postby Wrench » Thu Dec 24, 2009 4:54 pm

Update:
-ditched the OBA idea. Went to Harbor Freight and purchased a 12v air pump. Now I just gotta figure out why the cig lighter outlet doesn't work... :x

- purchased a Hi-Lift jack. Now need to fab a mount for it.
Paul
'84 XJ, '19JL

User avatar
bobracing
Posts: 750
Joined: Fri Jun 15, 2007 10:20 am

Postby bobracing » Thu Dec 24, 2009 8:47 pm

Wrench wrote:Update:
-ditched the OBA idea. Went to Harbor Freight and purchased a 12v air pump. Now I just gotta figure out why the cig lighter outlet doesn't work... :x

These aren't the best, 45min a tire is, well tiring.
The hi-volume work well, for a while until the piston break when you need it the most, ask me how I know.

Might talk to Ron at 4wheelingplus.com.
http://www.aworc.com/phpBB/viewtopic.php?f=53&t=9028

User avatar
Lurch
Peak Putters Member
Peak Putters Member
Posts: 2363
Joined: Thu Nov 08, 2007 7:10 am
Location: Pasco

Postby Lurch » Thu Dec 24, 2009 11:43 pm

I run co2, it's portable and insant pressure. You won't find a faster way to air up tires. It's also great for setting beads if you loose one.
You can follow me.... but it's gonna hurt ;)

User avatar
erslll
Posts: 62
Joined: Fri Mar 16, 2007 6:32 pm
Location: Hermiston OR

Postby erslll » Fri Dec 25, 2009 1:52 pm

My main concern was if you would loose your coil when you drooped. Not sure I completely understand what you did but it sounds like you have it figured out. I would like to see a pic of the spacer and maybe a flex shot.

Wrench
Peak Putters Member
Peak Putters Member
Posts: 1237
Joined: Sat May 30, 2009 7:23 am
Location: in a van down by the river

Postby Wrench » Fri Dec 25, 2009 1:58 pm

Got her out today, had a little fun.

Here are some pics of flex:
Image
Image
Looks like the front is a tad softer in spring rate than the rear, but it makes for some very predictable stability off road.
Last edited by Wrench on Sat Jan 09, 2010 3:08 pm, edited 1 time in total.
Paul
'84 XJ, '19JL

User avatar
tobyw
Posts: 1887
Joined: Wed Mar 14, 2007 10:00 am
Location: Under the hood...

Postby tobyw » Sat Dec 26, 2009 7:45 am

Wrench wrote:
Tobicon wrote:Ummm, wow... Do you have any droop travel up front? Might want to address those control arm angles and then comment on the improvement?


Go for a ride in it some time and see for yourself. :D


I've had a built XJ, and so has ersll... No doubt they ride great and put up with quite a bit. That said, trust me when I tell you that addressing those control arm angles will dramatically improve your ride quality. However good it seems now, it will make your jaw drop once you get the frontend setup properly. Keep up the good work though, it's always great to see someone actually doing work themselves 8) I remember back before I had kids, and I had time to tinker :roll:
Yep, I've wheeled one of those, too...

Image

User avatar
Roman
Peak Putters President
Posts: 2761
Joined: Wed Mar 14, 2007 5:30 pm
Location: Kennewick, WA

Postby Roman » Sat Dec 26, 2009 10:16 am

Hey Toby, I think you and Ed might have missed these are homemade or HEAVILY mod'ed stockers, almost a J-Arm. So the viewed angle isn't the "operating" angle

User avatar
erslll
Posts: 62
Joined: Fri Mar 16, 2007 6:32 pm
Location: Hermiston OR

Postby erslll » Sat Dec 26, 2009 2:45 pm

Roman wrote:Hey Toby, I think you and Ed might have missed these are homemade or HEAVILY mod'ed stockers, almost a J-Arm. So the viewed angle isn't the "operating" angle


I actually did notice that but that really doesn't change the operating angle. No matter how you look at it, that much lift with short arms makes for steep control arm angles.

Wrench
Peak Putters Member
Peak Putters Member
Posts: 1237
Joined: Sat May 30, 2009 7:23 am
Location: in a van down by the river

Postby Wrench » Sat Dec 26, 2009 5:56 pm

Tobicon wrote:I've had a built XJ, and so has ersll... No doubt they ride great and put up with quite a bit. That said, trust me when I tell you that addressing those control arm angles will dramatically improve your ride quality. However good it seems now, it will make your jaw drop once you get the frontend setup properly. Keep up the good work though, it's always great to see someone actually doing work themselves 8) I remember back before I had kids, and I had time to tinker :roll:


I guess I really need to take a ride in a "properly" setup XJ to compare back to back. Are you referring to offroad ride quality, or street?

There are many issues with this tall of a lift that I have addressed that also cause horrible handling, but have little to do with the control arm angles. My upper control arms are modified so I can adjust caster, the lower arms are longer than stock (improving the angle), and my track bar mount point is dropped 4" with an additional cross- brace from the other side of the frame so it is more solid. Dropping the track bar mount point made quite an improvement in itself, both in ride quality and total flex. I personally think the track bar angle is considerably more critical to total suspension performance than the control arm angles.

One thing about retaining the shorter arms is that my front driveline does not extend or retract very far at all during full flex rotation. Under heavy abuse, I have absolutely NO fears of the driveline popping out.

The "4inch" dropped pitman arm from Ebay wasnt as long of a drop as I expected, so my steering arm and track bar are still not parallel, causing a little bump steer. I plan on making my own steering setup using a solid steering arm from wheel to wheel mounted on top the knuckles, and a separate arm from the pitman arm to the right knuckle. I just need to figure out what ball-ends I will use.

For the control arms, I actually plan on building a long-arm set that eliminates the top control arms, just dont have the time right now. The current setup has worked better than any rig I have gone wheeling with so far, so I am not too concerned. My main goal was to have suspension that allows me to nail the nasty stuff faster than the next guy (speed retention) to make up for my power deficiency, and so far I have had a lot of success.

...and dont use kids as an excuse. I have 3 myself, and the oldest girl is almost 13. :shock:

:D
Paul
'84 XJ, '19JL

Wrench
Peak Putters Member
Peak Putters Member
Posts: 1237
Joined: Sat May 30, 2009 7:23 am
Location: in a van down by the river

Postby Wrench » Wed Dec 30, 2009 6:28 pm

Update:
-fabbed mount for Hi-lift on rear bumper
-welded hitch receiver onto rear bumper/added bracing
-installed mud flap on rear bumber
-completed most of stereo wiring, waiting for speakers to arrive.
Paul
'84 XJ, '19JL

User avatar
tobyw
Posts: 1887
Joined: Wed Mar 14, 2007 10:00 am
Location: Under the hood...

Postby tobyw » Wed Dec 30, 2009 8:17 pm

Wrench wrote:...and dont use kids as an excuse. I have 3 myself, and the oldest girl is almost 13. :shock:


So that confirms it, I am getting lazy... :oops:
Yep, I've wheeled one of those, too...

Image

sams88
Posts: 264
Joined: Sun Nov 11, 2007 2:51 pm
Location: Richland, WA

Postby sams88 » Thu Dec 31, 2009 4:13 pm

It's an aging thing Toby. :D It's not your fault! LOL
90 MJ, 5.5" RE Long arm

88 yota p/u


Return to “Projects and Build-Ups”

Who is online

Users browsing this forum: No registered users and 87 guests