Page 1 of 5

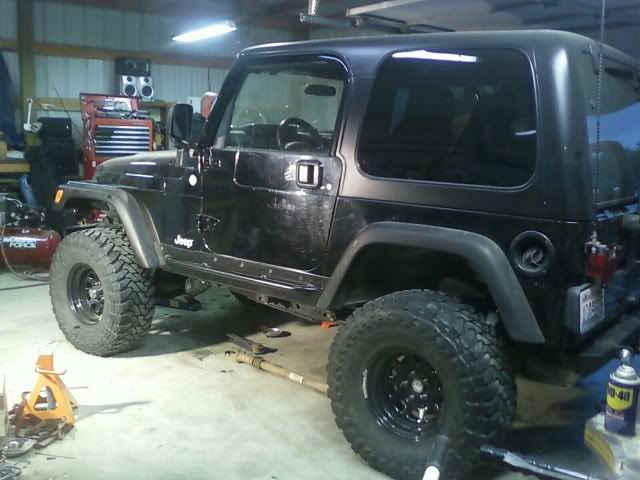
Black mall crawler 90% bolt on build.

Posted: Sat Mar 19, 2011 7:41 pm
by TJDave
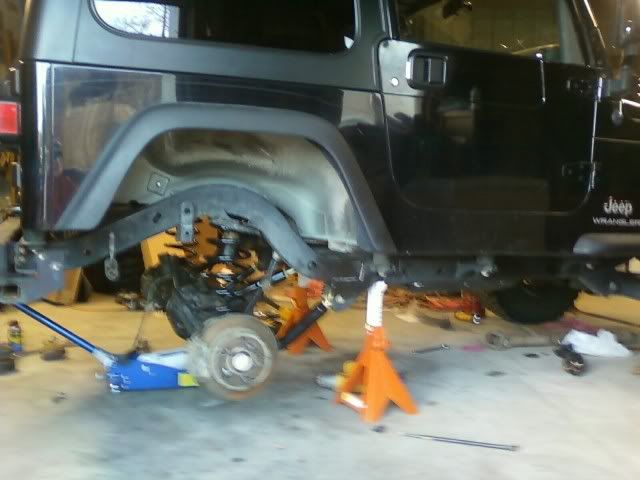
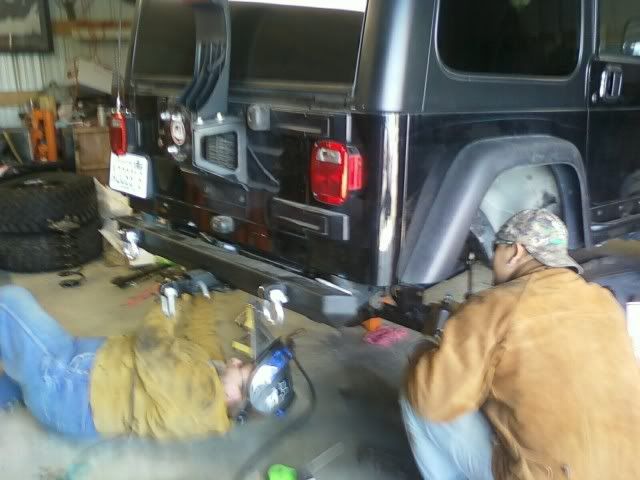
Finally. I pulled the black jeep into my buddies shop today to install all the stuff I have been piling up over the last 8 months as money has allowed. I think I have enough to get it going for now.

Here's the list:

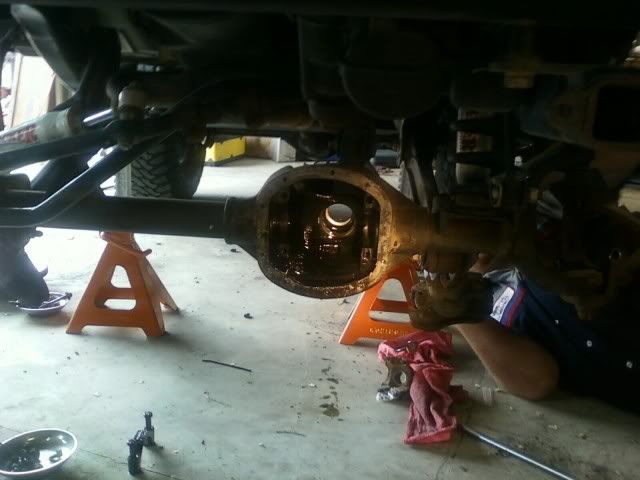
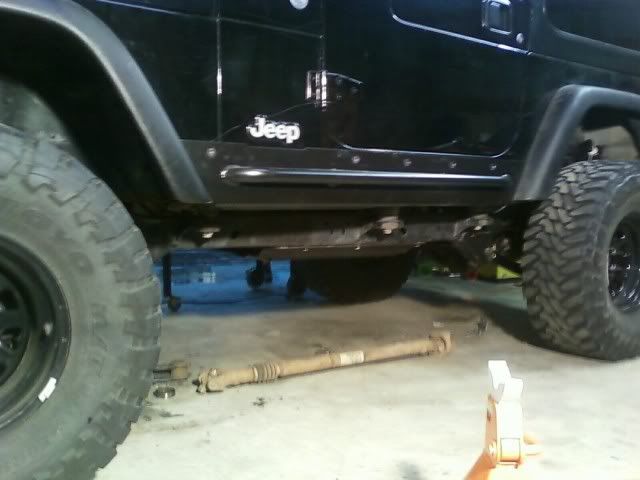
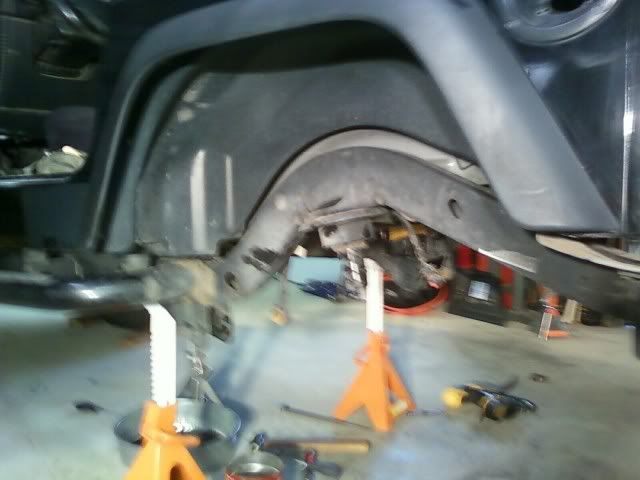
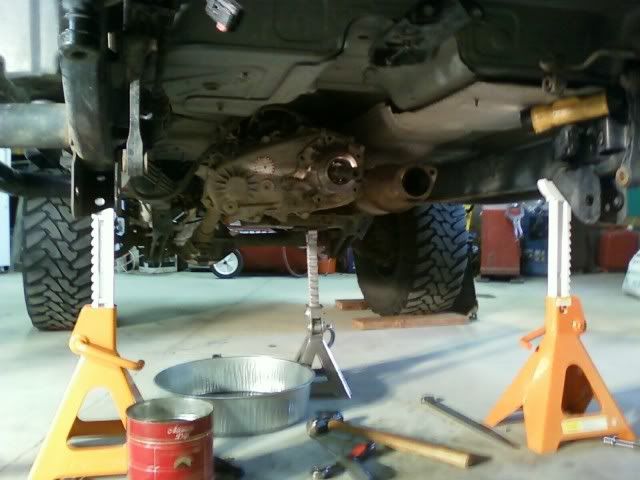
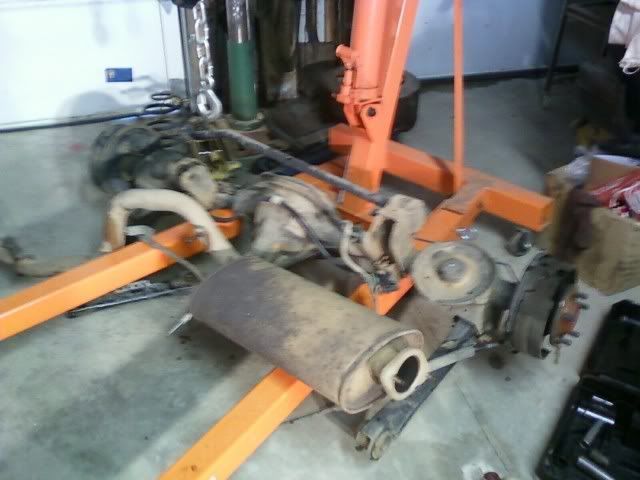
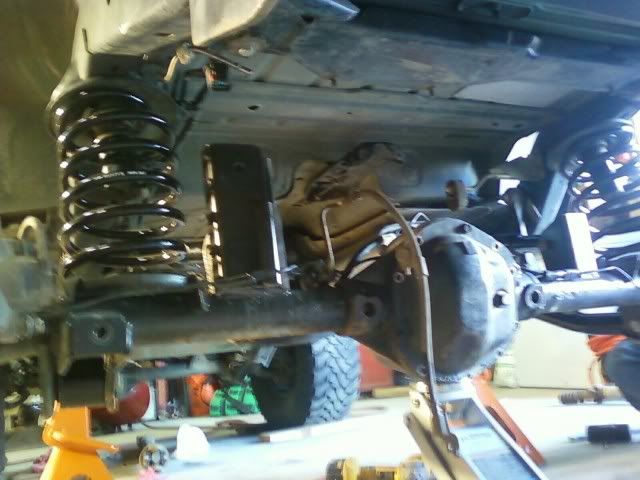
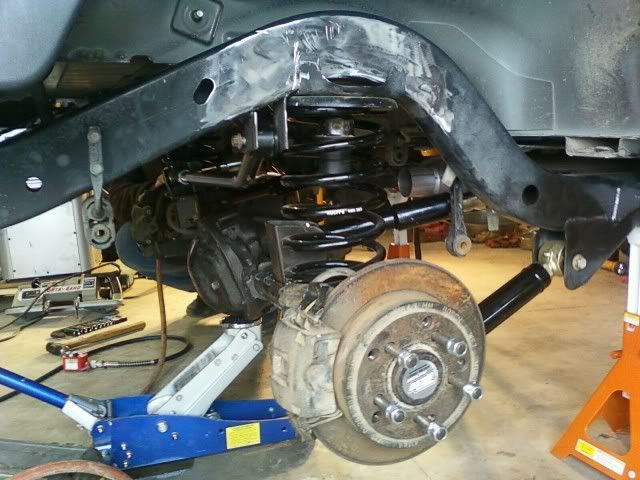
Rubicon Dana 44 rear axle, 35 spline Ten Factory chromoly axles with matching ARB locker. 4.88 gears, Poly Performance HD brackets.

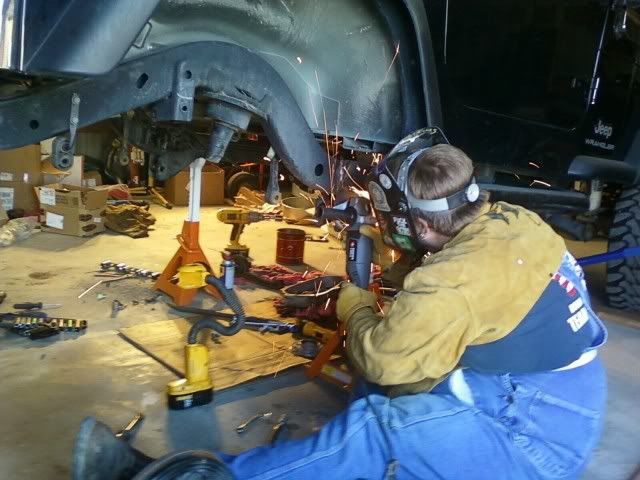
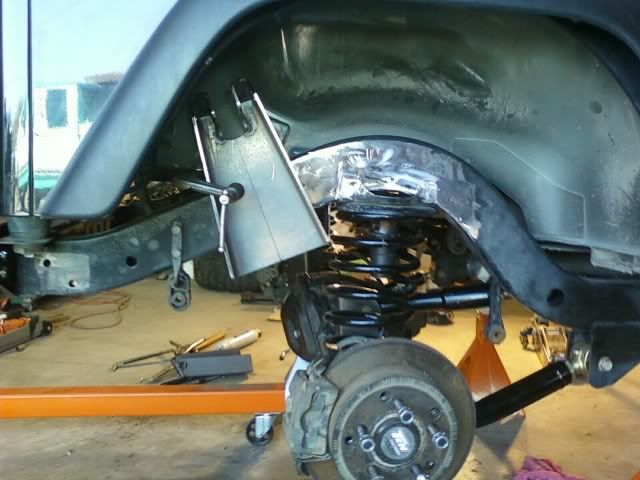
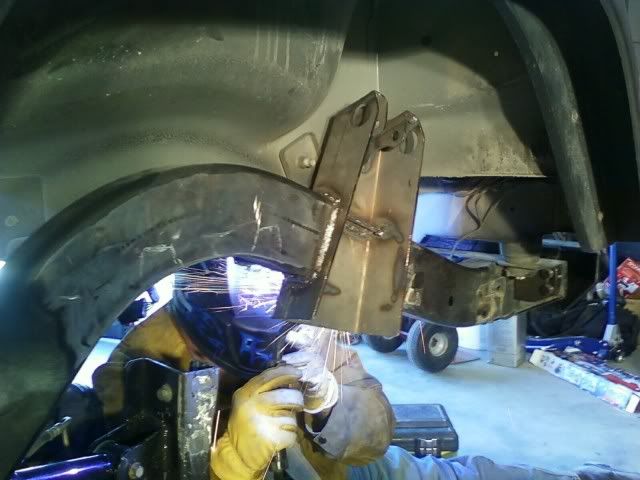
Poly Performance rear shock outboarding kit/mounts. (gotta cut my frame, yikes! )

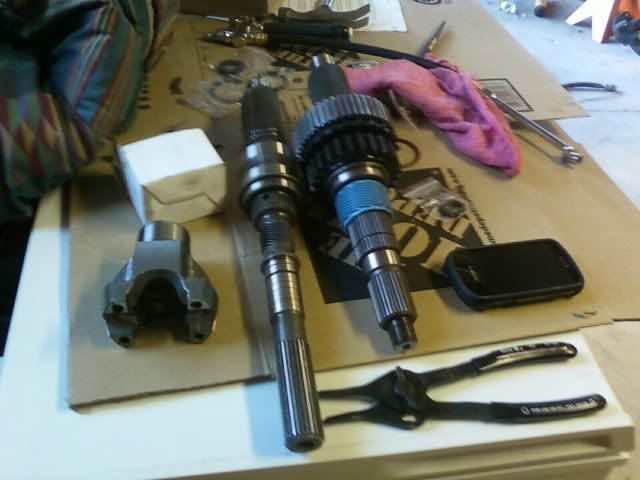
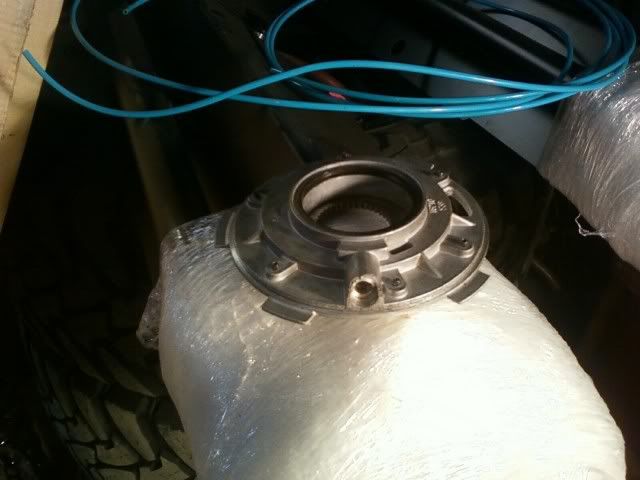
PORC slip yoke eliminator with Tom Wood's CV shaft.

Undercover Fabworks steel high clearance TC skid.

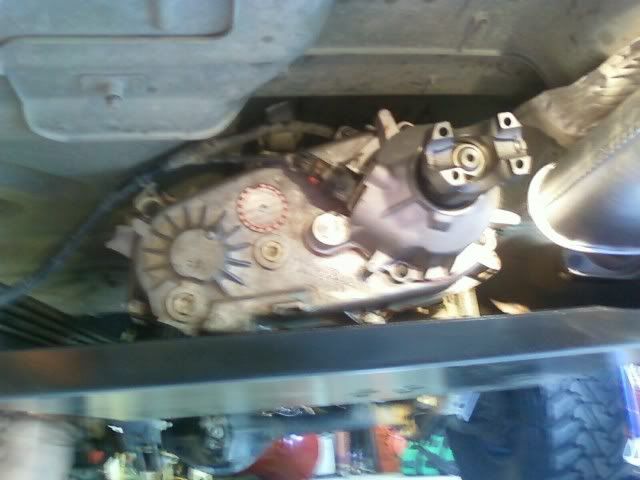
Advanced Adapters transfer case linkage relocation bracket.

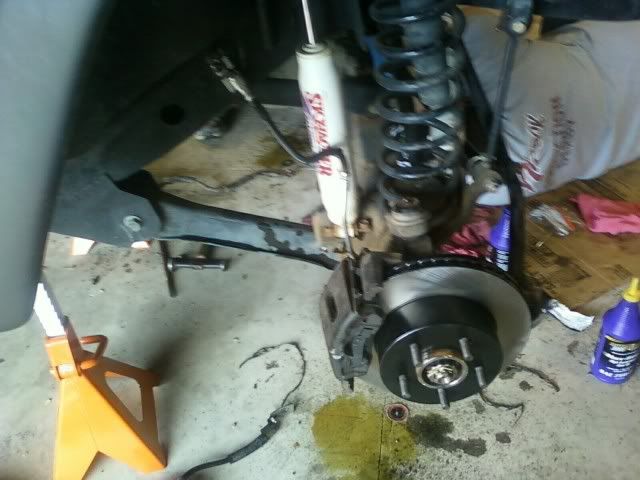
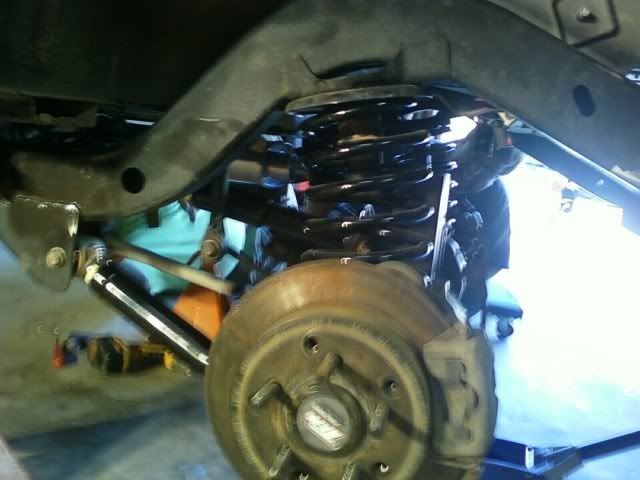
Rusty's adjustable control arms w/flex joints. (I know, they were cheap, and will get me going until I decide on a 4 link or full set of Currie CA's $$).

Motive Gear 4.88 ring and pinion and rebuild kit for stock LP D30.

Front Savvy Black Magic brake pads and Centric premium rotors.

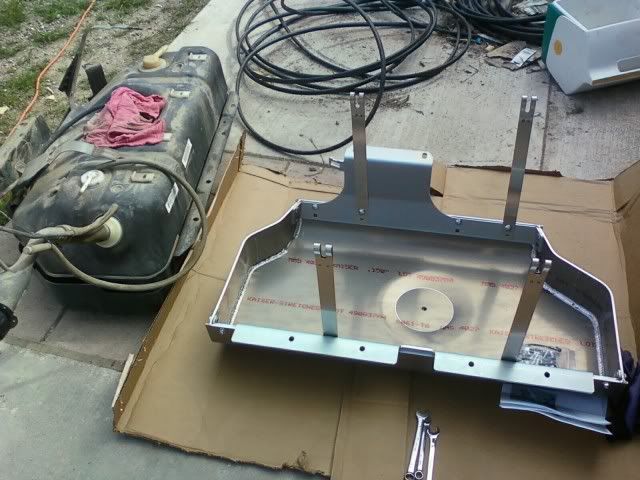
Savvy aluminum gas tank skid.

Moog V8 Grand Cherokee steering.

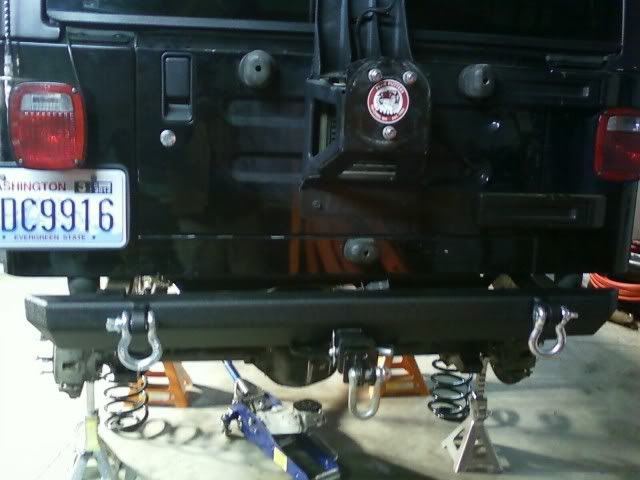
Rusty's 3" rear springs to match the front. I will cut down the 2.25" rear budget spacers to re-level out the front. Probably .75".

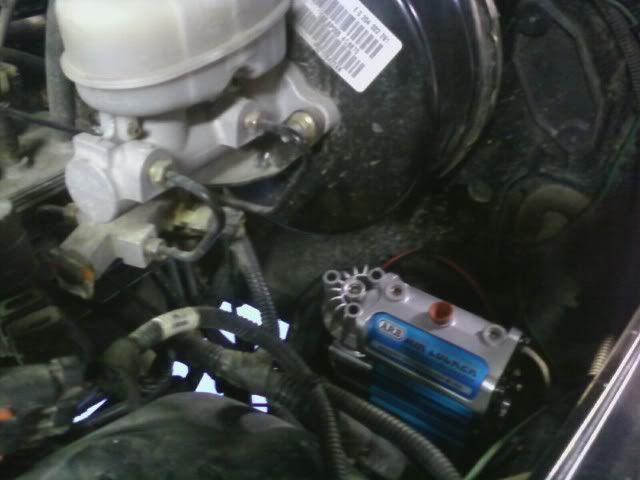
Nifty in cab winch switch that a friend of mine makes and sells on the MCE website. Will relocate my bashed and damaged solonoid box under the hood.

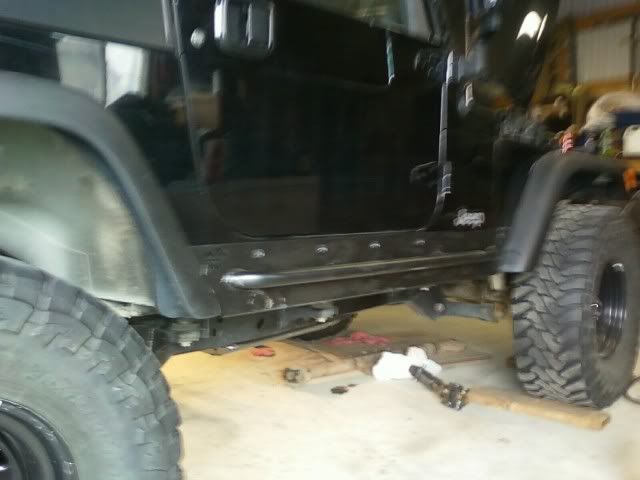
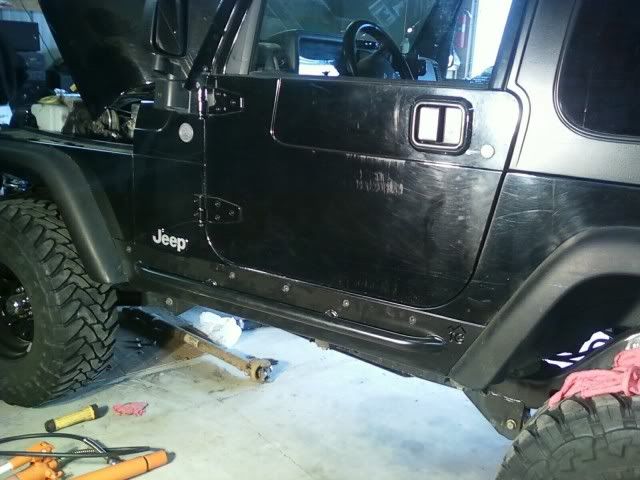
Trail Gear rock sliders with step to replace the lame frame mounted nerf bars.

Dynomax turbo cat-back exhaust system.

That's what is going in now. What I have left:
I am in need of a Or-Fab or Rock Hard cage upgrade. Have not decided which one yet.
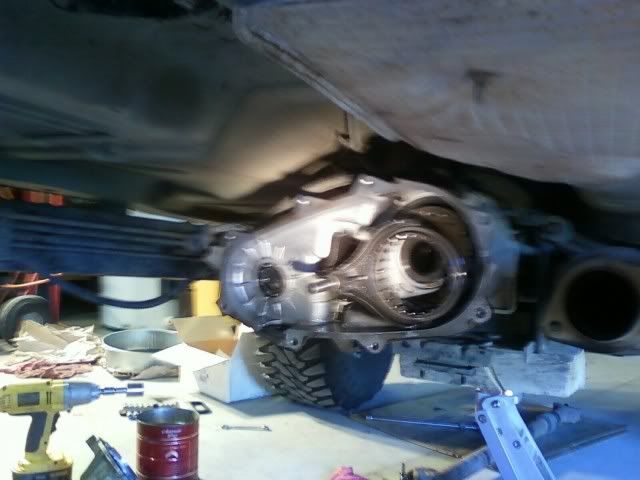
I have a HP D30 from a Cherowagon still sitting in my garage that I scored for free. It needs to be rebuilt with upgraded shafts and a ARB locker when I can afford to buy them.

So much more stuff to do than that. I don't think I'll ever be done.

I will take pics as progress is made, and probably will have lots of questions for you guys too. I am happy to finally get this project going. :D

Posted: Sat Mar 19, 2011 8:18 pm
by Toolegit86
sent u a pm.. did not see u wanted to build the hp30, thats cool i ll still buy the stock axles..

Posted: Sun Mar 20, 2011 7:13 pm
by TJDave
Day one: Tear down almost complete :D

Everything is out: TC skid, gas tank & skid, exhaust system, and D35 C-ya clip. Started on the SYE, but Leonard mangled his little snap ring plyers trying to get the dang thing off. Got to have large, heavy duty snap ring plyers. Ed the toolman to the rescue. 8) Still have to cut off the nerd bars. Today's crappy cell phone pics....

Image
Image
Image
Image

Posted: Sun Mar 20, 2011 8:26 pm
by Toolegit86
i can swing buy and get that rear anytime this week, or weekend. next week i am doing 12s

Posted: Mon Mar 21, 2011 3:37 am
by TJDave
OK. Wed. we will be working on it again. I might need a couple brake line items off of it for the D44. It is in BC if that makes it any easier.

build

Posted: Mon Mar 21, 2011 10:05 am
by Dale
what 4:88's did u go with

Posted: Mon Mar 21, 2011 4:37 pm
by Toolegit86
TJDave wrote:OK. Wed. we will be working on it again. I might need a couple brake line items off of it for the D44. It is in BC if that makes it any easier.


thats fine take all u want. all ineed is the shafts.

Re: build

Posted: Mon Mar 21, 2011 5:08 pm
by TJDave
Dale wrote:what 4:88's did u go with


I bought the D44 already built and ready to go. Not sure who's gears are in it.

I have Motive Gear 4.88's to throw in my stock Dana 30 to get me going until I can afford to work on the HP30.

Posted: Mon Mar 21, 2011 7:38 pm
by Roman
I hope you pulled the T-case out to do the SYE kit . . .

I know it "CAN" be done in the rig, but it's not worth it!

Posted: Mon Mar 21, 2011 8:00 pm
by TJDave
Roman wrote:I hope you pulled the T-case out to do the SYE kit . . .

I know it "CAN" be done in the rig, but it's not worth it!


Haven't pulled it yet, but I think we will after the snap ring snafu. :D
It will make it easier to get that AA linkage bracket on there too.

Posted: Sat Apr 02, 2011 6:01 pm
by TJDave
Made some progress today. No time to work on it since it was torn apart.
More crummy cell phone pics. I forgot my camera again. :evil:
First order of business was to cut off the nerd bars.
Image
We decided to do the SYE with the transfer case still in the Jeep. It was easy since everything was torn out of the way: No TC skid, axle, or gas tank.
Image
Gears on the new shaft
Image
All together with UCF belly up skid in place, AA TC shifter relocation bracket, and new Dynomax turbo muffler.
Image
Next was getting the Rubi 44 set in place with new control arms and springs.
Image
Image
Kind of a pain in the butt setting the pinion angle and measuring and adjusting control arms. Put in, set to ride height, check pinion angle, rinse and repeat about 4 times until we got it right. That is where we called it a day. This is how it sits now.
Image
Going to have to get a adjustable rear track bar because the bracket is tilted back so far, plus the stock one is an inch too short. Next will be cutting the frame and welding in the outboard shock mounts. Might cut the top spring perches and move them back too.
It was a fun day. 8)

Posted: Sun Apr 03, 2011 10:49 am
by TJDave
Ok, I have a Question:
In the second to last pic I posted, you can see how tall the HD Poly track bar mount is. This is to keep the track bar as close to level as possible, I guess. My pinion angle is pointed straight at the TC output shaft at ride height at the moment. I did not think this would tilt this bracket back as far as it did. I hear that the pinion angle could be set a bit lower. This may get the bracket a little closer to being even (same angle) with the frame mount. Would an adjustable rear track bar be the fix, since the ends can be set with at different angles from each other? I really don't want to cut off all the axle mounts and have them welded back on at a different angle.

Thanx for any input.

Dave

Posted: Sun Apr 03, 2011 11:05 am
by White trash
Set the pinion angle 1* down from straight at the yoke at ride height. Having the frame and axle mounts inline with the axle will keep it from feeling goofy as the suspension cycles as you are driving along the road.

Posted: Sun Apr 03, 2011 11:20 am
by TJDave
White trash wrote:Set the pinion angle 1* down from straight at the yoke at ride height. Having the frame and axle mounts inline with the axle will keep it from feeling goofy as the suspension cycles as you are driving along the road.


8) Cool. I will drop the pinion angle back down a bit, and order an adjustable rear trackbar.

Probably will not get another chance to work on it again until next weekend anyway. Thanx.

Posted: Fri Apr 08, 2011 7:05 am
by TJDave
Nothing ever goes as planned. The Jeep has been in pieces for almost 3 weeks now. I guess for some on here, that is nothing. :lol: ....... :shock: ..................Anyway,

For those of you doing a SYE on your NP231 in the future,.... Be very careful when removing the oil pump housing. The little collar that holds the oil pick-up tube in place is very fragile. A little piece of the collar broke off while removing it. We did not think it would be that big of deal, since it is a suction fitting. So, we put it back together. After some searching, and questions to those that know a heck of a lot more about these things than I do, it is highly recommended that I get the new oil pump. So, I found one and ordered it. Now I wait for more parts to show up. :evil: At least no case splitting is involved to replace it. Here's the broken part:
Image

Posted: Sat Apr 09, 2011 6:25 pm
by TJDave
Fun for today. Not much really. Cut off upper spring perches. They will be moved back to fix the arched springs after rotating axle for SYE.

Image
The rear track bar mount is going to be in the way of the Poly Performance outboarded shock towers. So, off it comes. Leonard is going to make a new one.

Image

Put the gas tank skid/tuck together and mounted the tank inside it.

Image

Posted: Sun Apr 10, 2011 11:41 am
by TJDave
Well another problem. And another hopefull solution. I ordered the adjustable rear trackbar and..............it doesn't fit. :banghead:

I just had to order what I heard was "the best". Currie's rear trackbar with Johnny Joints. Well in my haste, I did not realize that the JJ end is wider than a stardard trackbar end and requires their special bracket. Their bracket only works with a stock trackbar mount, which mine is not.

I stole these pics off of JF from someone with the same problem with their 8.8 axle brackets and the Currie trackbar. We are going to have to cut the bracket at the red lines, spread it, and re-weld some material to fill in the gap. I guess this is cheaper than buying another trackbar. My buddies at work are helping me with this project. With all the OT at work right now, one day a week (usually Saturdays) are all we can get off together to work on it. No snow camping for me next weekend. :( I'll update how it goes next week. Cheers.
Image
Image

Posted: Thu Apr 14, 2011 7:37 pm
by rennat_2006
Ive been told to set the rear pinion like 3* lower than straight at the tcase output because of normal axle wrap. Just something to think about and maybe it will help you a little more with your angles.

Posted: Fri Apr 15, 2011 6:49 pm
by TJDave
Todays work on the Jeep: Fixing the problem areas we encountered. New TC pump finally showed up. T-case is buttoned up and ready to go. Pinion angle was still a bit steep, so we dropped it down a little. Had to spread the rear axle track bar mount to fit the Currie JJ end of the adj. track bar. Made a couple of cuts and spread it with a porta-power thing-a-ma-jig.
Image
Image
Then, cut a piece of steel pipe the same size as the JJ and bolted it through to straighten the bracket back out. It is ready to have the gap filled and then capped with a extra piece of steel. But, the welder we were borrowing didn't show up yet, so we move on to another area....
Final measuring and fitment of the relocated upper spring mounts.
Image
Nice and straight at ride height and ready to be tacked in. But, no welder yet. So, we move on to another area......
Installed the rock sliders that are replacing the Derf Bars.
Image
Image
We were also ready to cut into the frame, and start on the outboarded shock towers. But we decided just to throw on the rear bumper and call it a day.
Image

No turning back......

Posted: Sat Apr 23, 2011 6:12 pm
by TJDave
:lecture 
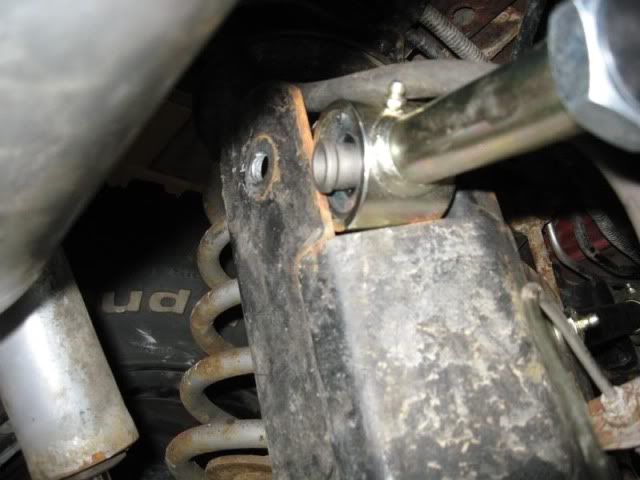
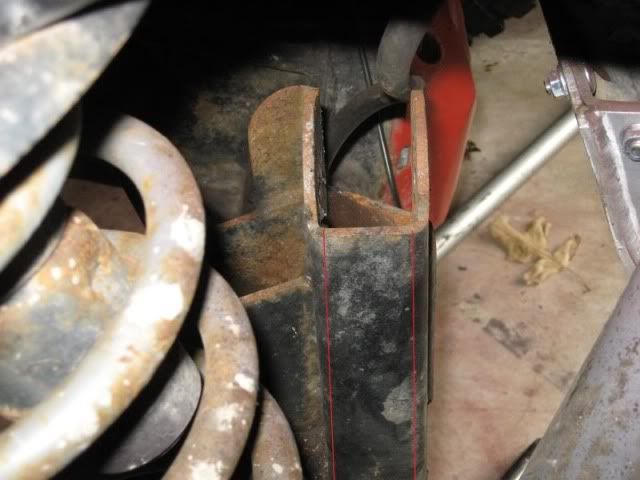
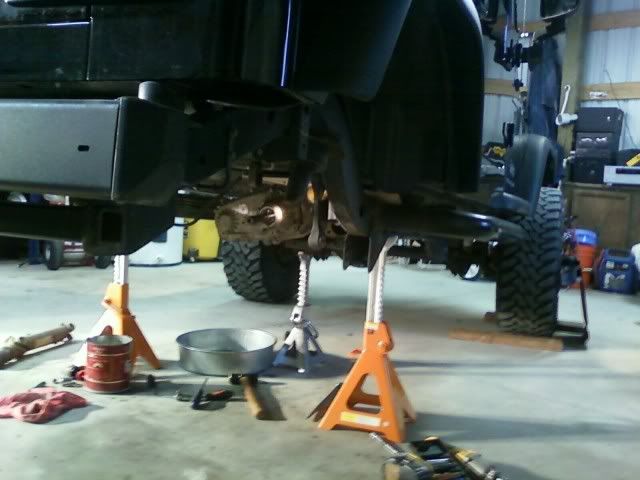
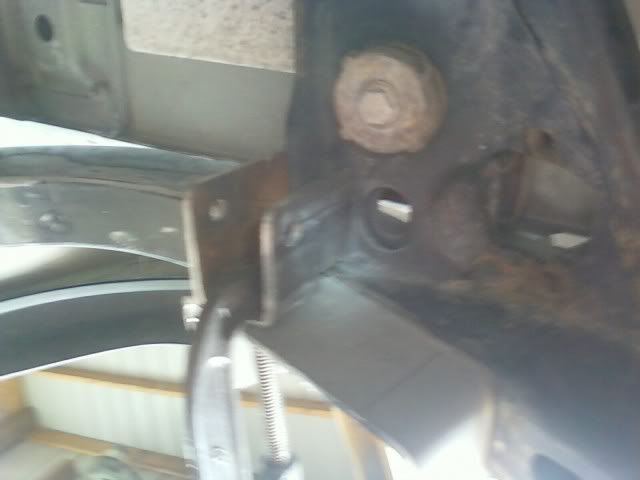
Let's see..... They are going to go right here....


Image

All I have to do now is cut the frame :shock:

All I have to do now is cut the frame :oO

All I have to do now is cut the frame :ange

Image

Ready for welding. Whew, glad that's over. :)

Posted: Sat Apr 23, 2011 6:29 pm
by White trash
Meh it's just metal get it over with ya sally. :lol:

Posted: Sat Apr 30, 2011 6:18 pm
by TJDave
Time for more crummy cell phone picks. :D Lot's done today, rear end is in and just needs some fine tuning, johnny joints greased, and brakes bled. Gas tank and exhaust is in and it started right up!
Here's the pics, starting with the gaping hole in my frame. :shock:
Image
I made a new frame side trackbar bracket out of some box frame scrap. I fabbed something! :roll:
Image
Image
Image
Remember the axle side trackbar mount that I had to cut and spread to fit the Currie johnny joint trackbar? You can see it all filled and welded as Rick welds on my outboarded shock towers.
Image
Relocated spring buckets welded in their new spot.
Image
Painted and Purdy. Gas tank and skid goes in next..
Image
Exhaust and trackbar goes on..
Image
The welding team! Big thanx to my work buds Leonard and Rick, and Leo's son in law, Prodo
Image

Posted: Sat Apr 30, 2011 6:25 pm
by TJDave
That's the way it is going to sit, cause they ain't movin' now! 8) I put 12" travel shocks in and set the towers for 6" up travel, and 6" down. Stock, I had less than 3" uptravel and really bottomed out on the whoops sections.

Image
Image
Image

This new axle got a new present that I mounted under the hood.

Image

Just have to finish a couple things and it's on to the front.

Posted: Sat May 07, 2011 7:04 pm
by TJDave
Today we just finished up the little things on the rear of the Jeep.
Centered axle, bled new rear disc brakes, tightened all control arm, track bar, and shock bolts. Fought with the driveshaft, attached e brake cables, greased all zerks, and sat it on tires. I only took a couple pics.......not very good ones. :mosc 
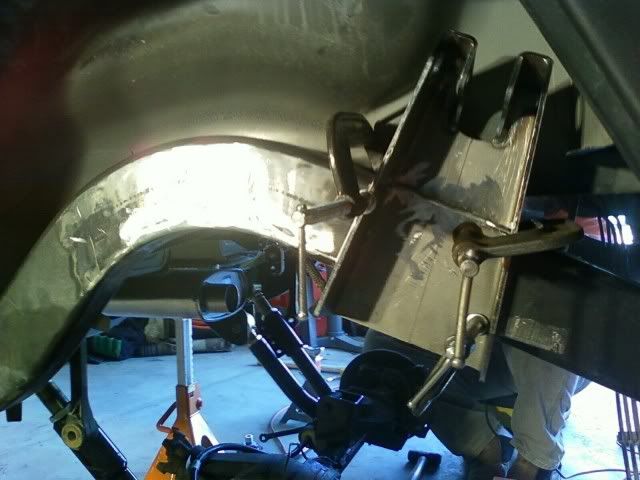
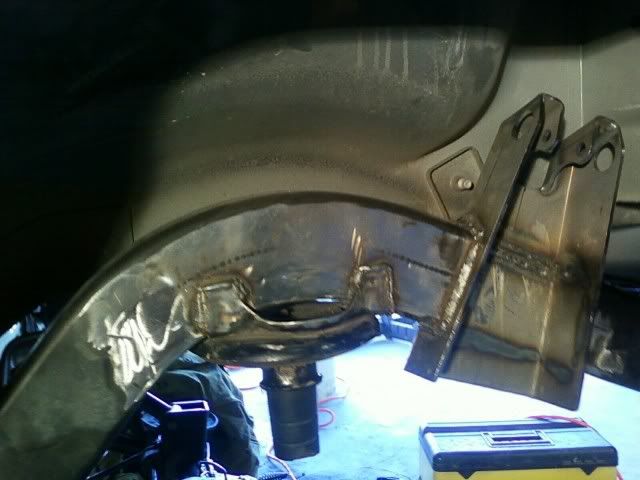
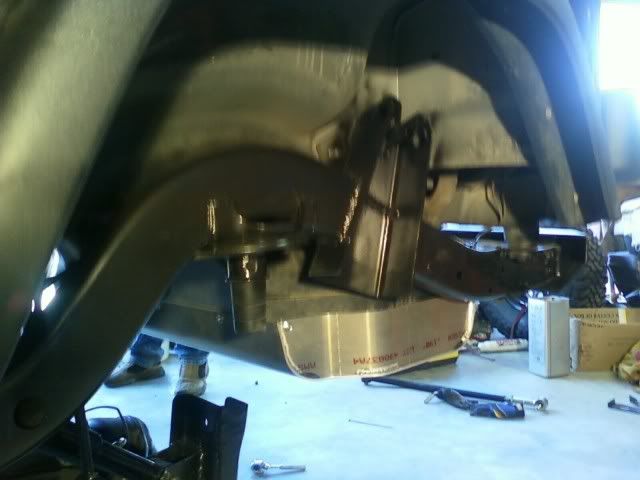
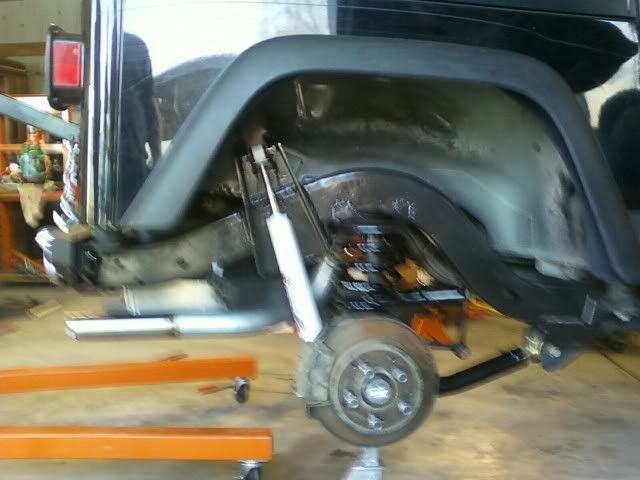
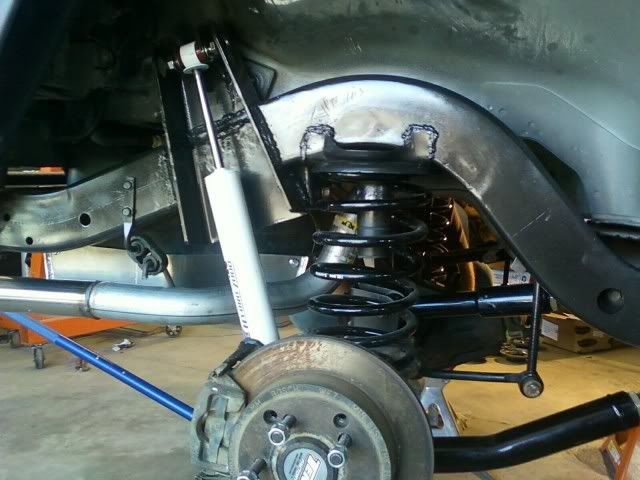
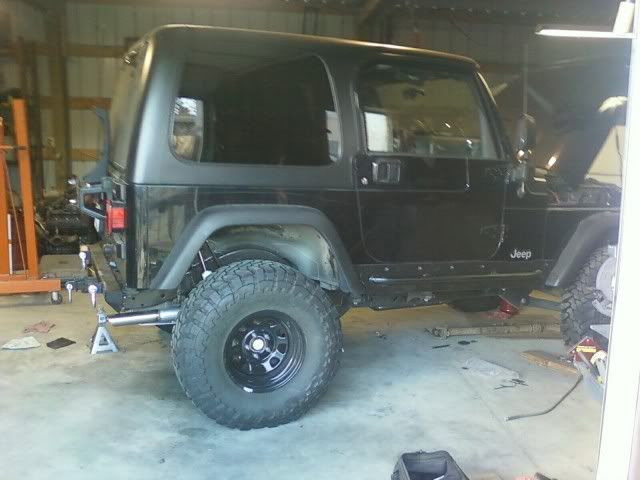
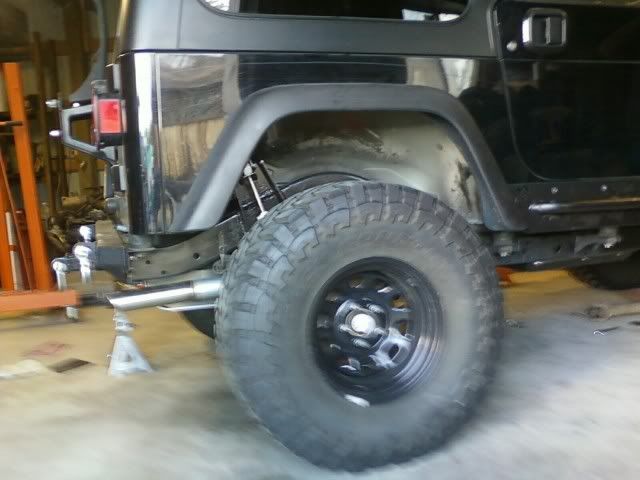
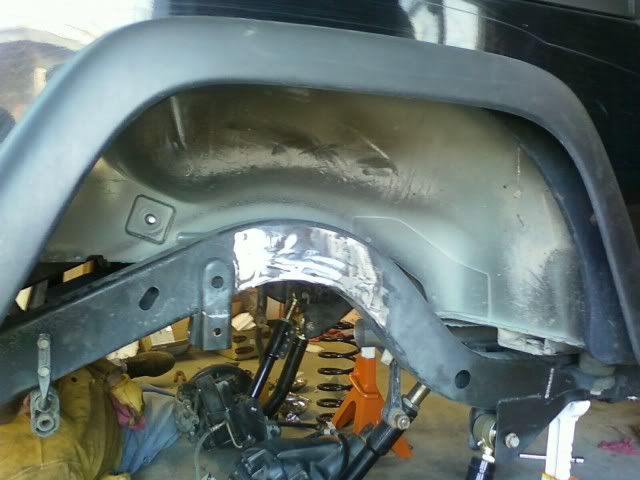
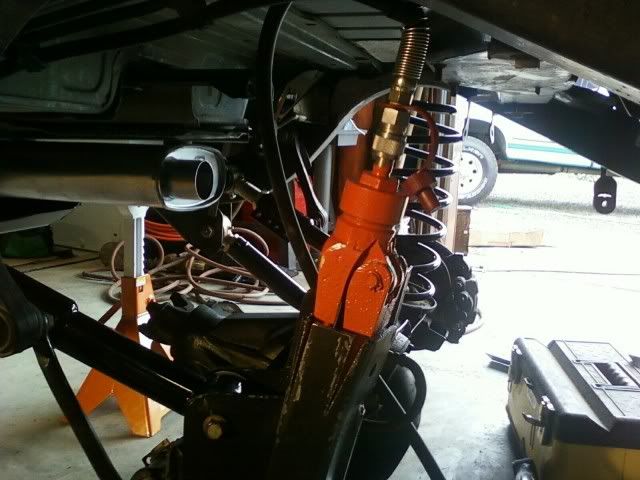
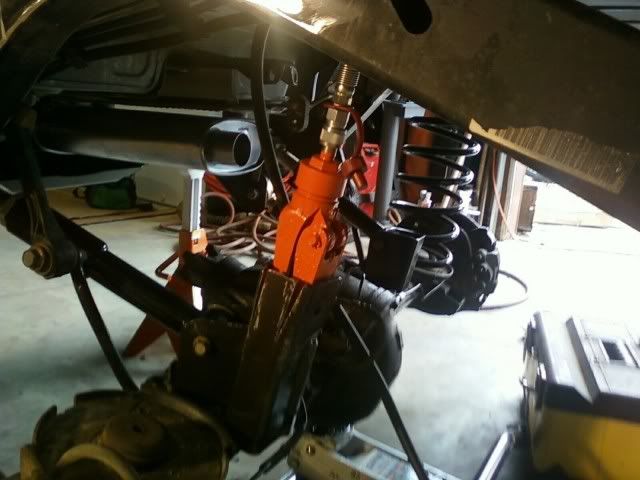
Looks like room for some 35" tires now.

Image
Image

Yep. It sits over two inches higher in the rear than the front now. Hopefully, the new rear springs will settle down some with some miles, and a spare tire hanging off the back. I cut down the 2" spacers about 3/4" and will be putting them up front.

But, Tomorrow is Mother's day so no playing on the Jeep. :D

Posted: Sat May 14, 2011 7:32 pm
by TJDave
Another day off. Another day of getting closer to being done. Finished the Rubi E-brake cables and threw some goo in the rear diff. Back end is done, on to the front.''''

Front axle re-geared to 4.88 to match the rear D44. Some really nice guy just stopped by and threw them in! :wink: New Centric rotors went in along with new Savvy Black Magic brake pads. New YJ brake lines went in, (they are longer), and adjustable control arms.
When we relocated the rear upper spring perches, along with new 3" Rusty's rear springs to match the front, it added about 1.5" to 2" lift in the rear. So, I shaved the spring spacers that came off the rear to 1.5" and put them up front. Threw my old 33's on and it sits level. Some ARB lines and switches still to do.
I can almost smell mud burning on my exhaust pipe. :D

Image
Image
Image
Image