YJ mods, an on going thread.

Re: YJ mods, an on going thread.
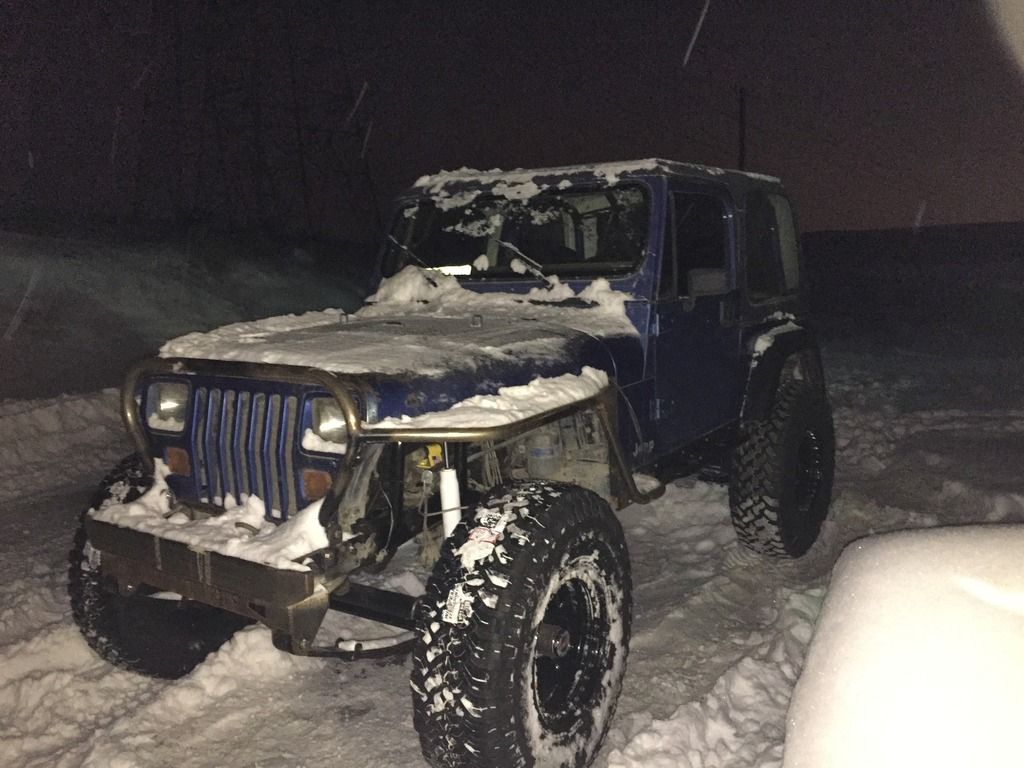
There is about 3.5" to the bumps and about 3.5 to the flare, thinking the flare could use some cutting. The problem right now is, I really have no idea how much lift is there. The springs are worn out who knows what. The front spring mounts have been "frenched" into the frame. I do know I'm running 2" less clearance between the frame and axle compared to a 3.5" lift and 1" shackle lift.
James
'92 YJ with a little something of everything.
'92 YJ with a little something of everything.
Re: YJ mods, an on going thread.
Just call it squatty.
20" to the frame.
73"ish to the top of B-pillar
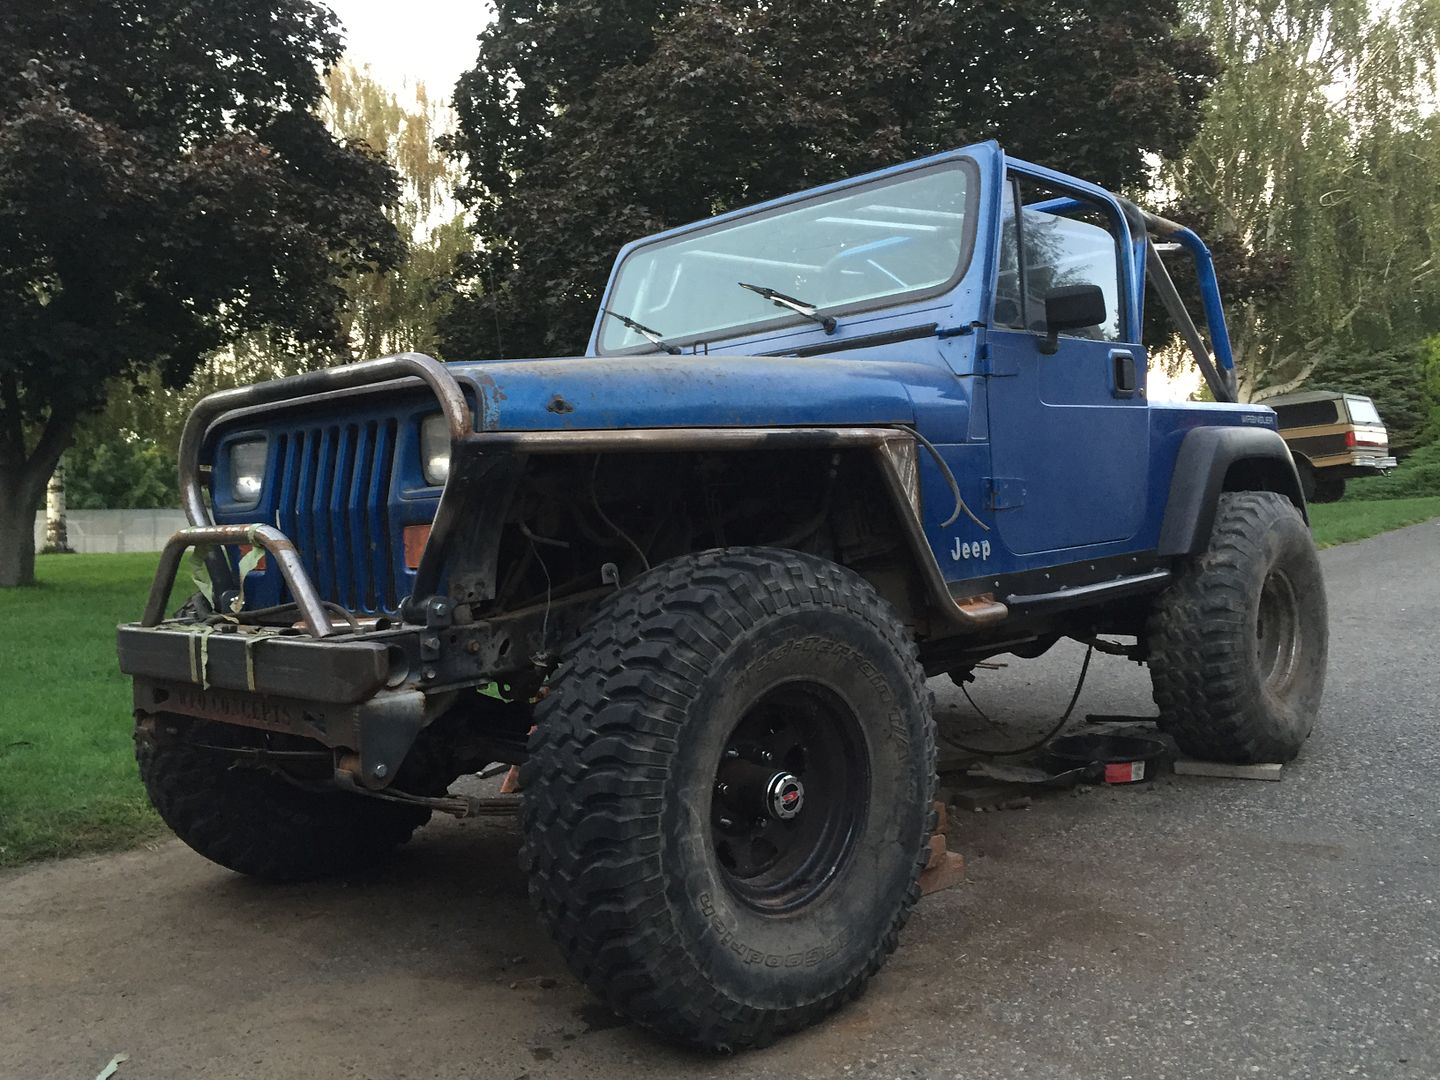
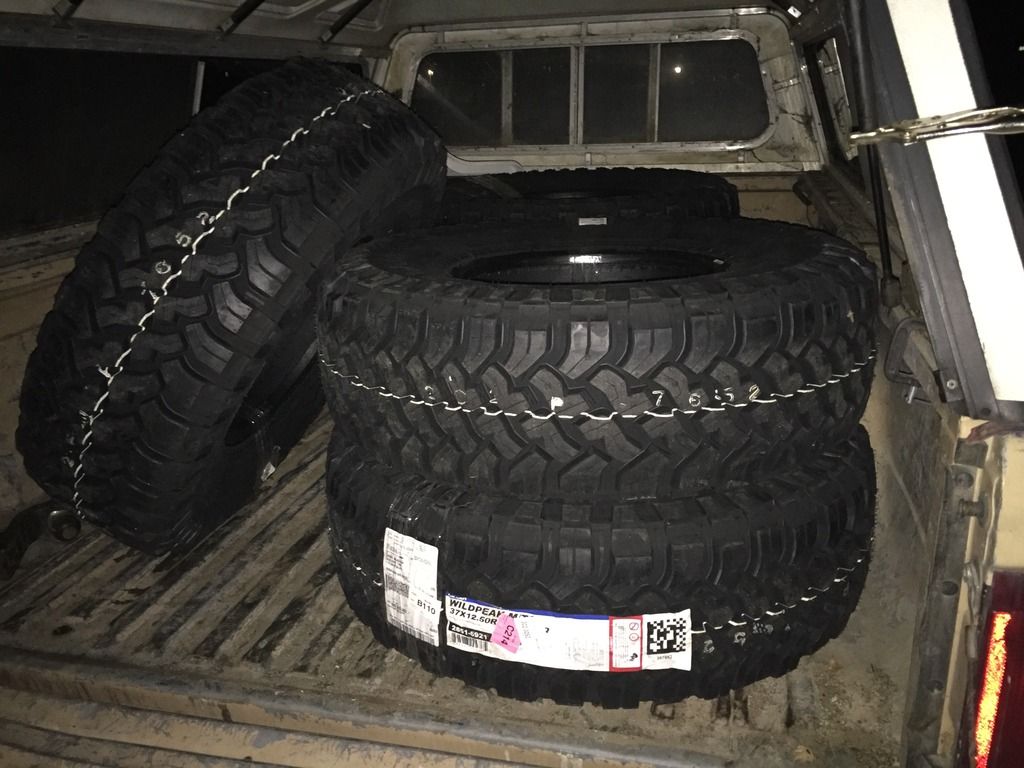
Do wish I has a matching set of tires.
20" to the frame.
73"ish to the top of B-pillar


Do wish I has a matching set of tires.
James
'92 YJ with a little something of everything.
'92 YJ with a little something of everything.
Re: YJ mods, an on going thread.
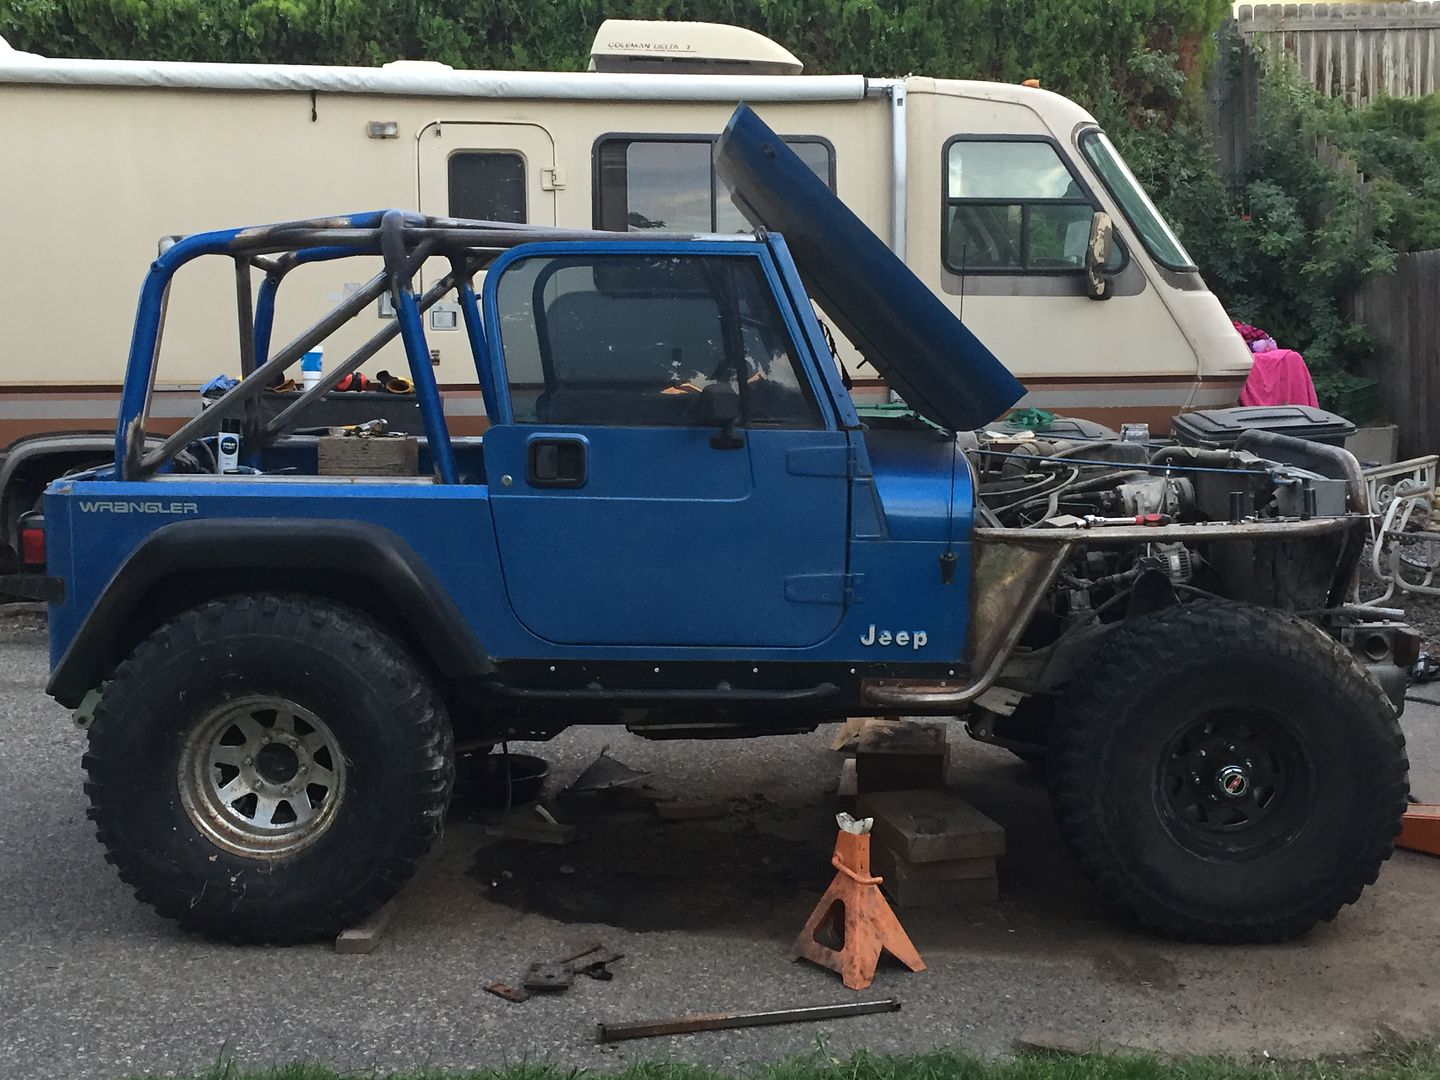
After a mad scramble around town this morning looking for AN- fittings, wanted to get the brakes hooked back up and the existing 10mm doesn't fit the new 7/16 calipers well. I've come to the conclusion that nobody supports hotrods. Baxter's had the best selection but not what I was looking for and 3 out of 4 flunkies at autozone didn't even know what an AN fitting was.
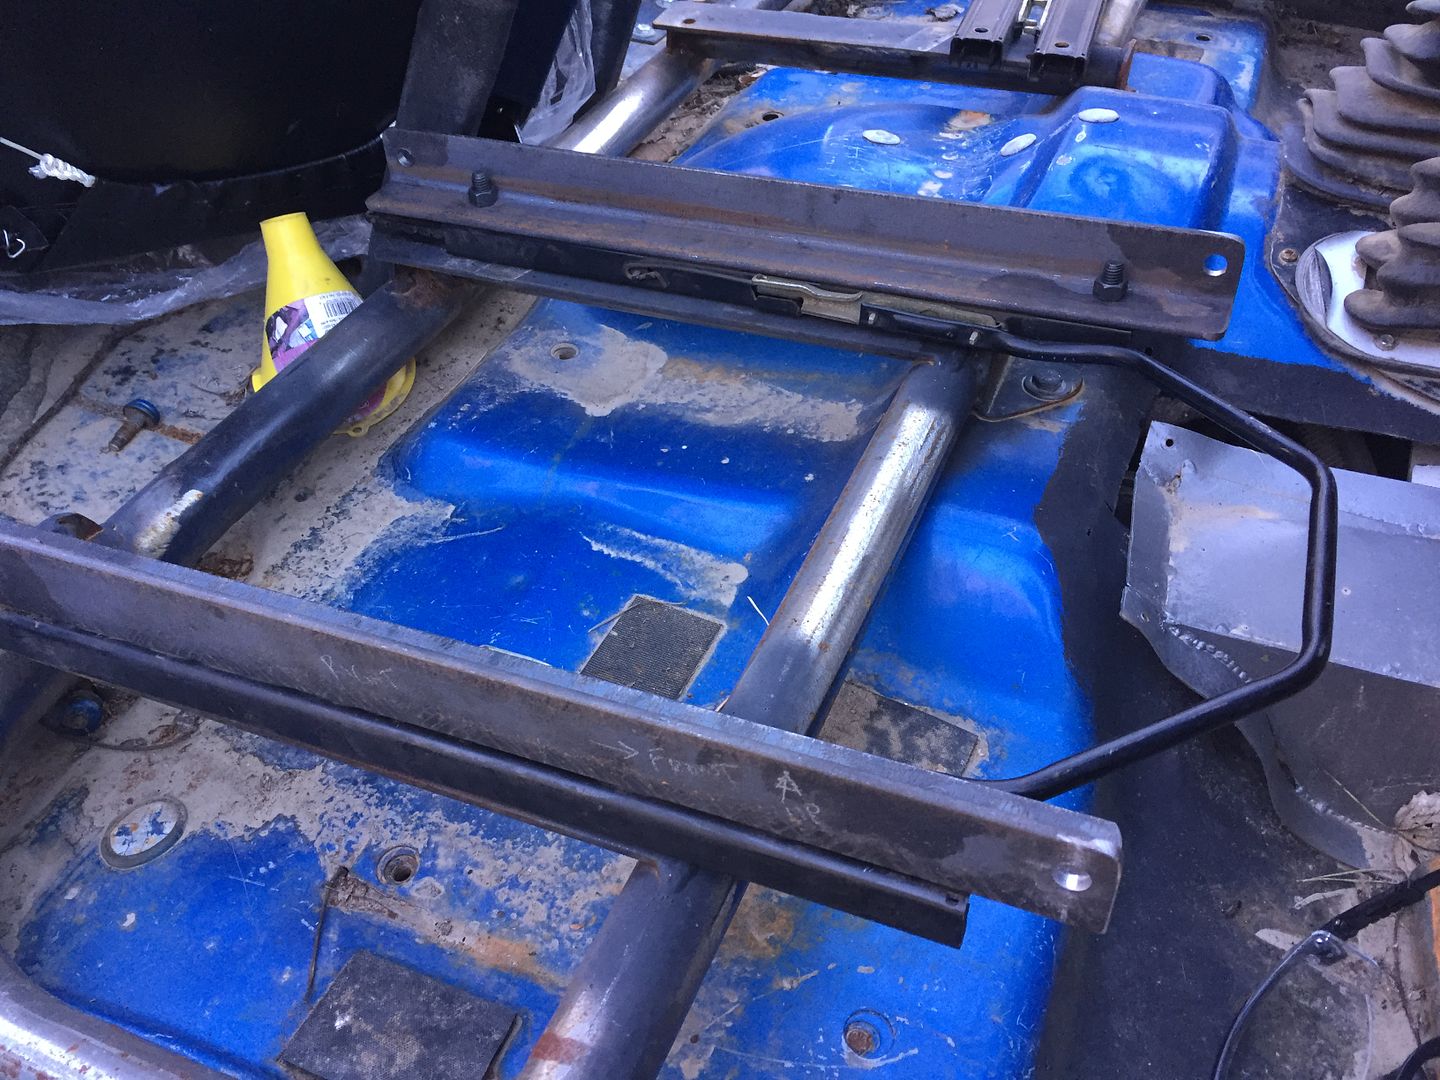
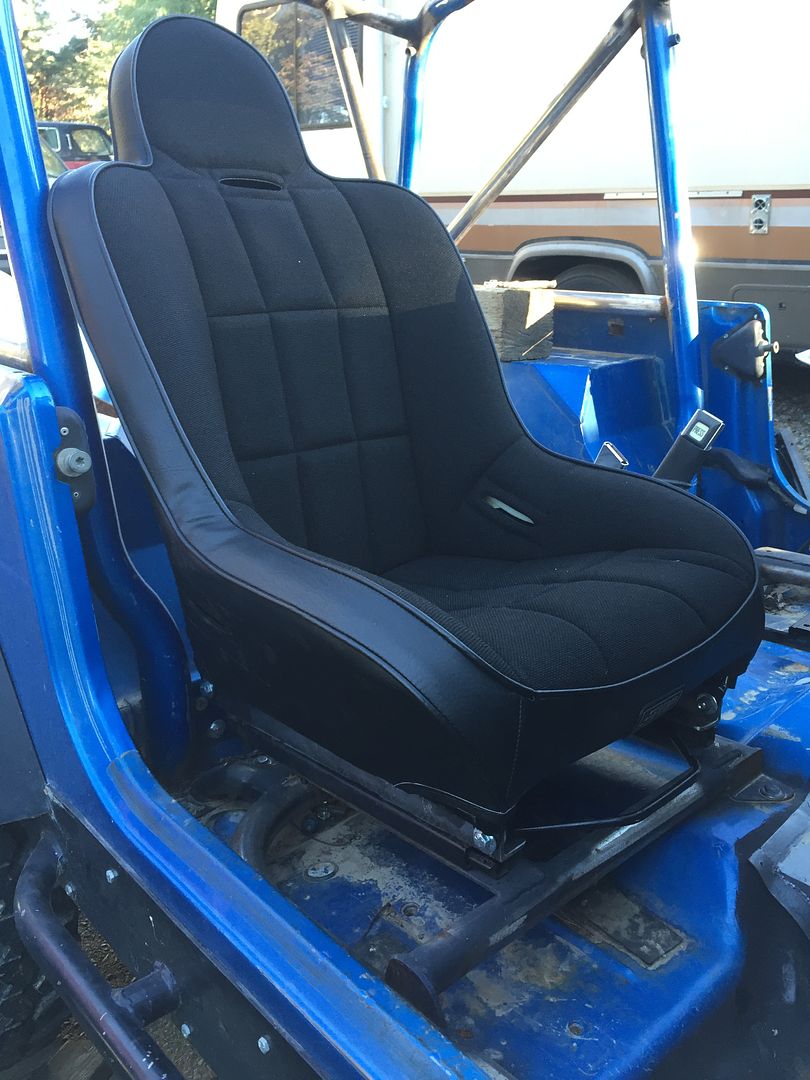
Not much of an update but finally got the seat mounts finished.
Stock sliders mounted to the cage. 1 1/2" angle mounted to the top of the slides and PRP seats mount to the angle. Stock adjuster is also still used.
Not much of an update but finally got the seat mounts finished.
Stock sliders mounted to the cage. 1 1/2" angle mounted to the top of the slides and PRP seats mount to the angle. Stock adjuster is also still used.


Last edited by bobracing on Mon Sep 12, 2016 7:51 am, edited 2 times in total.
James
'92 YJ with a little something of everything.
'92 YJ with a little something of everything.
-
Grumpy

- Peak Putters' Land-Use Coordinator

- Posts: 6049
- Joined: Wed Mar 14, 2007 8:38 am
- Location: Kennewick, WA
Re: YJ mods, an on going thread.

Dave
Have Scout, will wheel...Someday...Maybe
Quote:
Originally Posted by Oregon80
-By driving a Scout, you my friend have recycled, which is more than those pansy Prius owners can say.
-I love driving a piece of history that was nearly lost.
Have Scout, will wheel...Someday...Maybe
Quote:
Originally Posted by Oregon80
-By driving a Scout, you my friend have recycled, which is more than those pansy Prius owners can say.
-I love driving a piece of history that was nearly lost.
Re: YJ mods, an on going thread.
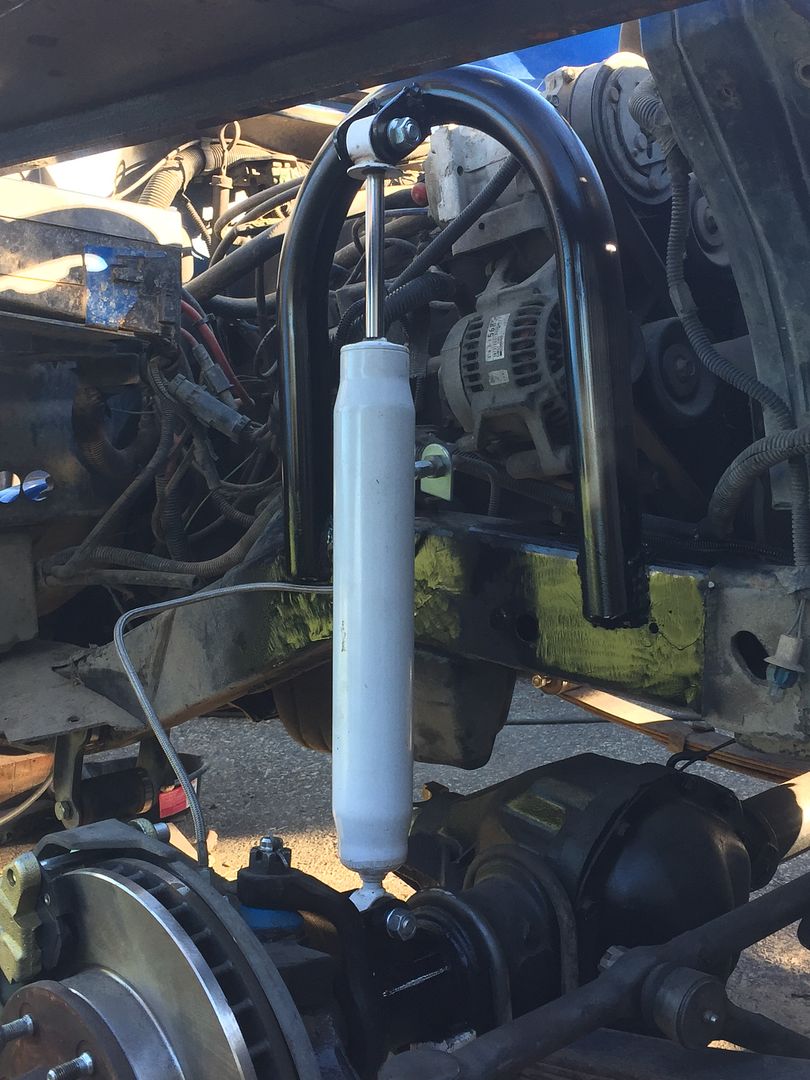
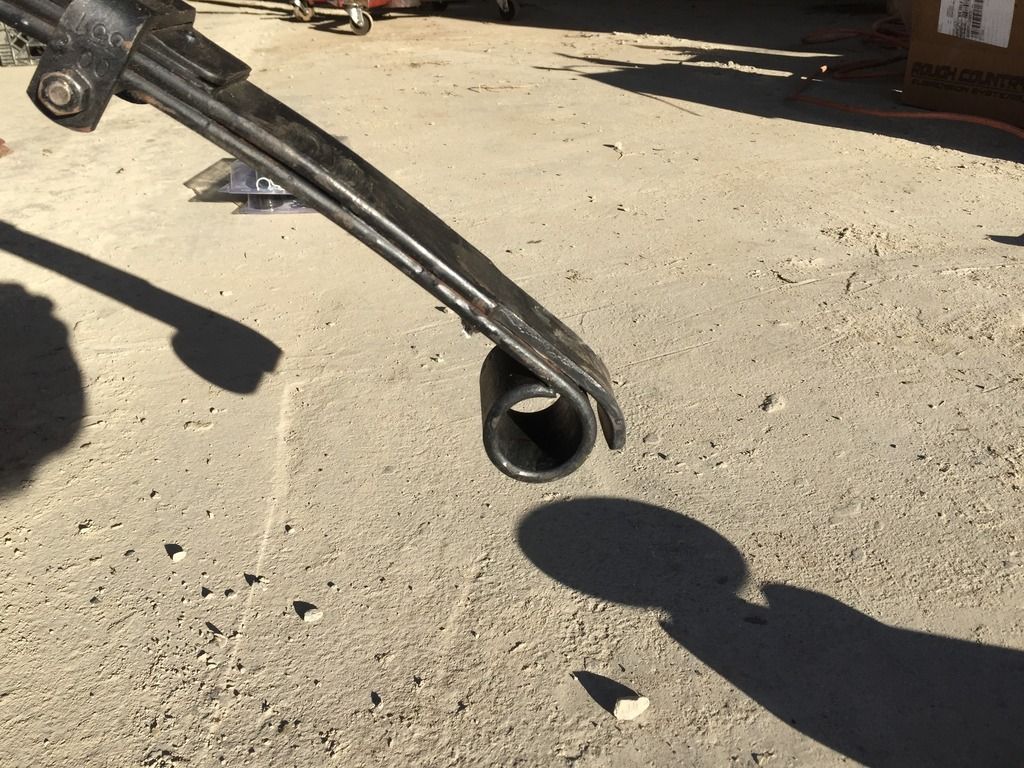
Still going at a snails pace.
Never cared for using the stock modified mounts, nothing wrong with it just didn't like it. I also moved the shock from behind the axle to on top with the new towers.
So off the stock shock towers go.
Test fit of the new shock hoop, just a touch too tall.
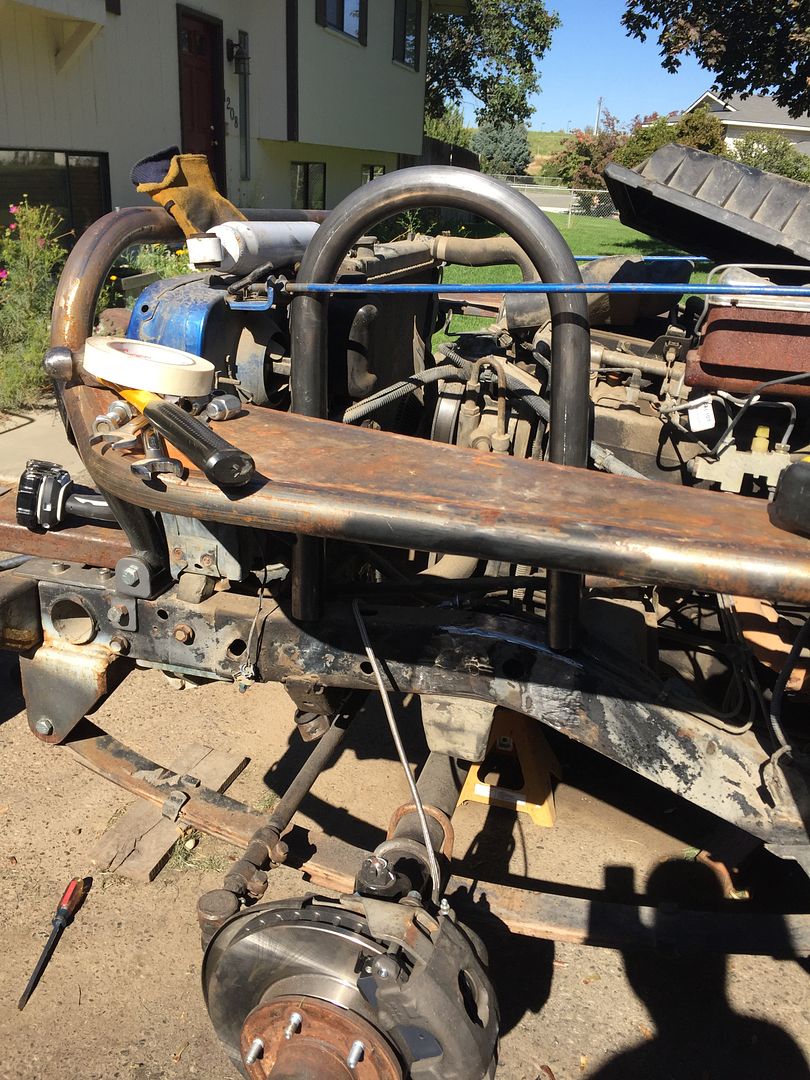
A few measurements, some cuts, some new upper & lower tabs, make things look a little better.
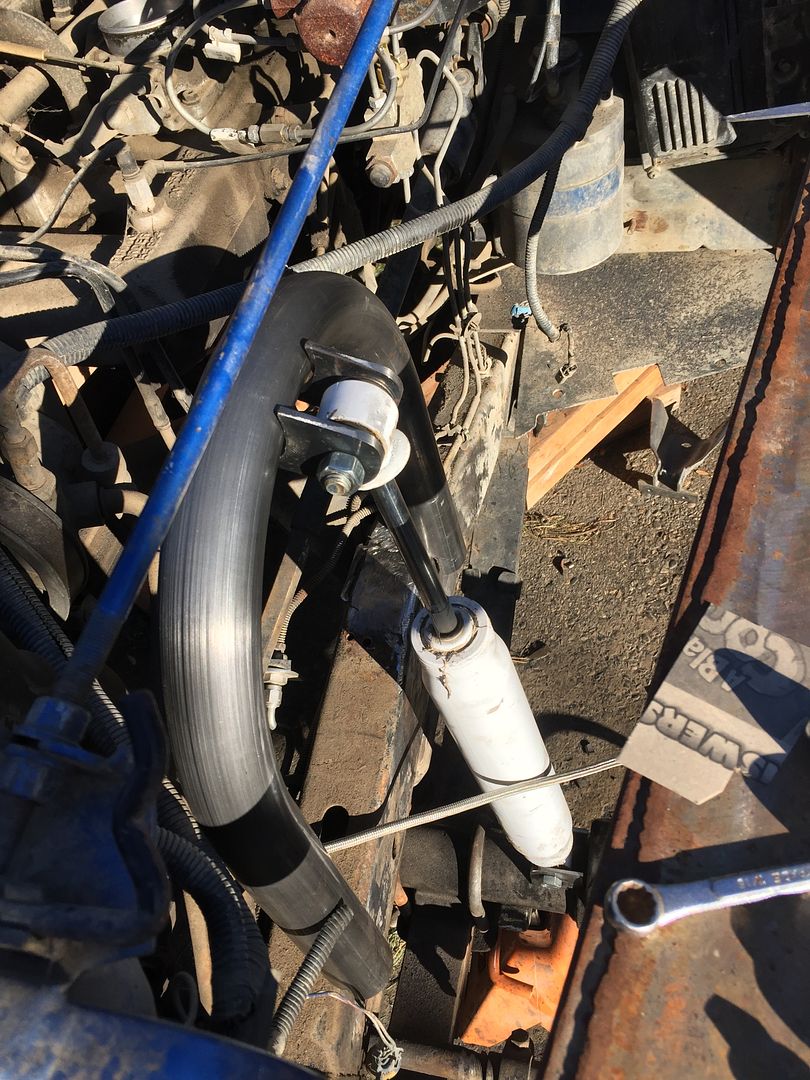
Never cared for using the stock modified mounts, nothing wrong with it just didn't like it. I also moved the shock from behind the axle to on top with the new towers.
So off the stock shock towers go.

Test fit of the new shock hoop, just a touch too tall.


A few measurements, some cuts, some new upper & lower tabs, make things look a little better.


James
'92 YJ with a little something of everything.
'92 YJ with a little something of everything.
Re: YJ mods, an on going thread.
Couple things:
Not sure what the rest of the suspension and drivetrain does in terms of contact at full compression, but all the YJ's I ran would squish the factory bumpstop to almost nothing... You might run out of compression on your shocks?
And, might be a bad camera angle but it looks like your shock body is going to want to share space with your frame rail when your crossed up?
Otherwise I dig it
Yep, I've wheeled one of those, too...

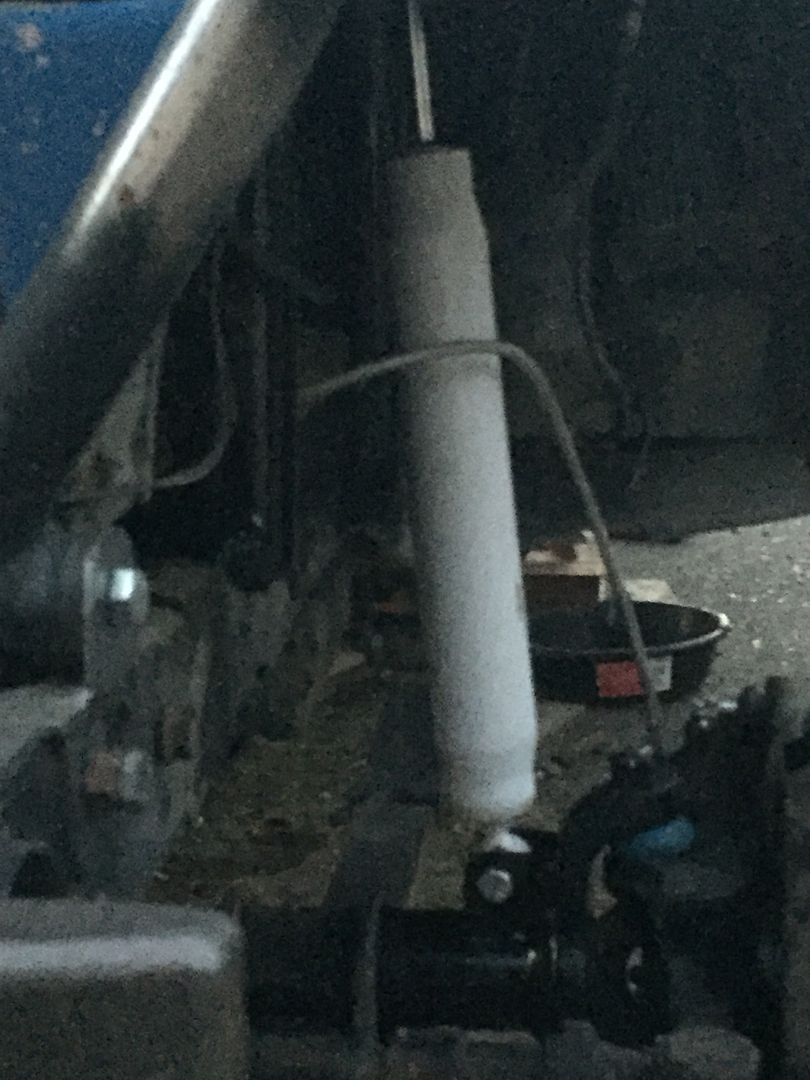
Re: YJ mods, an on going thread.
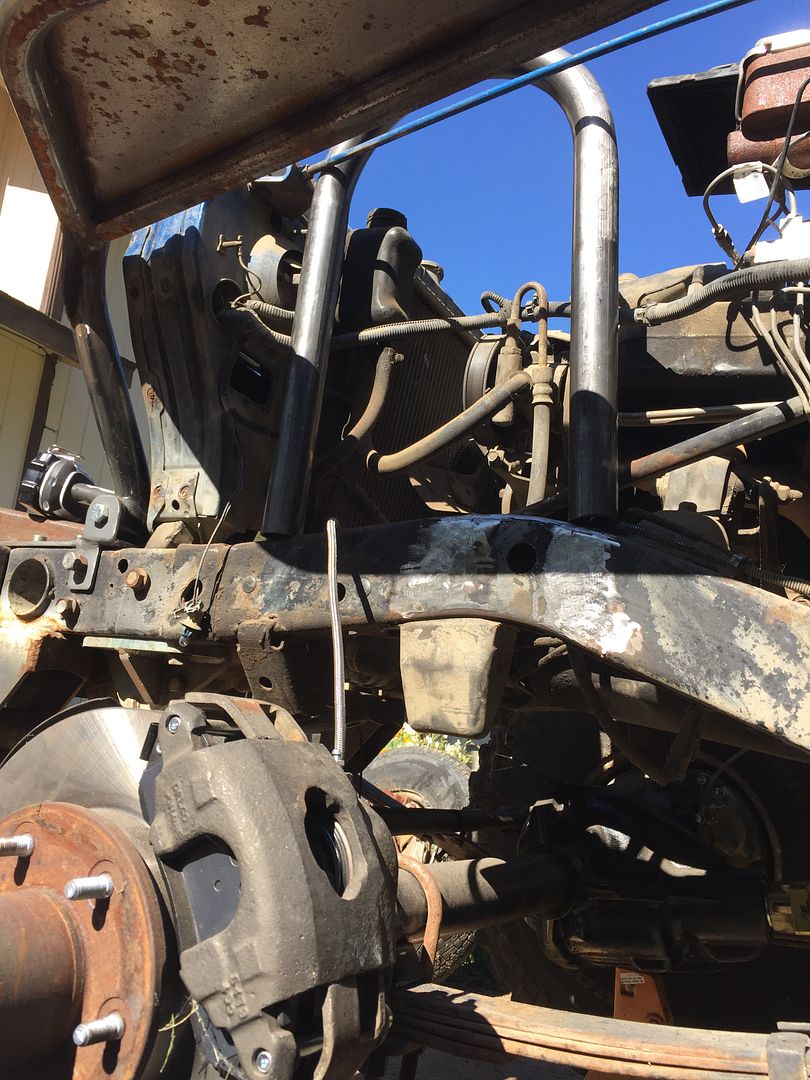
Thanks Toby.
I've never been able to squish the suspension on this Jeep even with the stock springs. Also the tires will be way into the fenders at the bumps, so the bumps will most likely need to be lowered a touch.
Really having issues with how to mount the rear shocks. I'm trying to keep the axle mounts high but that puts them at almost "kicker shock" angle. Outside the frame is tight along with fighting the disk brakes for space. I'll probably end up with a TJ style frame cut tower.
Different angle, along with paint.

James
'92 YJ with a little something of everything.
'92 YJ with a little something of everything.
Re: YJ mods, an on going thread.
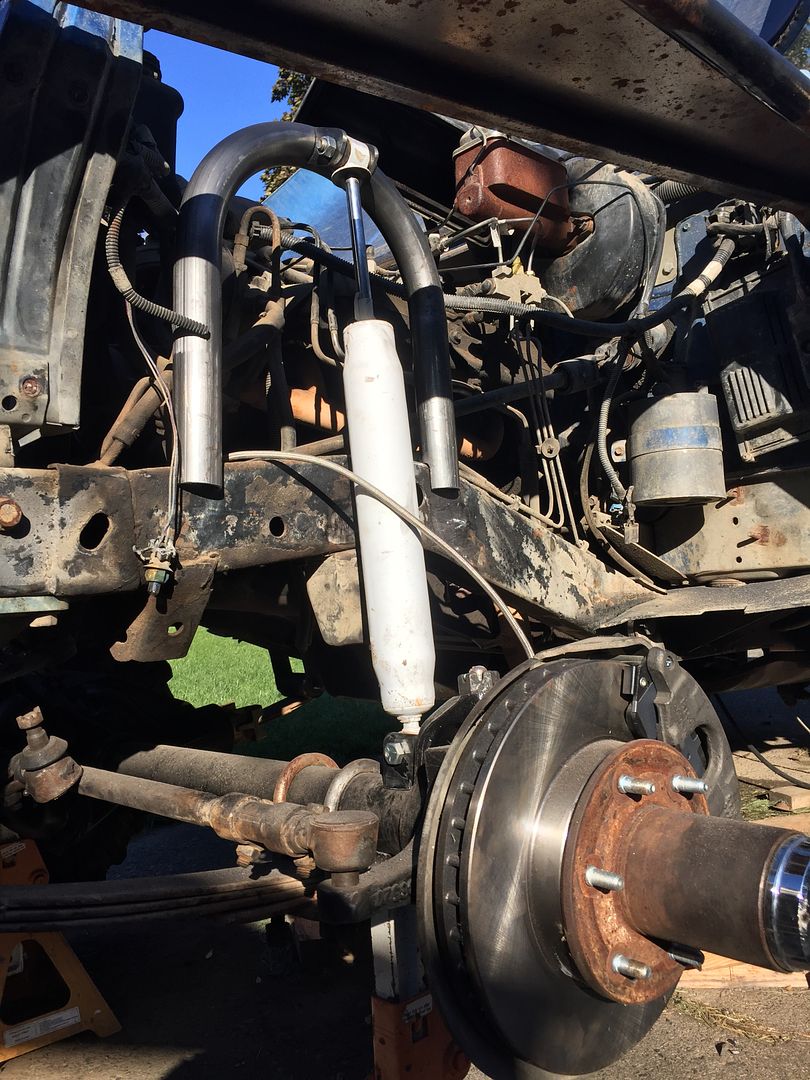
Little better front shot, little dark this morning.
Good thing is new tabs can take care of some travel length or move the top farther out if needed.

Good thing is new tabs can take care of some travel length or move the top farther out if needed.
James
'92 YJ with a little something of everything.
'92 YJ with a little something of everything.
Re: YJ mods, an on going thread.
Let's go wheelin and see how it all works!!
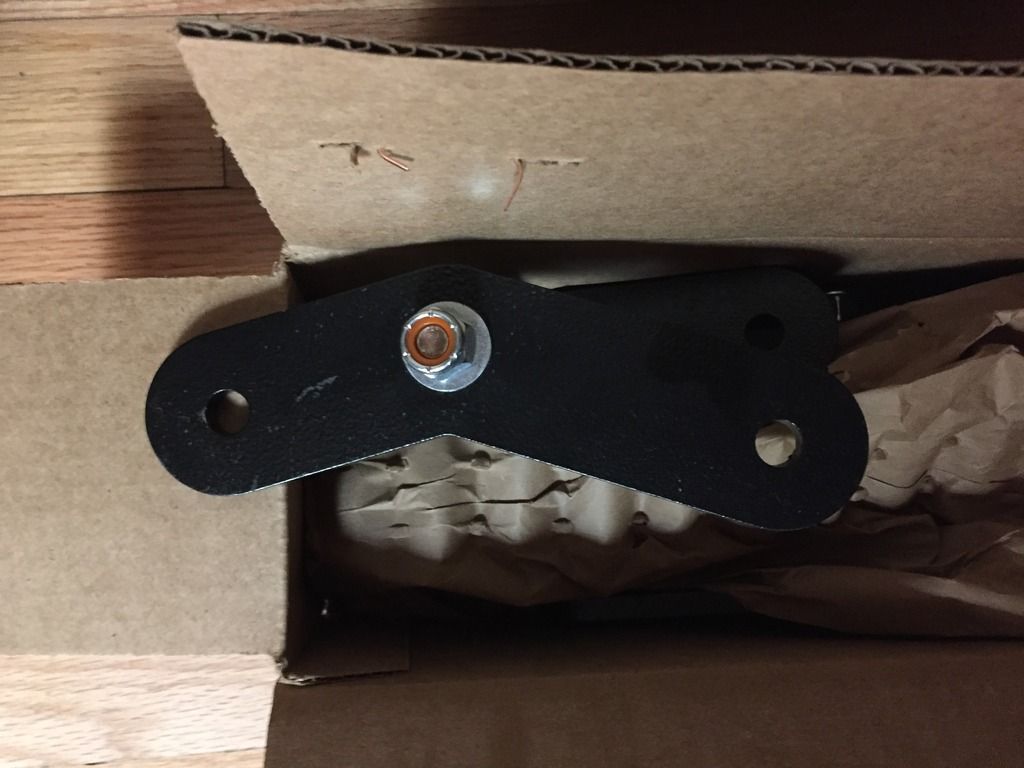
I've got an old set of Mountain Off-Road Enterpsises YJ rear upper shock extenders if your interested? If memory serves they allow for about 2" longer shocks?
I've got an old set of Mountain Off-Road Enterpsises YJ rear upper shock extenders if your interested? If memory serves they allow for about 2" longer shocks?
Yep, I've wheeled one of those, too...
Re: YJ mods, an on going thread.
tobyw wrote:Let's go wheelin and see how it all works!!
This has to be one of the best quotes I've see in a long time.
tobyw wrote:I've got an old set of Mountain Off-Road Enterpsises YJ rear upper shock extenders if your interested? If memory serves they allow for about 2" longer shocks?
Very I'll get a hold of you.
James
'92 YJ with a little something of everything.
'92 YJ with a little something of everything.
Re: YJ mods, an on going thread.
I have a bar that attaches to both upper shock mounts that allows you to mount you upper shocks mounts toward the center. can't really find the part number but I did find a pic. freebie!
http://www.quadratec.com/Assets/Images/ ... 058-md.jpg
http://www.quadratec.com/Assets/Images/ ... 058-md.jpg
Lightly Lifted and Locked LJ
I'm Scumby Dammit, take it or leave it!
I'm Scumby Dammit, take it or leave it!
Re: YJ mods, an on going thread.
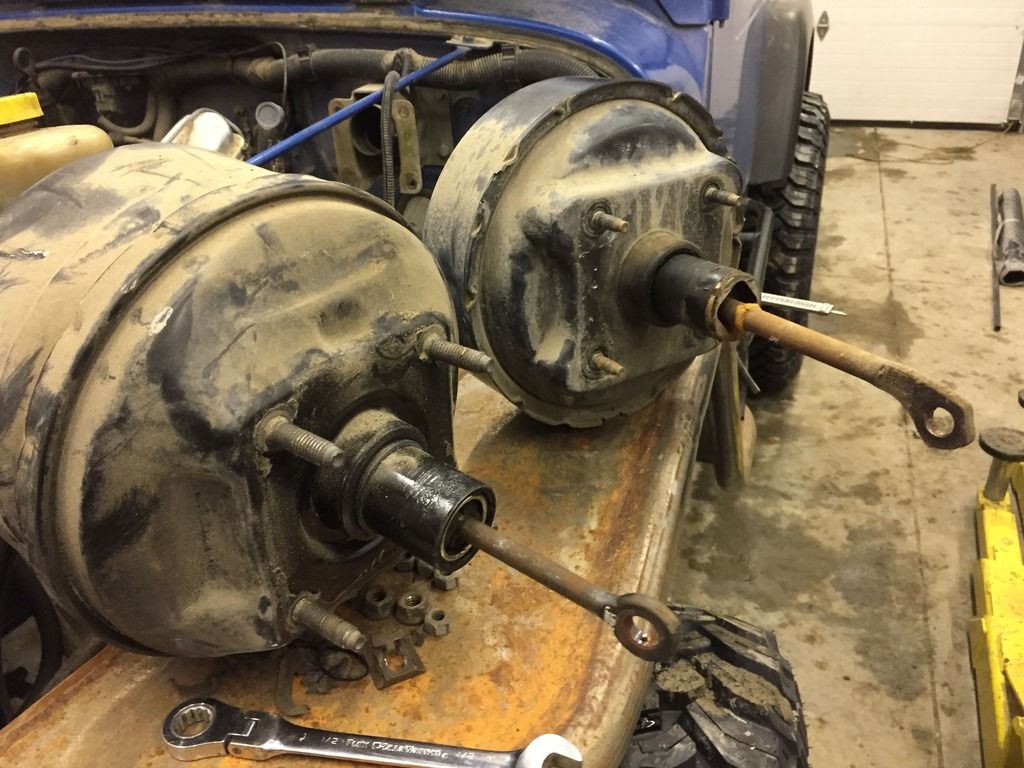
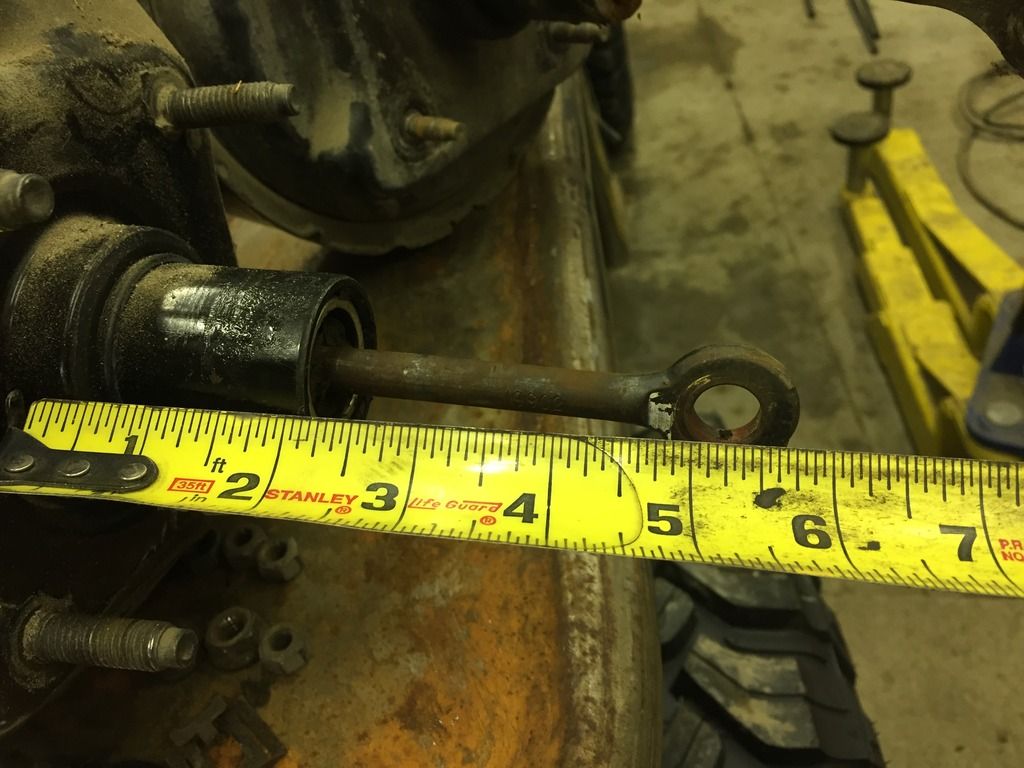
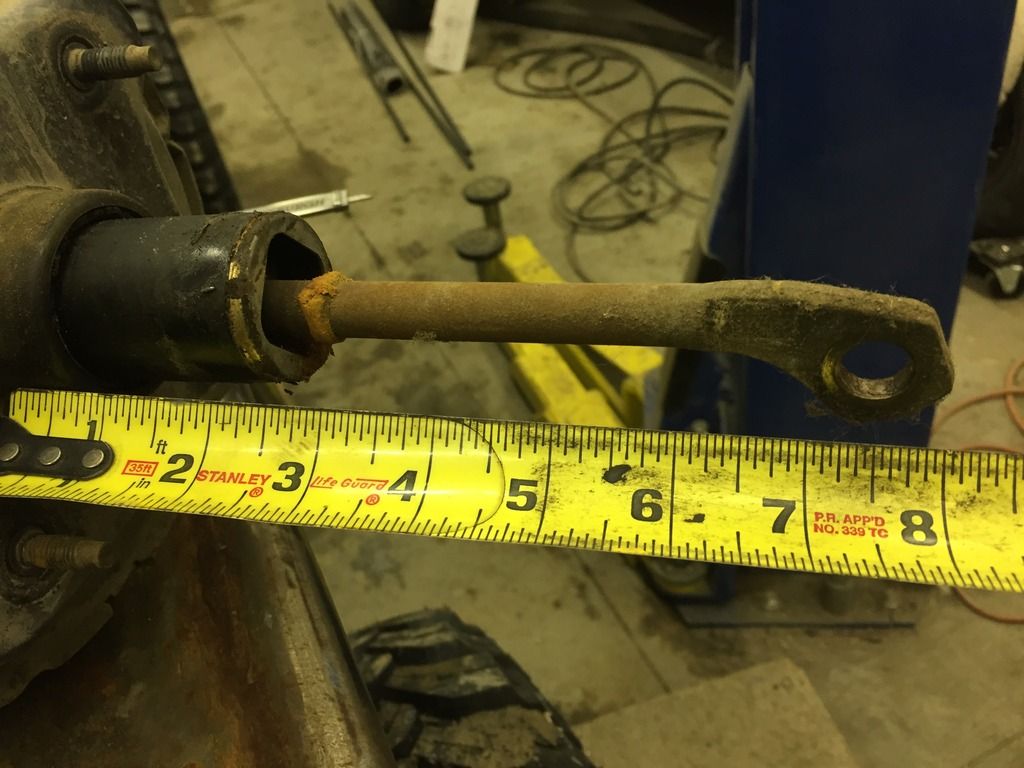
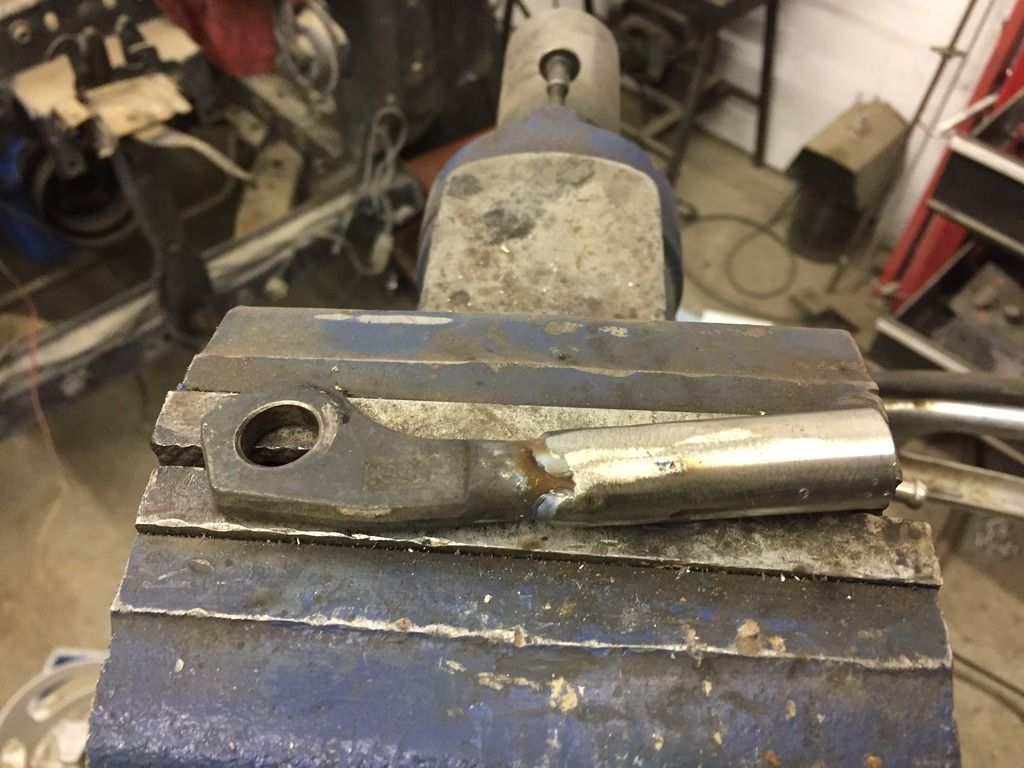
So, with the front axle moved a little to far forward, I'm having a bit of a problem getting a pitman arm to fit in the SUA setup even with the "MORE" 1" PS box mount.
At this time someone was nice enough to donate a TJ arm (thank you very much) that I think will work once the new springs are under but still going to be tight. If new arm doesn't work, guess it's time to make one or find a PS ranger arm.
We'll throw this out for general info.
Pitman arm Dimensions:
Top: stock waggy, 7" long ~3/4" drop
Middle: stock TJ, 5.5" long 2" drop
Bottom: stock XJ, 5.5" long 3" drop
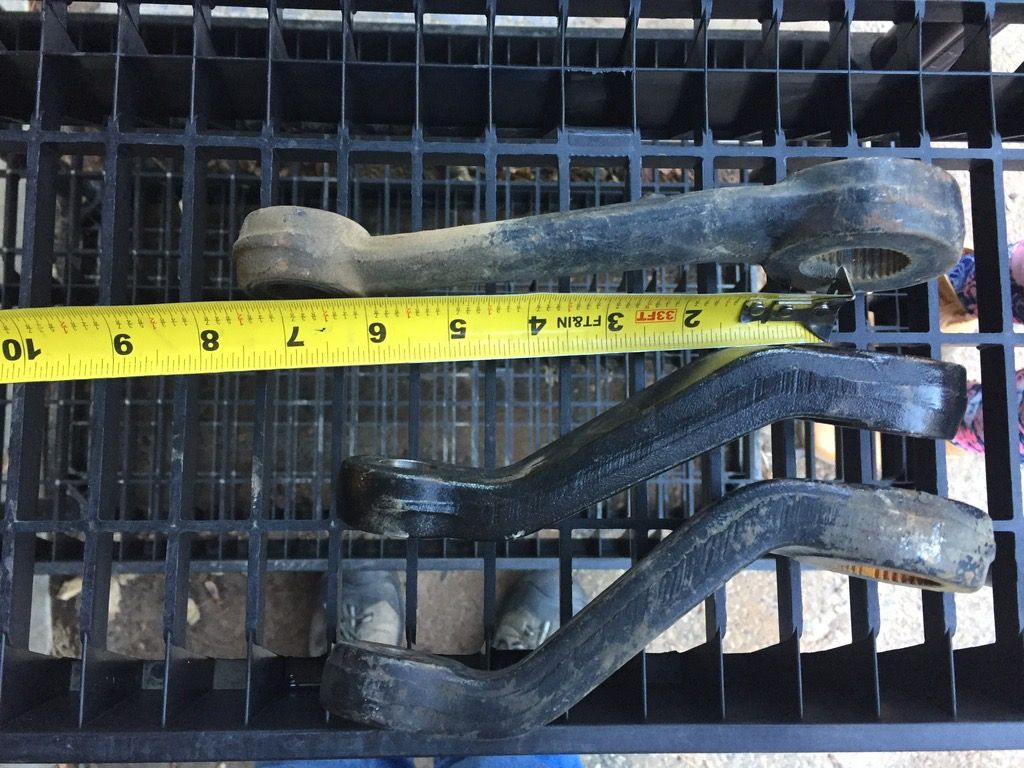
Waggy
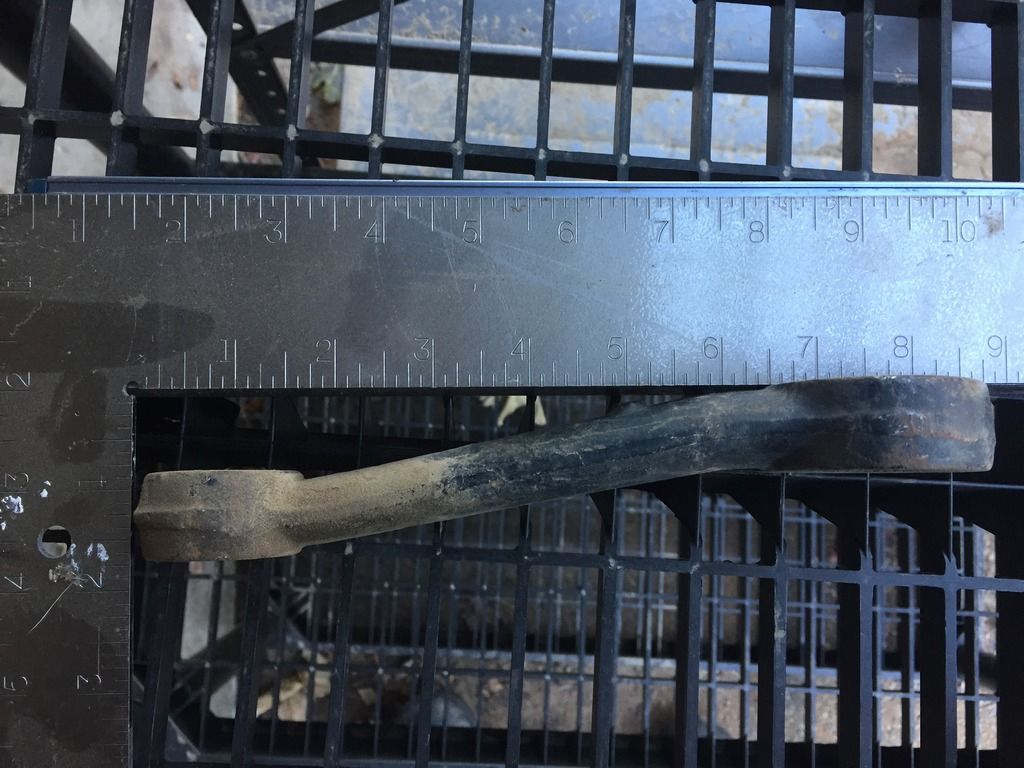
TJ
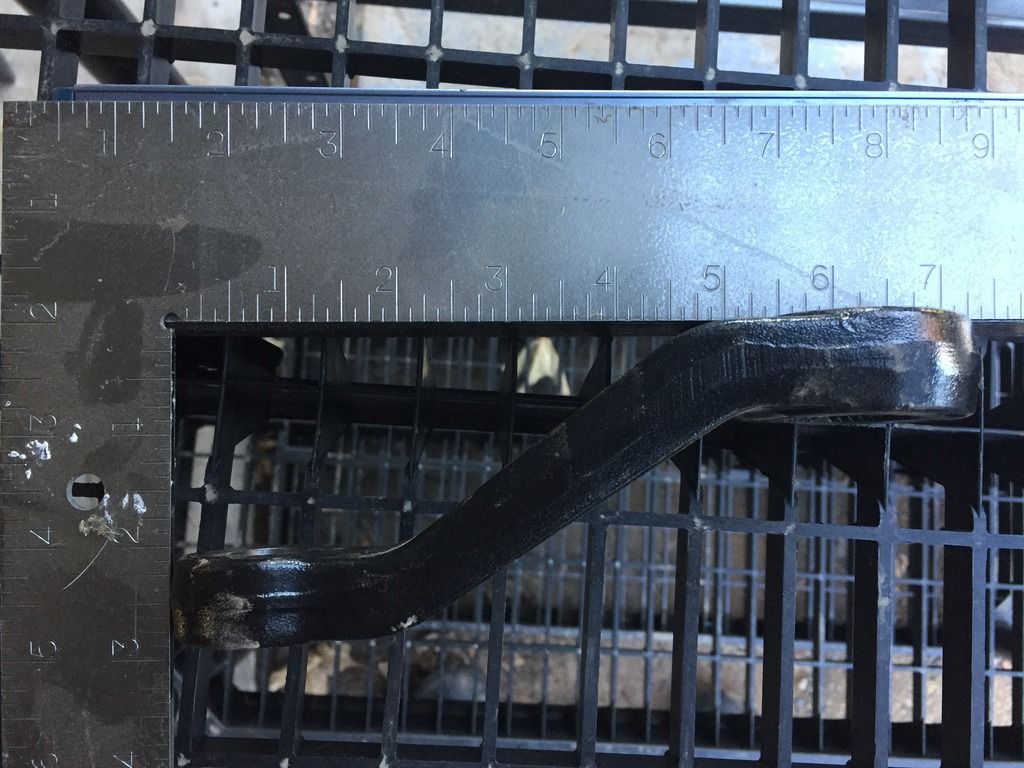
XJ
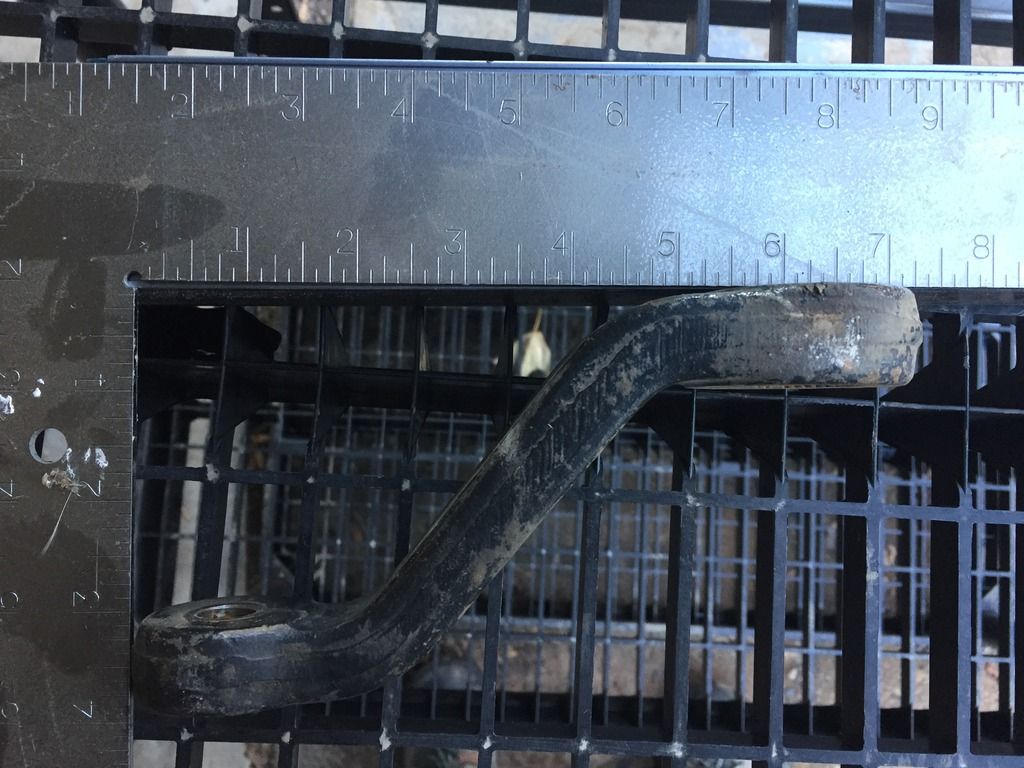

James
'92 YJ with a little something of everything.
'92 YJ with a little something of everything.
Re: YJ mods, an on going thread.
ASTRO ps box and an XJ intermediate shaft
Re: YJ mods, an on going thread.
Isn't that Purdy.
Maybe not the green box but the yellow mounts should at least hold the engine under the hood.
Maybe not the green box but the yellow mounts should at least hold the engine under the hood.

James
'92 YJ with a little something of everything.
'92 YJ with a little something of everything.
Re: YJ mods, an on going thread.
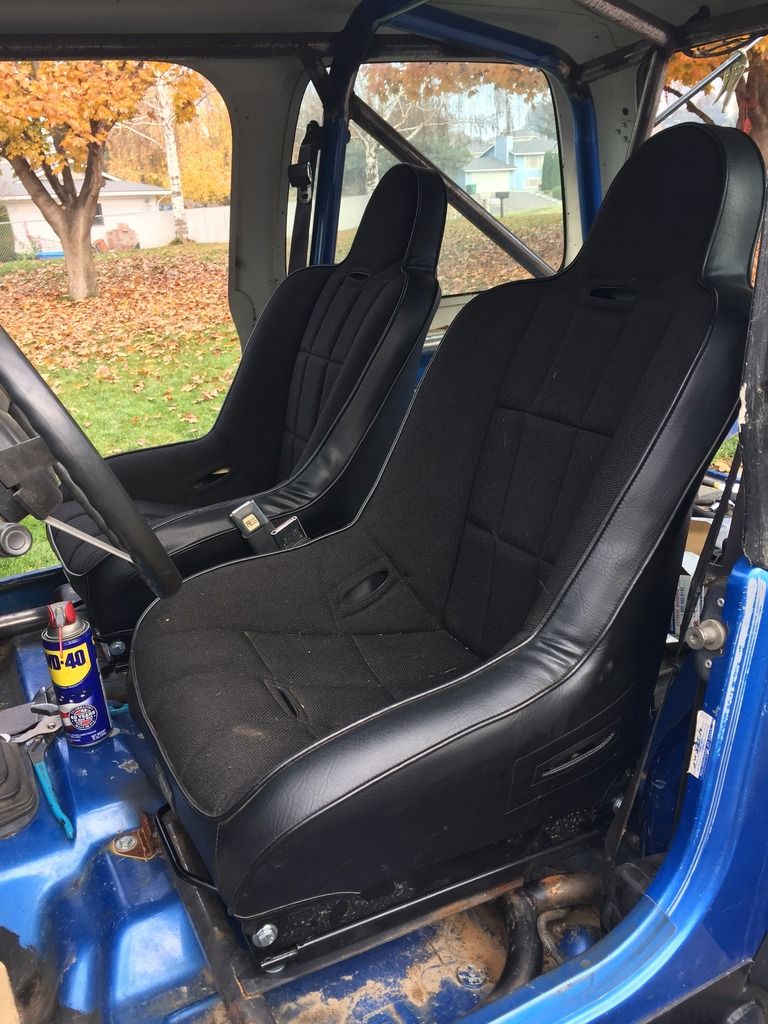
Again between wife, grandkids, and life in general it's been slow but have done a few things.
Seats:
Standard PRPs mount to the rollcage but also with factory sliders. Somehow it took me about 3 days of dodging rain and honey dos. The driver's seat went in fine but for some reason the pass side seat wouldn't work. Really not sure why it wouldn't work the first 20 times but it works great now???
Springs: 3.5" BDS
Well, they came in, not sure if they required digging the ore and forging them but they finally came in.
Got the front springs under it. The backs are still a flat unknown lift spring of some sort. The front is were the Jeep will sit, and the tires are close to the right size.
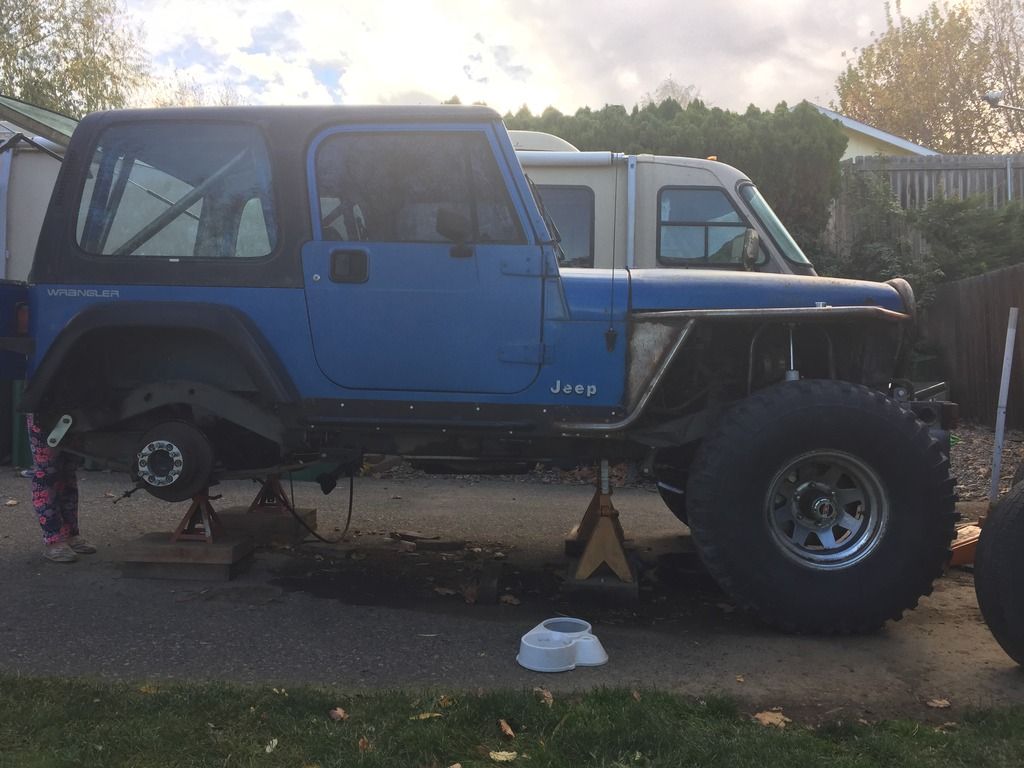
Off to the Rusty Ranch, some things are just easier on a lift.
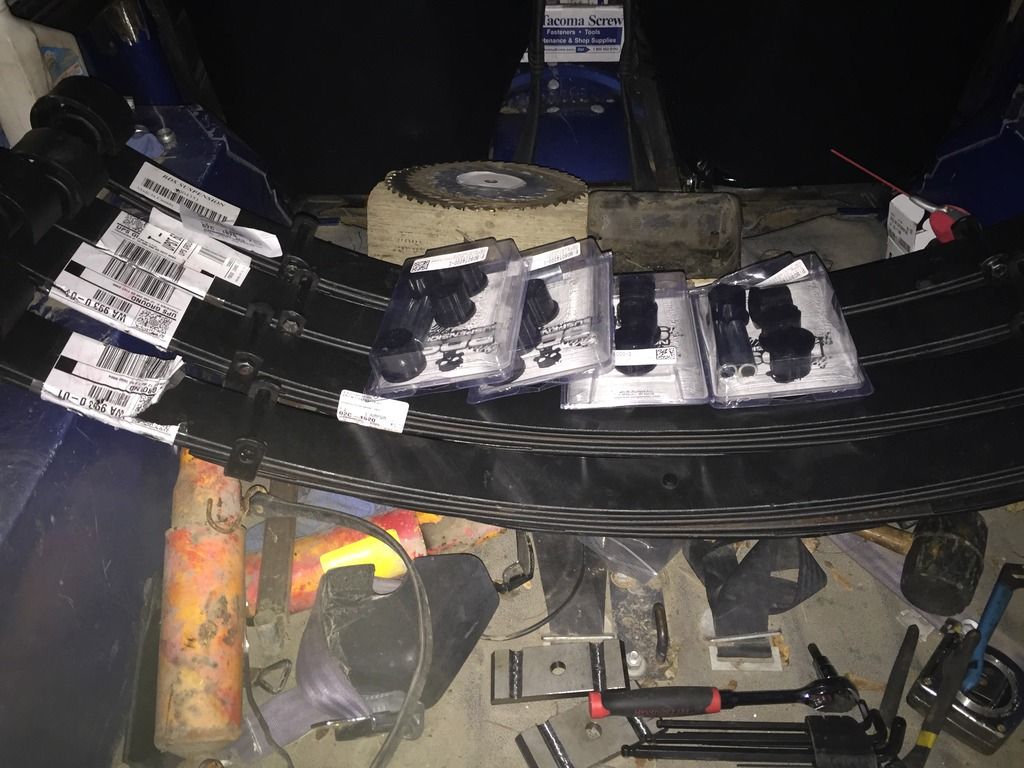
A little mail showed up.
Got a call to pick-up some more parts

Seats:
Standard PRPs mount to the rollcage but also with factory sliders. Somehow it took me about 3 days of dodging rain and honey dos. The driver's seat went in fine but for some reason the pass side seat wouldn't work. Really not sure why it wouldn't work the first 20 times but it works great now???

Springs: 3.5" BDS
Well, they came in, not sure if they required digging the ore and forging them but they finally came in.

Got the front springs under it. The backs are still a flat unknown lift spring of some sort. The front is were the Jeep will sit, and the tires are close to the right size.

Off to the Rusty Ranch, some things are just easier on a lift.

A little mail showed up.

Got a call to pick-up some more parts


James
'92 YJ with a little something of everything.
'92 YJ with a little something of everything.
Re: YJ mods, an on going thread.
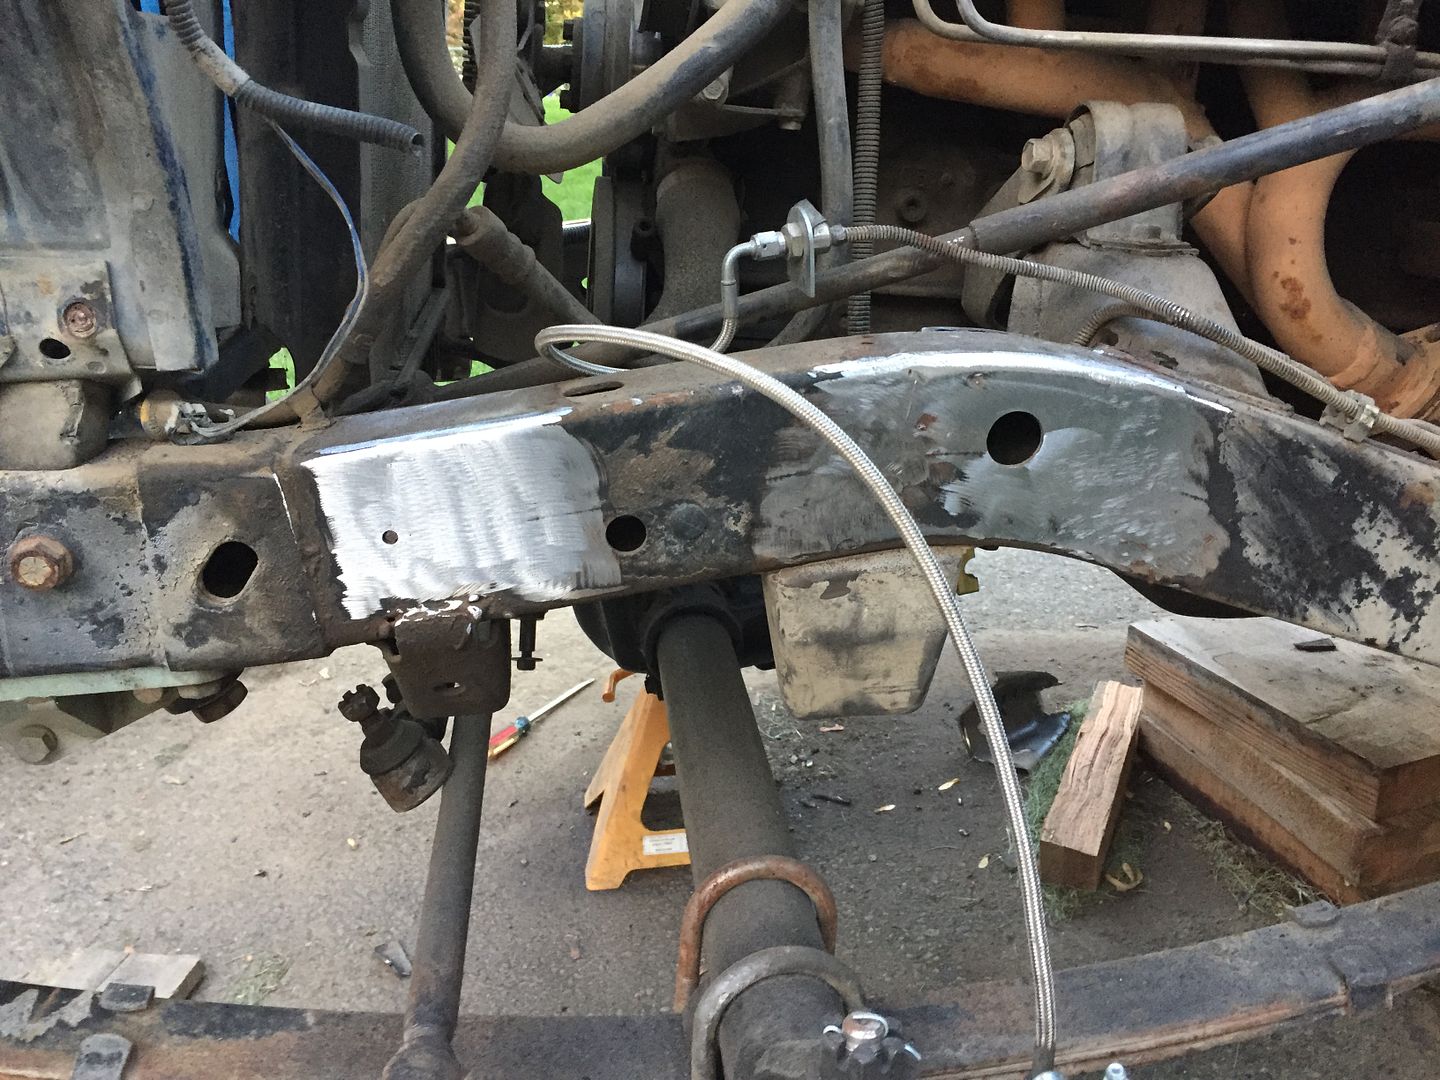
Today started off by cutting some brand new spring. The military wrap wasn't working with my setup and after some reading, also limits the spring a little. So out came the cutoff wheel and made short work of them.
Springs were install with the above shackles. Seems they provide a touch more lift then the 4" flat unknown brand. Spring perches were set and welded along with connecting up the brakes and blessing them.
Tried to use my fancy dancy new u-bolt plates buuuut, seems the brake line and brake mounting bolt didn't think it was a good idea, so back to flats plates under the spring, for now.
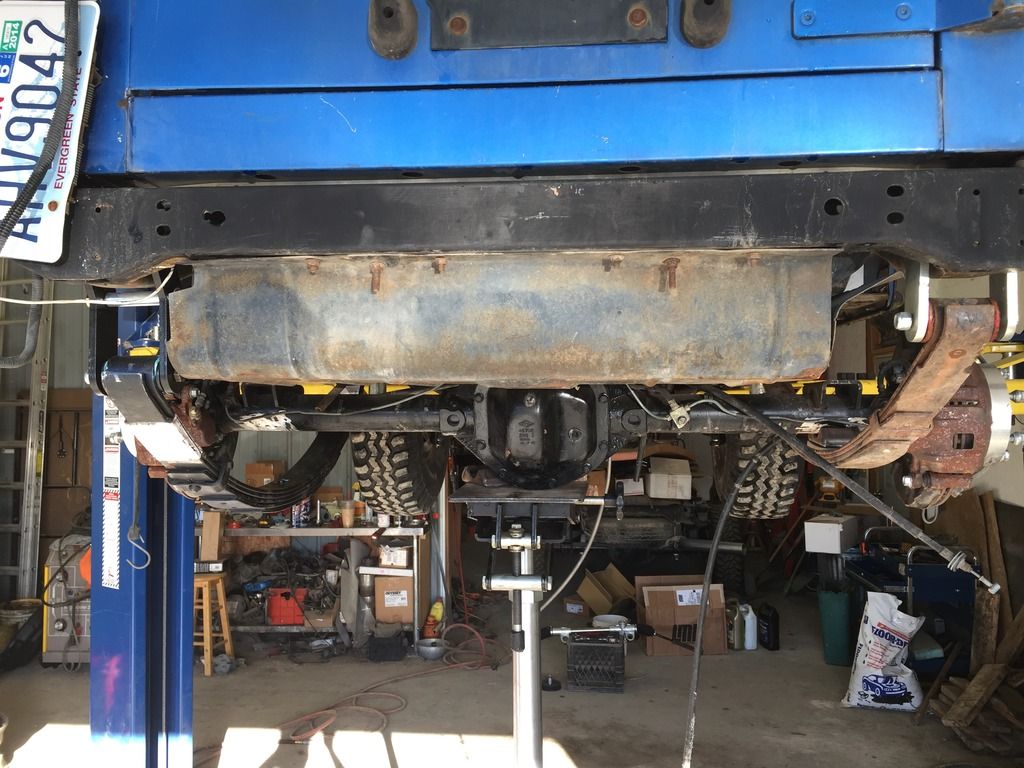
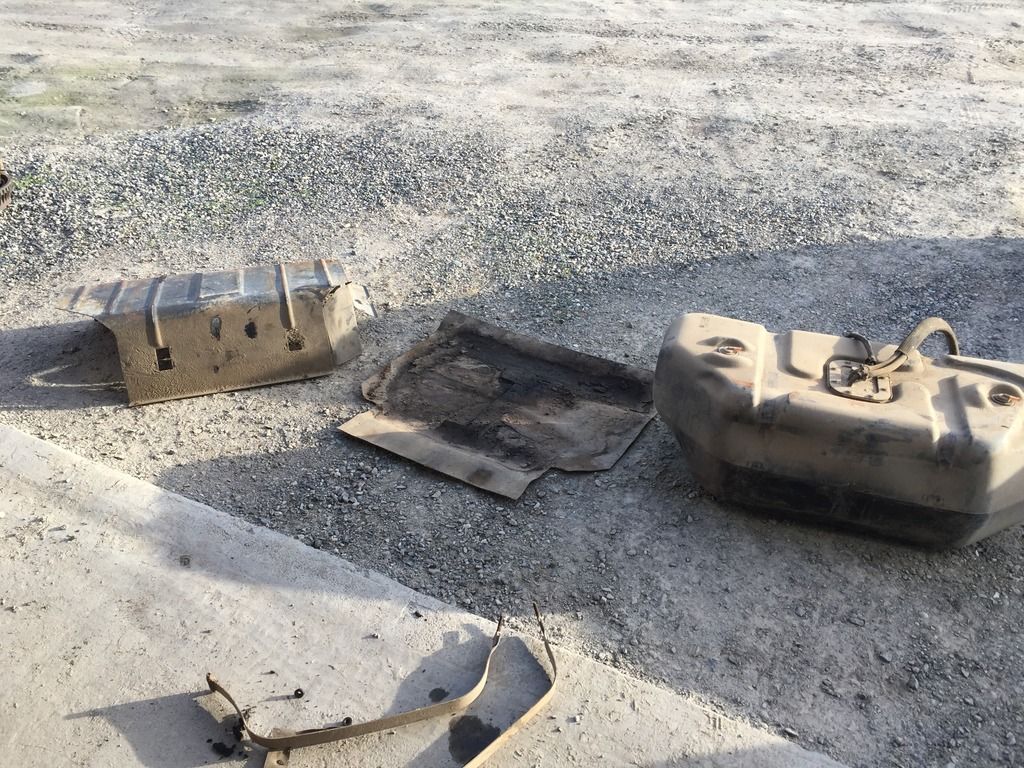
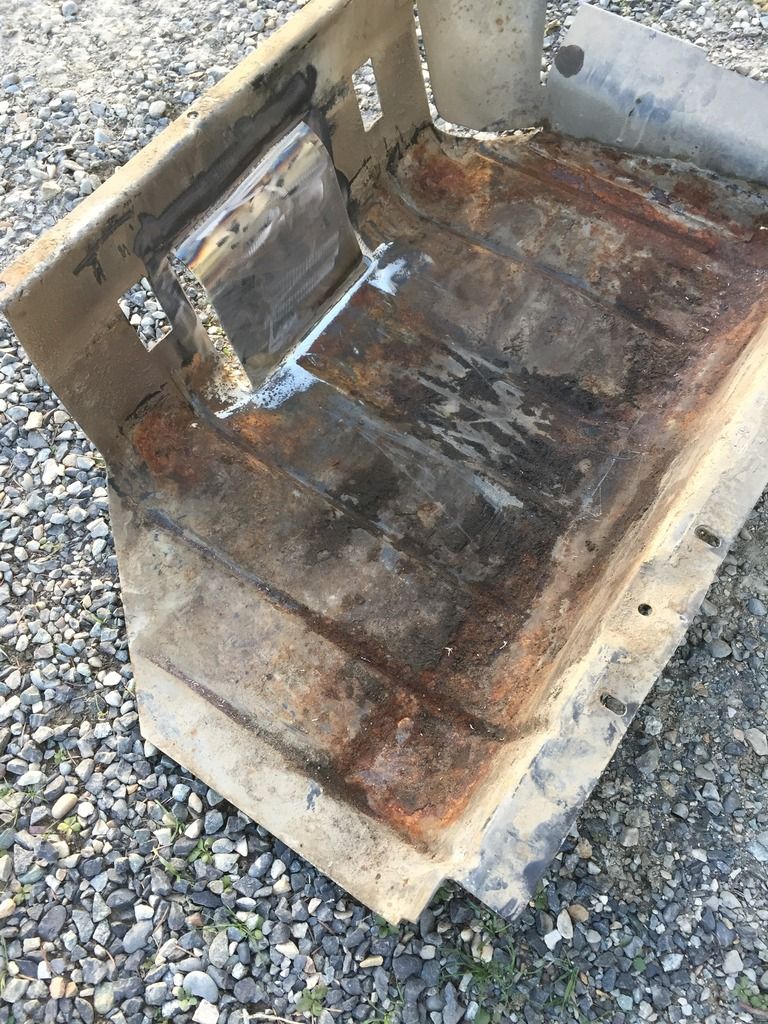
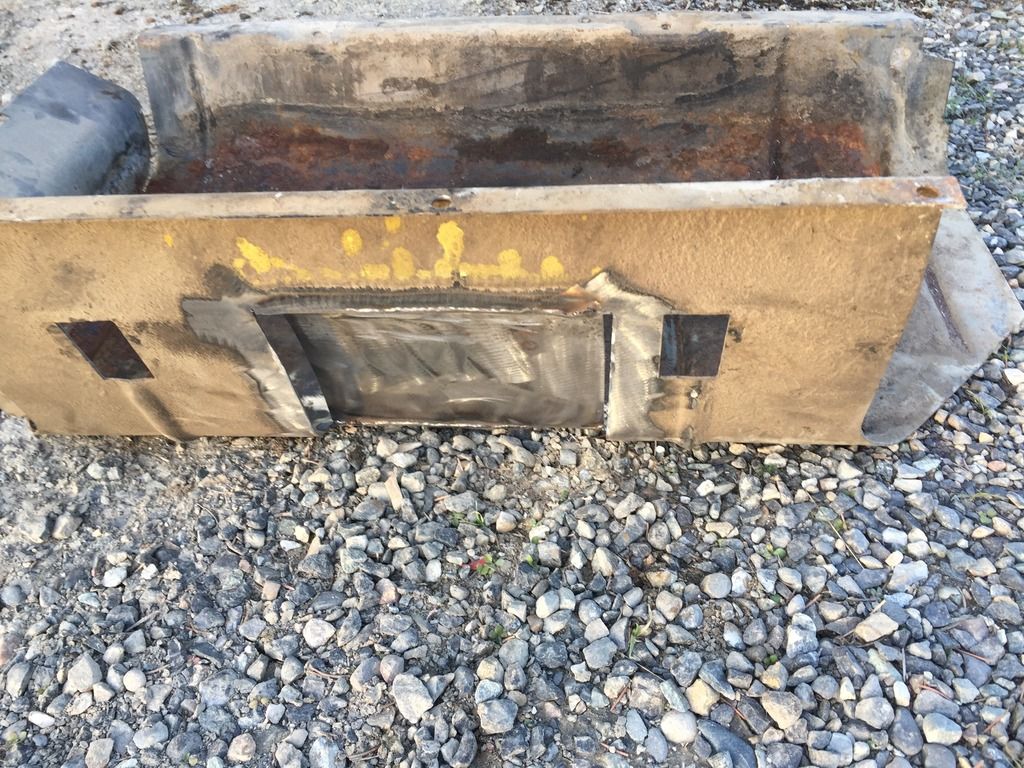
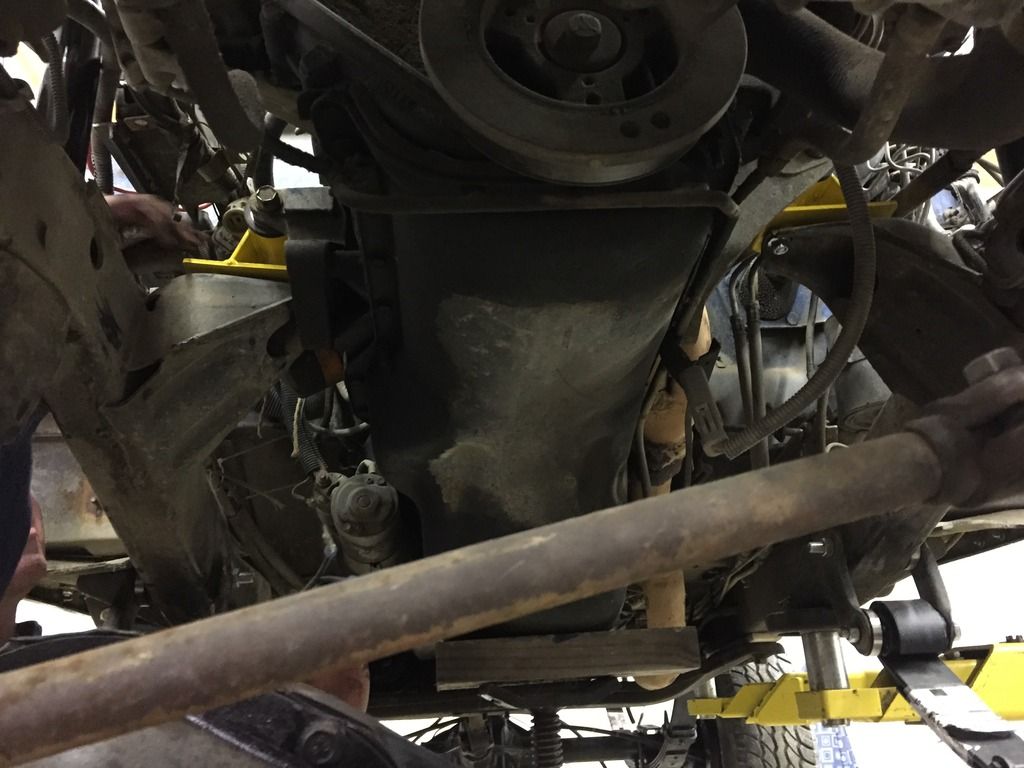
The rear was moved back about 1 1/2" and a D44 installed so, diff meet fuel tank, fuel tank meet diff. To fix this problem, there is a nice write up on Pirate about clearencing the skid and tank. So the skid was cut, rewelded, tank was heated, and pushed back together. This should give the extra space needed.
And Brown Santa showed up today.

Springs were install with the above shackles. Seems they provide a touch more lift then the 4" flat unknown brand. Spring perches were set and welded along with connecting up the brakes and blessing them.

Tried to use my fancy dancy new u-bolt plates buuuut, seems the brake line and brake mounting bolt didn't think it was a good idea, so back to flats plates under the spring, for now.

The rear was moved back about 1 1/2" and a D44 installed so, diff meet fuel tank, fuel tank meet diff. To fix this problem, there is a nice write up on Pirate about clearencing the skid and tank. So the skid was cut, rewelded, tank was heated, and pushed back together. This should give the extra space needed.


And Brown Santa showed up today.


James
'92 YJ with a little something of everything.
'92 YJ with a little something of everything.
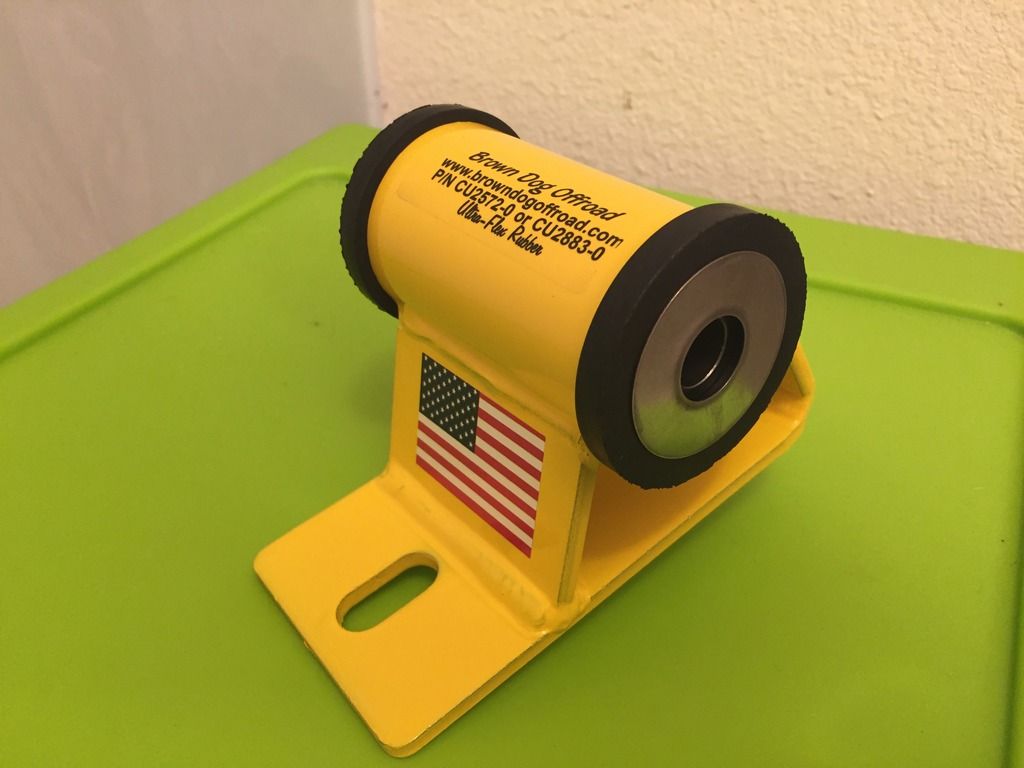
Re: YJ mods, an on going thread.
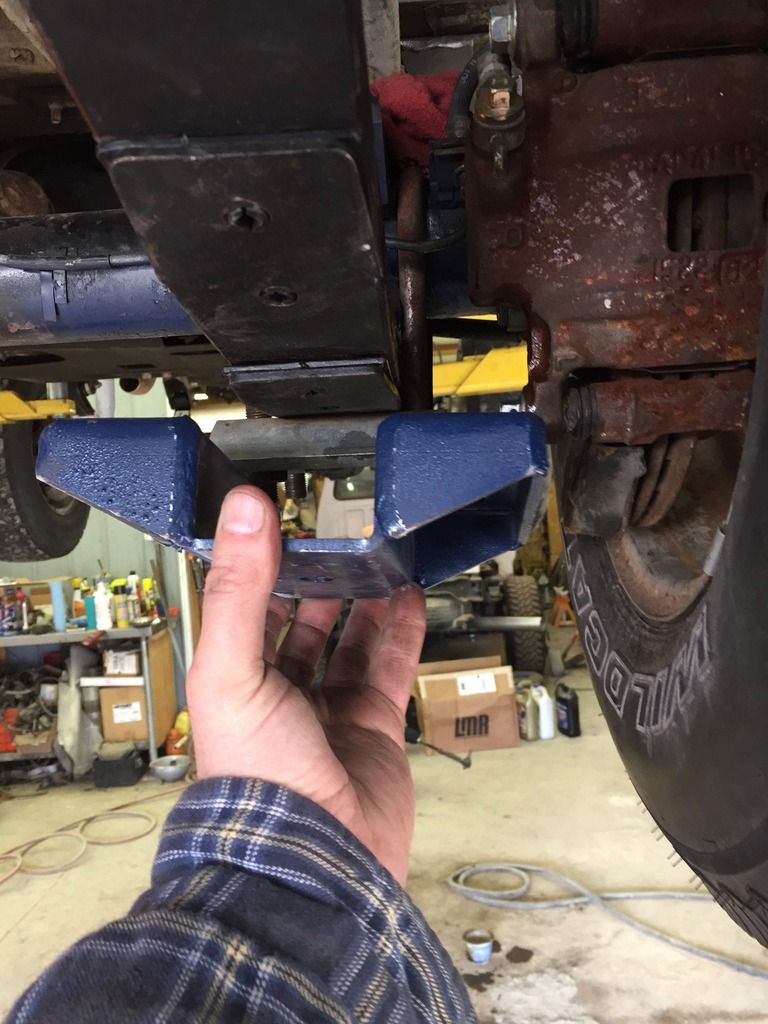
Hmmmm, guess they weren't happy
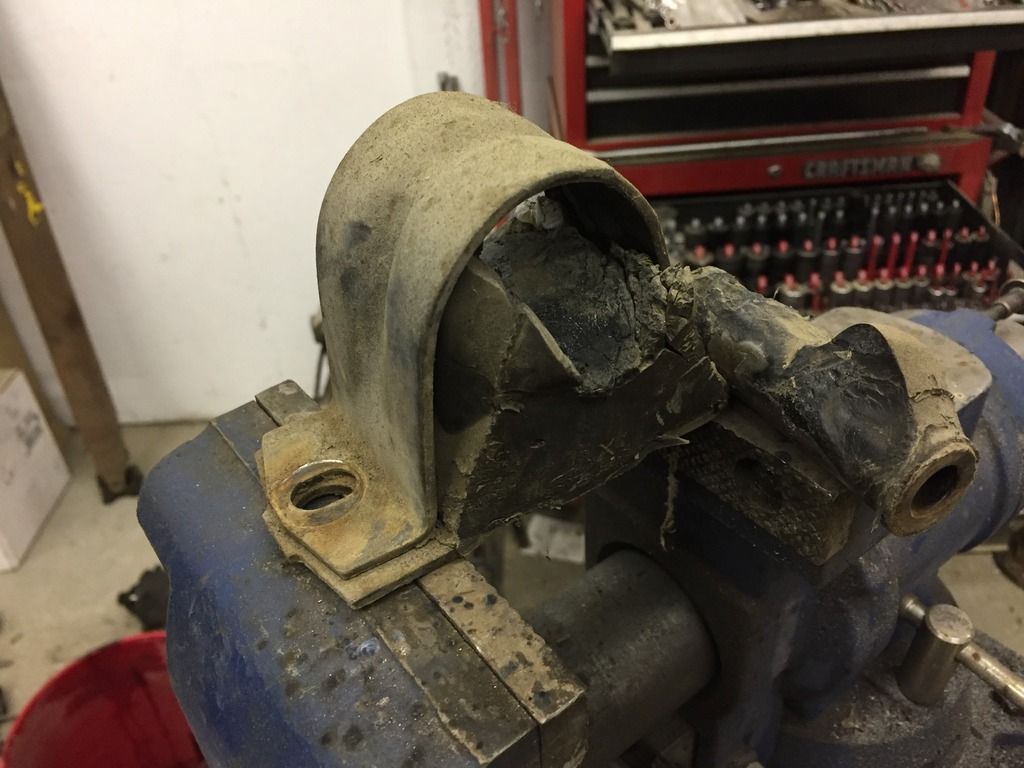
So a happy little set of Brown Dog mounts took their place.
Correct yokes replaced the existing, a driveshaft hooked up.
All suspension and body tie-in bolts were replaced with new.
Some fresh fuel, a battery, and nothing but starter. A few checks around the engine compartment and everything should be good except the humming sound outback. So jumpers and a little tap tap tap, the fuel pump started working again.
It does starts and moves on it own. Some steering mods along with some resealing needs but closer.

So a happy little set of Brown Dog mounts took their place.

Correct yokes replaced the existing, a driveshaft hooked up.
All suspension and body tie-in bolts were replaced with new.
Some fresh fuel, a battery, and nothing but starter. A few checks around the engine compartment and everything should be good except the humming sound outback. So jumpers and a little tap tap tap, the fuel pump started working again.
It does starts and moves on it own. Some steering mods along with some resealing needs but closer.
James
'92 YJ with a little something of everything.
'92 YJ with a little something of everything.
Re: YJ mods, an on going thread.
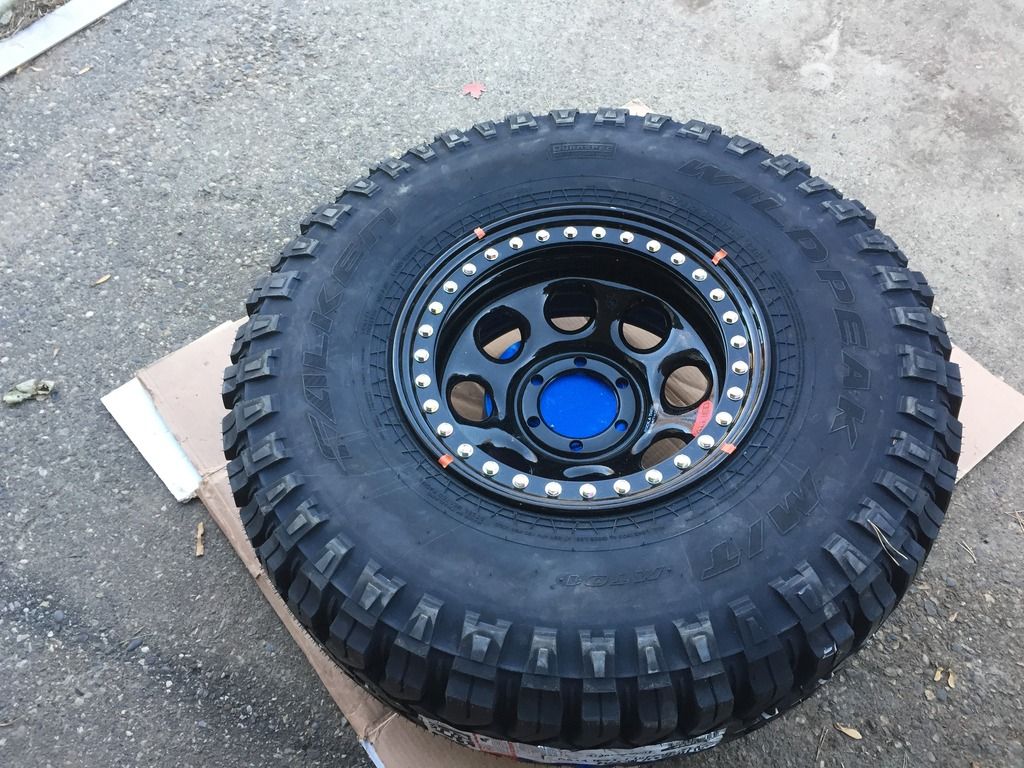
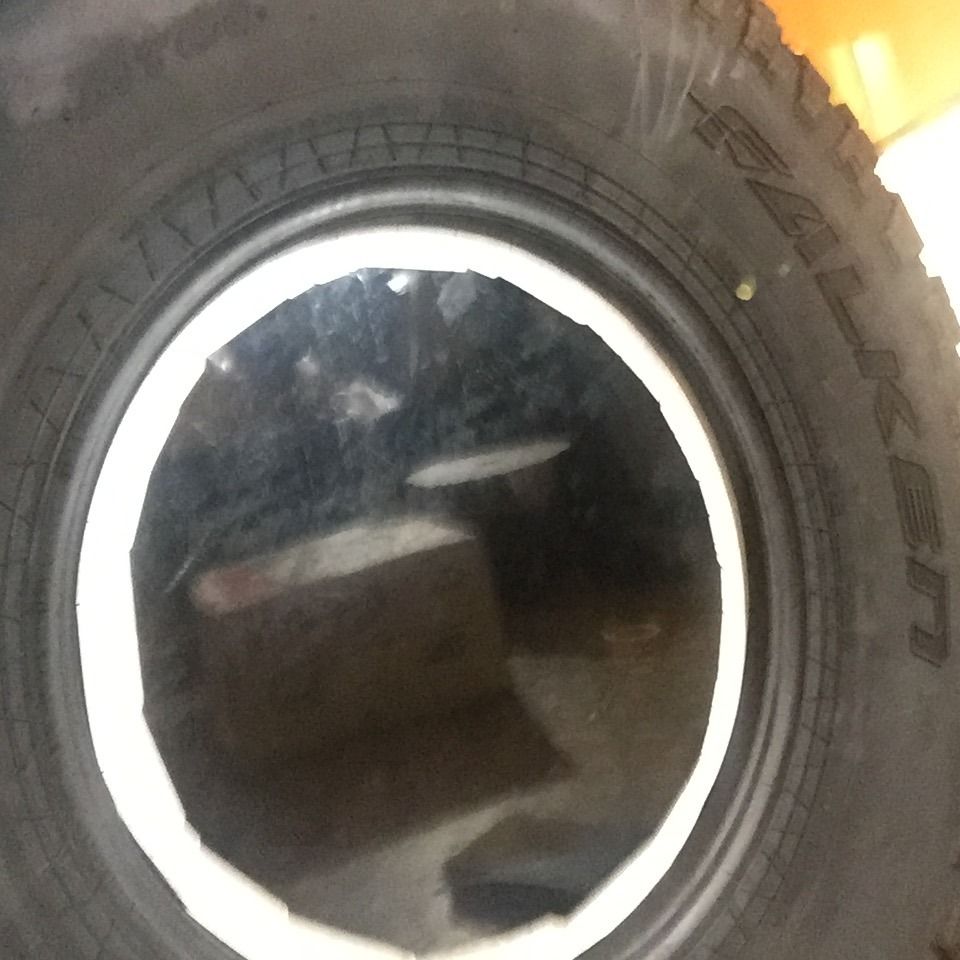
Adventures in beadlocks.
Must say that I've never had or mounted beadlocks before but watched a couple videos, just not the same.
First thing, soapy water is your friend.
I also believe in the spacer. The spacer give the bolts something to tighten up against, rather than hanging out waiting to break. My personal thoughts.
At first I just tried to put a tire on the rim, no soap, just dry. Well the Falkens seem to be very sticky and no matter how hard I pushed jumped or wiggled it wouldn't go.
(Yes the plastic was off)
After measuring the Falken Beads at .800", I ordered some spacers from Raceline, which are 1/8" thick.
So after mixing up some soap and water, the tire slipped right on. Not thinking, threw the spacers on and started on the front bolts. Well, as you tighten the bolts the clamping ring will center the tire, if it can slip. What I ended up with was, not using soap, was a tire that didn't center or come close to clamping down on the spacers, but looks cool.
As a side note, placing tape (orange marks) help keep track of where you are while tightening the 32 bolts.
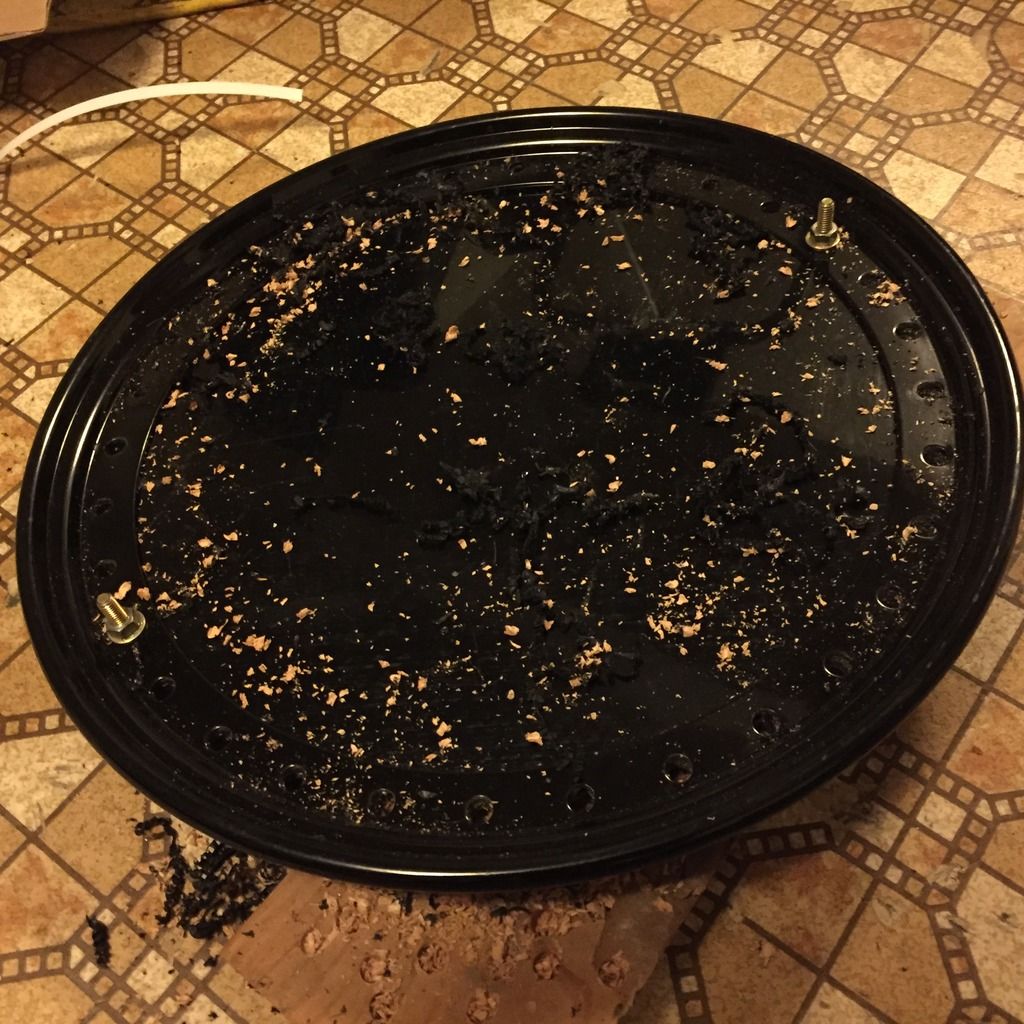
At this time I was think that I really messed up because the Raceline steel rims don't have a centering ring. Ok well, let's stop by the machine shop and get some 3/16 Al cut for spacers, $400 to have rims waterjeted out, little above my budget at his time, and again $400 Al beadlock don't look so bad now.
A stop at the local plastic shop yeilded a 4x4x3/16 price of PVC.
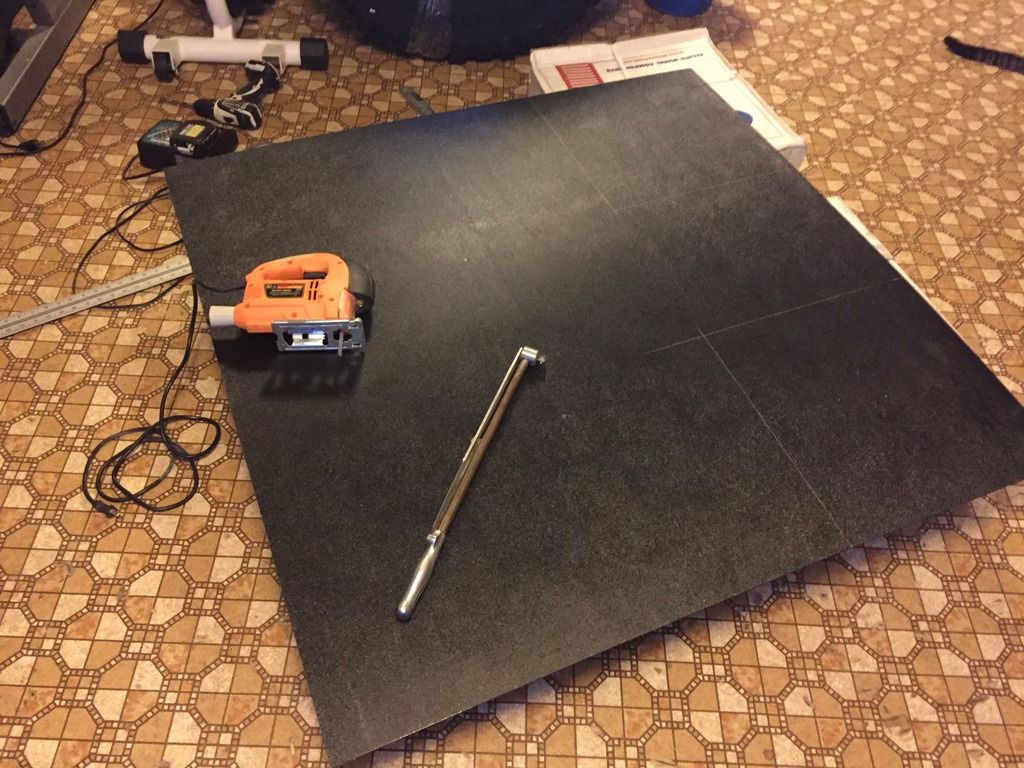
Well, the paper template didn't work as well has I'd hoped but eventually they did. Probably should have had the machine shop waterjet them out.
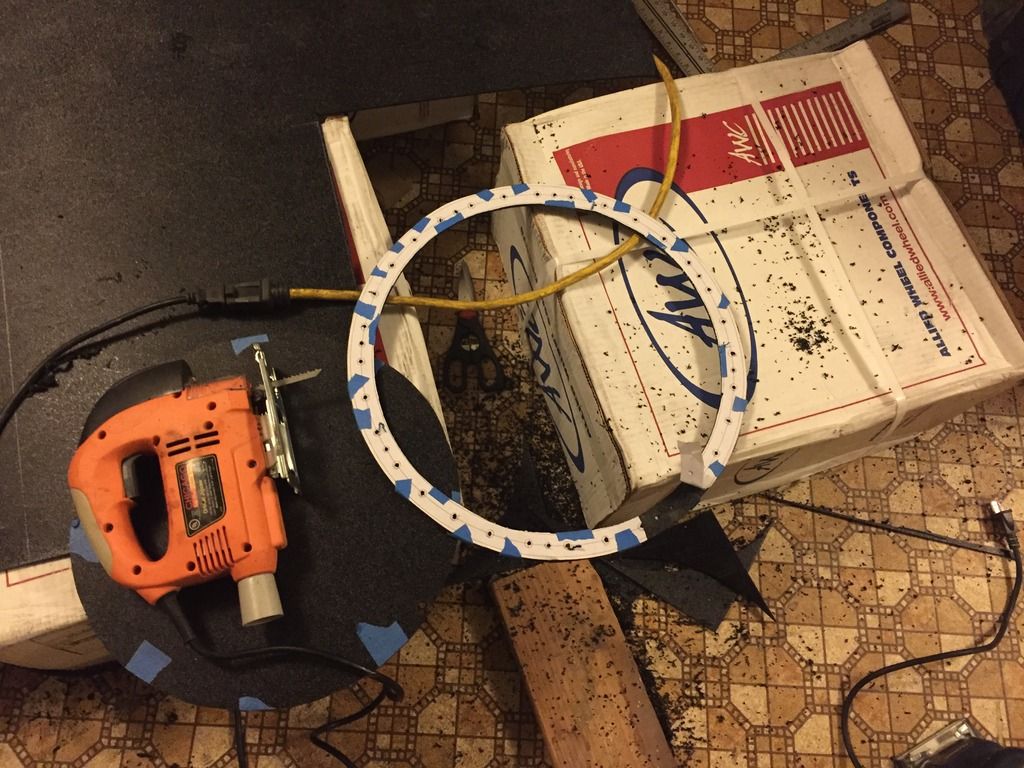
Cutting a circle out with a jigsaw, definitely not something I'm good at but did find that getting the shape close, taping the edge, placing the plastic inside the tire, then using the tire bead as a template worked much better.
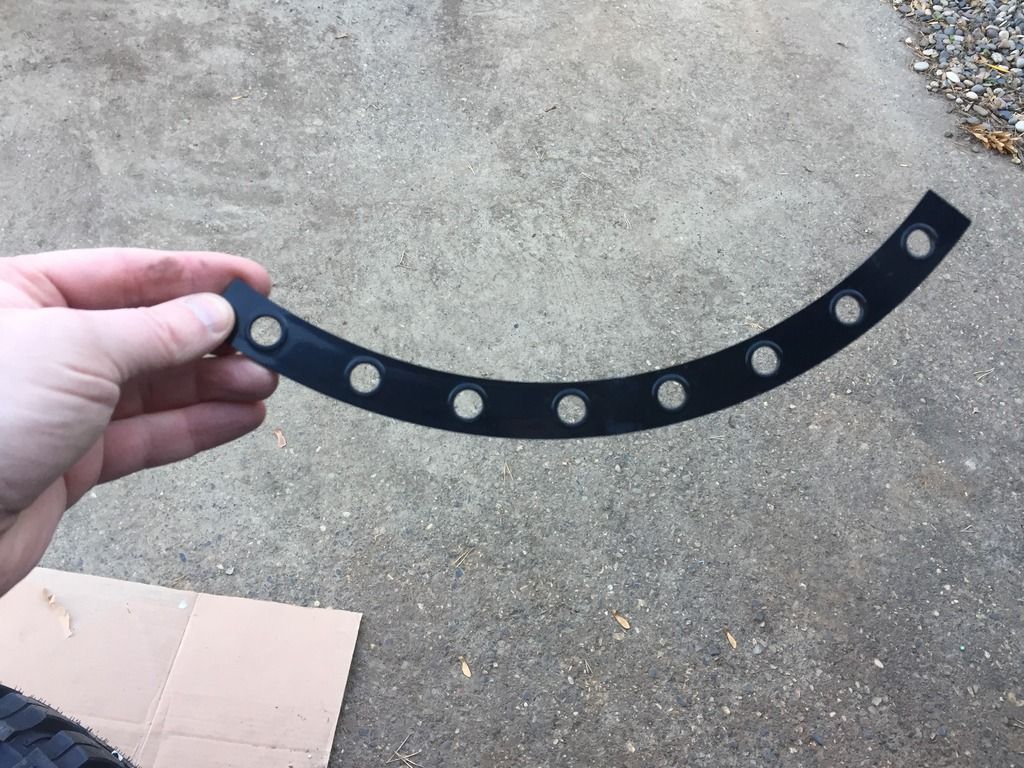
Drilled two holes in the spacer from the template then bolted it to a clamping ring, yes the paint was sacrificed on one ring to drill the other holes.
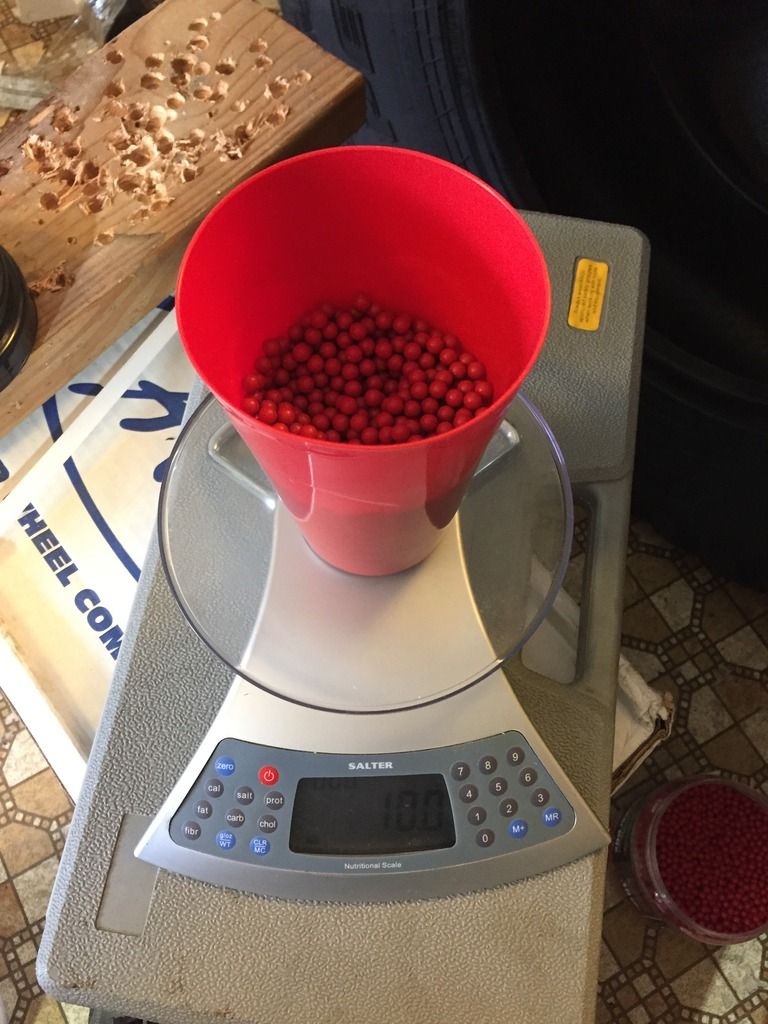
The new 3/16" spacers were added along with 10oz of air soft pellets.
As for tightening this and lots of soap. As we learned earlier, rubber slides much easier with soap. With the soap, the clamping rigs center as it was tightening down with about 4 rounds, then another round with a torque wrench to 15ft pounds.
Don't forget to use a strong enough bucket.
After getting everything mocked up on one rim and tire, I had things sit for a few days, yes this is in the basement so it can be done in comfort when it's 10 deg outside weather.
Weeeeell, the dog decide she was bored and took off with not only a bag of bolts but also all the valve stems. Luckily she only made it out the door before tearing into the bolts, found them all. The valve stems, well not so lucky with 12" of snow on the ground but Firestone was nice enough to supply the needed parts.
Lessons learned:
Soap
Strong bucket
3/16 is probably about the thinnest spacer that should used on steel Raceline and .800 beads. I'd guess I could have ordered another set of 1/8 factory parts and been fine with up to a 1/4" spacer.
And beadlock take time, even with power tools there is a bit of time wrapped up in mounting each tire.
Setting the bead at 10# scares the hell out of the wife upstairs.
My experience, yours maybe be different.
Must say that I've never had or mounted beadlocks before but watched a couple videos, just not the same.
First thing, soapy water is your friend.
I also believe in the spacer. The spacer give the bolts something to tighten up against, rather than hanging out waiting to break. My personal thoughts.
At first I just tried to put a tire on the rim, no soap, just dry. Well the Falkens seem to be very sticky and no matter how hard I pushed jumped or wiggled it wouldn't go.
(Yes the plastic was off)

After measuring the Falken Beads at .800", I ordered some spacers from Raceline, which are 1/8" thick.

So after mixing up some soap and water, the tire slipped right on. Not thinking, threw the spacers on and started on the front bolts. Well, as you tighten the bolts the clamping ring will center the tire, if it can slip. What I ended up with was, not using soap, was a tire that didn't center or come close to clamping down on the spacers, but looks cool.
As a side note, placing tape (orange marks) help keep track of where you are while tightening the 32 bolts.

At this time I was think that I really messed up because the Raceline steel rims don't have a centering ring. Ok well, let's stop by the machine shop and get some 3/16 Al cut for spacers, $400 to have rims waterjeted out, little above my budget at his time, and again $400 Al beadlock don't look so bad now.
A stop at the local plastic shop yeilded a 4x4x3/16 price of PVC.

Well, the paper template didn't work as well has I'd hoped but eventually they did. Probably should have had the machine shop waterjet them out.

Cutting a circle out with a jigsaw, definitely not something I'm good at but did find that getting the shape close, taping the edge, placing the plastic inside the tire, then using the tire bead as a template worked much better.

Drilled two holes in the spacer from the template then bolted it to a clamping ring, yes the paint was sacrificed on one ring to drill the other holes.

The new 3/16" spacers were added along with 10oz of air soft pellets.

As for tightening this and lots of soap. As we learned earlier, rubber slides much easier with soap. With the soap, the clamping rigs center as it was tightening down with about 4 rounds, then another round with a torque wrench to 15ft pounds.

Don't forget to use a strong enough bucket.

After getting everything mocked up on one rim and tire, I had things sit for a few days, yes this is in the basement so it can be done in comfort when it's 10 deg outside weather.
Weeeeell, the dog decide she was bored and took off with not only a bag of bolts but also all the valve stems. Luckily she only made it out the door before tearing into the bolts, found them all. The valve stems, well not so lucky with 12" of snow on the ground but Firestone was nice enough to supply the needed parts.

Lessons learned:
Soap
Strong bucket
3/16 is probably about the thinnest spacer that should used on steel Raceline and .800 beads. I'd guess I could have ordered another set of 1/8 factory parts and been fine with up to a 1/4" spacer.
And beadlock take time, even with power tools there is a bit of time wrapped up in mounting each tire.
Setting the bead at 10# scares the hell out of the wife upstairs.
My experience, yours maybe be different.
James
'92 YJ with a little something of everything.
'92 YJ with a little something of everything.
Re: YJ mods, an on going thread.
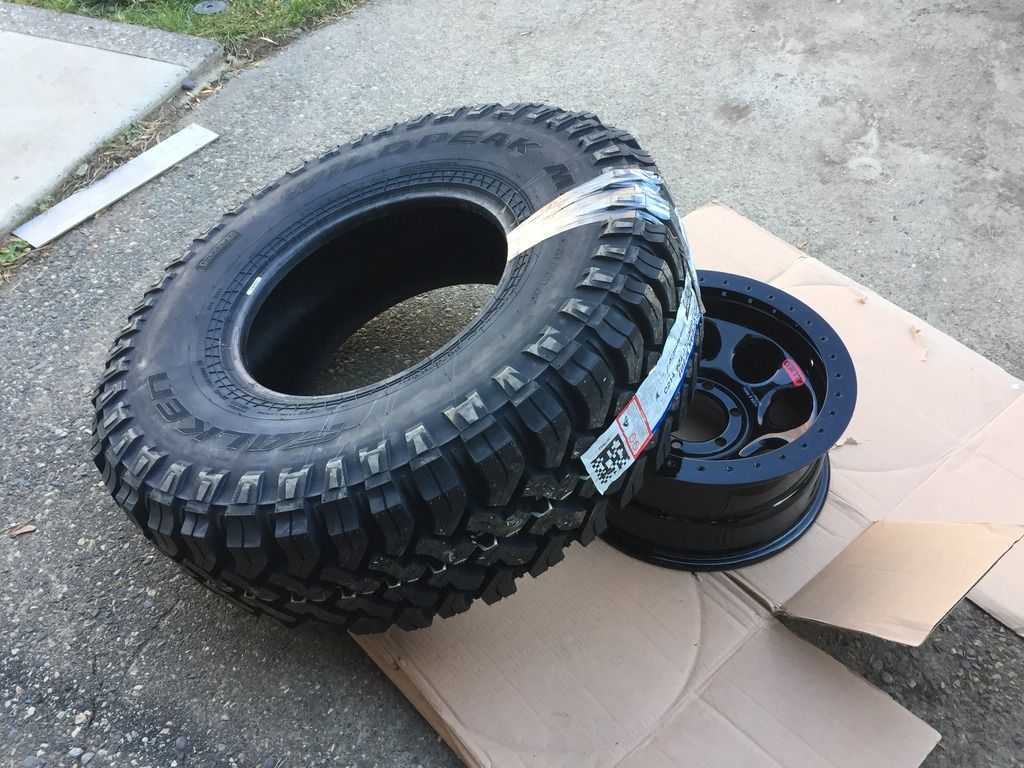
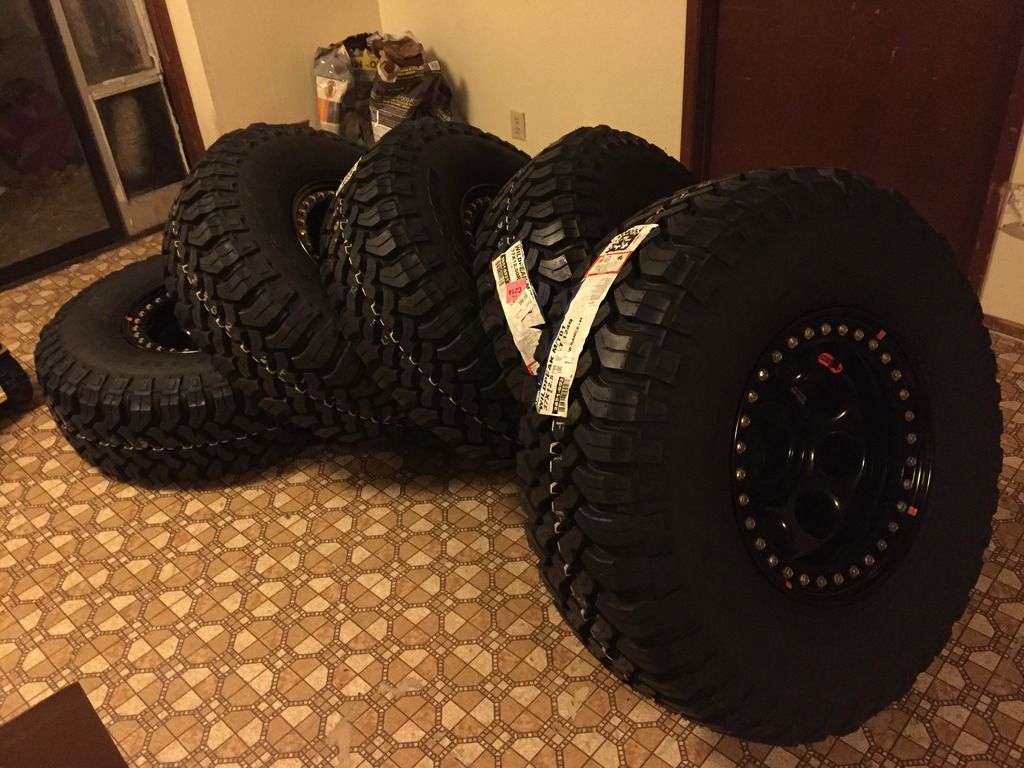
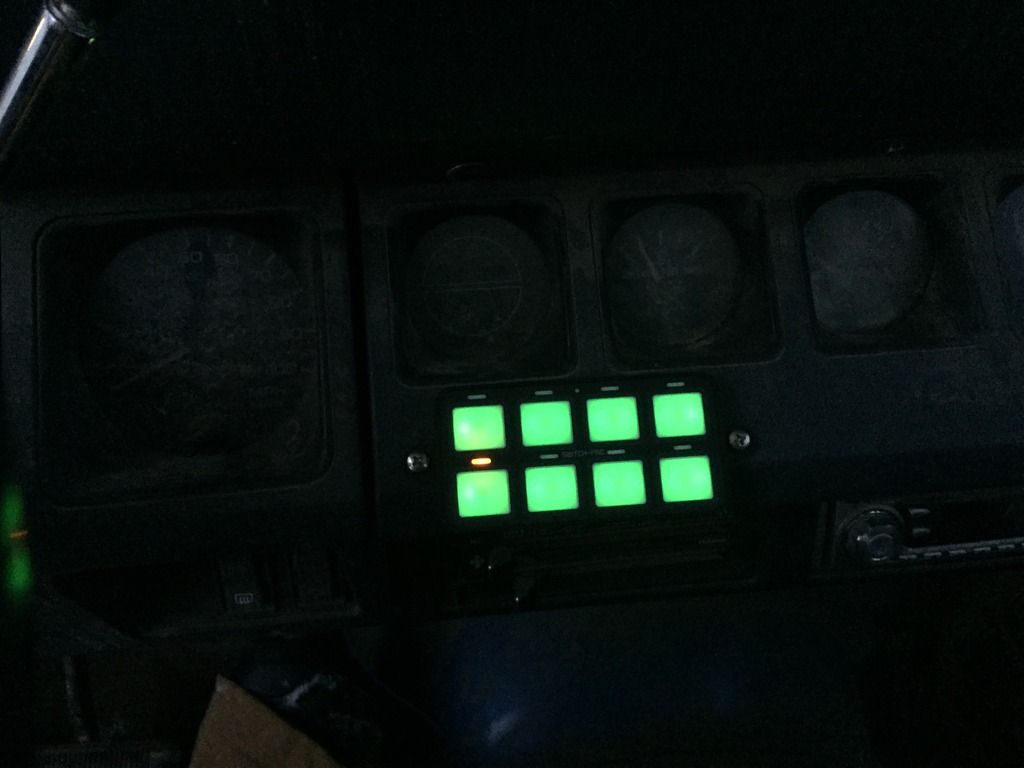
Finally got a chance to get back out to the Jeep. It's at the Rusty Ranch were a friend is doing some wiring work for me and this trip was for a switch-pro and some new shoes.
The Switch-pro makes for a very nice clean install of switches. You can use your phone to control it and other things but I just liked it because there isn't a bank of relay and switches across the dash, everything is in a nice tight package.
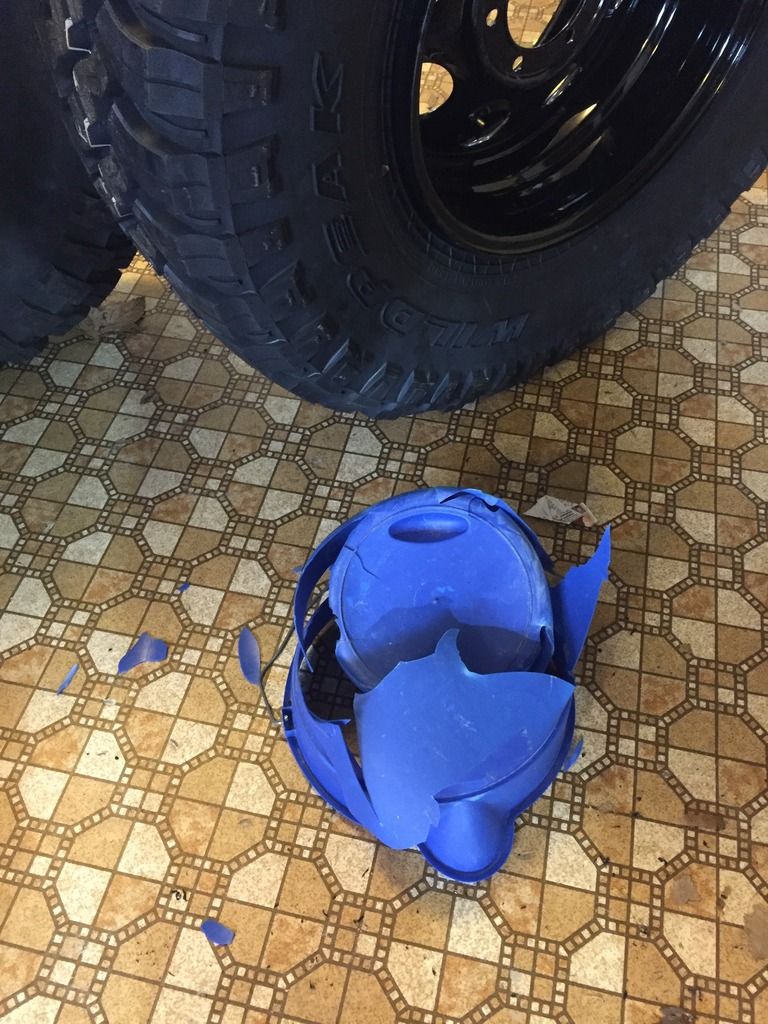
You can almost see, the buttons are mounted just below the gauges, yes, that piece of plastic became useful. After looking, might have to change to a black screw but it works for now.
And new shoes, OK, a bunch of poser shots.

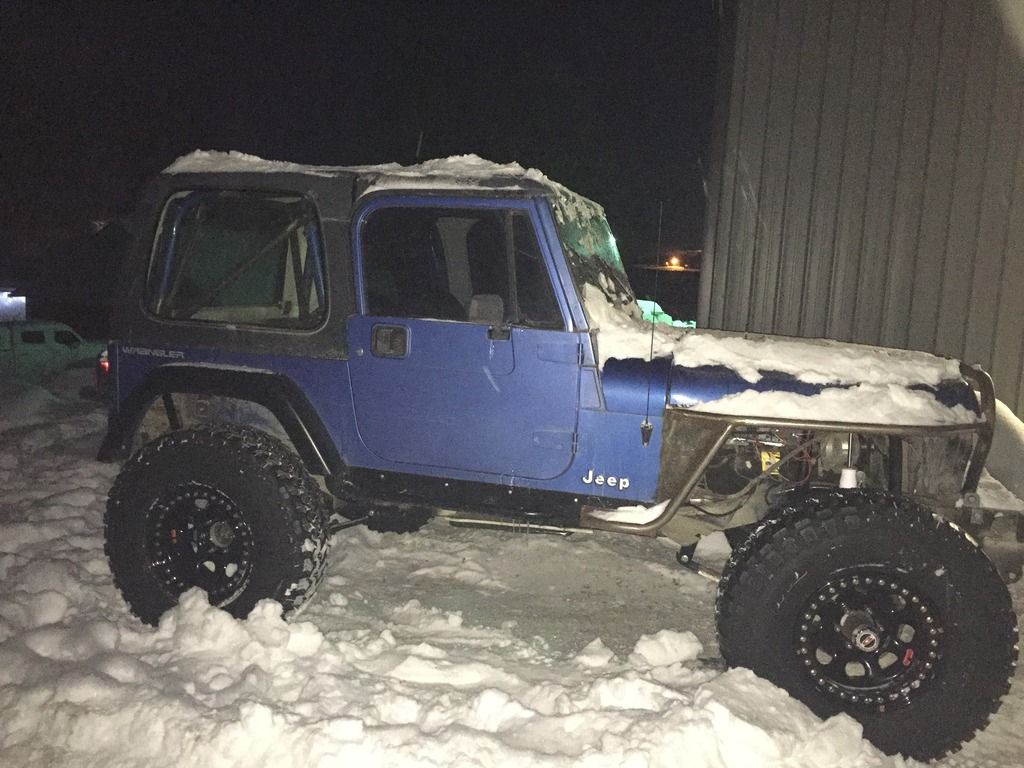
If the rear wheel drive, still waiting on the front driveshaft, spin around the Rusty ranch is any indication on how well the Jeep and tires work, I'm going to be one happy camper.
The Switch-pro makes for a very nice clean install of switches. You can use your phone to control it and other things but I just liked it because there isn't a bank of relay and switches across the dash, everything is in a nice tight package.
You can almost see, the buttons are mounted just below the gauges, yes, that piece of plastic became useful. After looking, might have to change to a black screw but it works for now.

And new shoes, OK, a bunch of poser shots.


If the rear wheel drive, still waiting on the front driveshaft, spin around the Rusty ranch is any indication on how well the Jeep and tires work, I'm going to be one happy camper.
James
'92 YJ with a little something of everything.
'92 YJ with a little something of everything.
Re: YJ mods, an on going thread.
Still trying to get some last minute things buttoned up, one being the brakes. Yes, the brakes work but are anything but impressive. The setup is stock single diaphragm booster, 75 T-bird master (disk fr & rr), 1/2 ton Chevy disks up front, Isuzu Rodeo rear disks, and a gutted proportioning valve.
There is a bit of a miss match with the Master being 1 1/8" piston, which match the front but the backs are made for a 1" master.
My main problem is the rear disks don't seem to work great, front lock but in low range the rears barely work and forget about low/low.
Solution? Not sure there is a single one but have a plan, if you see something I missed, feel free to add.
Phase 1: double diaphragm booster. This was a very rare 95 option in YJs but happen to come across one out of a cherocar, nothing else bolted, why should this be different.
Phase 2: get rid of the Isuzu rubber brake lines. Little hard to find but a few companies make braided sst flex lines for that rearend. Might also swap drop sides, at this point Jeep and Isuzu are on opposite sides making a very long drop to connect the axle.
Phase3: New master with a 1 1/16" bore. At this time a 98 Durango is the top candidate.
Eventually an adjustable proportioning valve. Doesn't affect any of the above but will help tune everything if the brake system is working correctly.
James
'92 YJ with a little something of everything.
'92 YJ with a little something of everything.
Re: YJ mods, an on going thread.
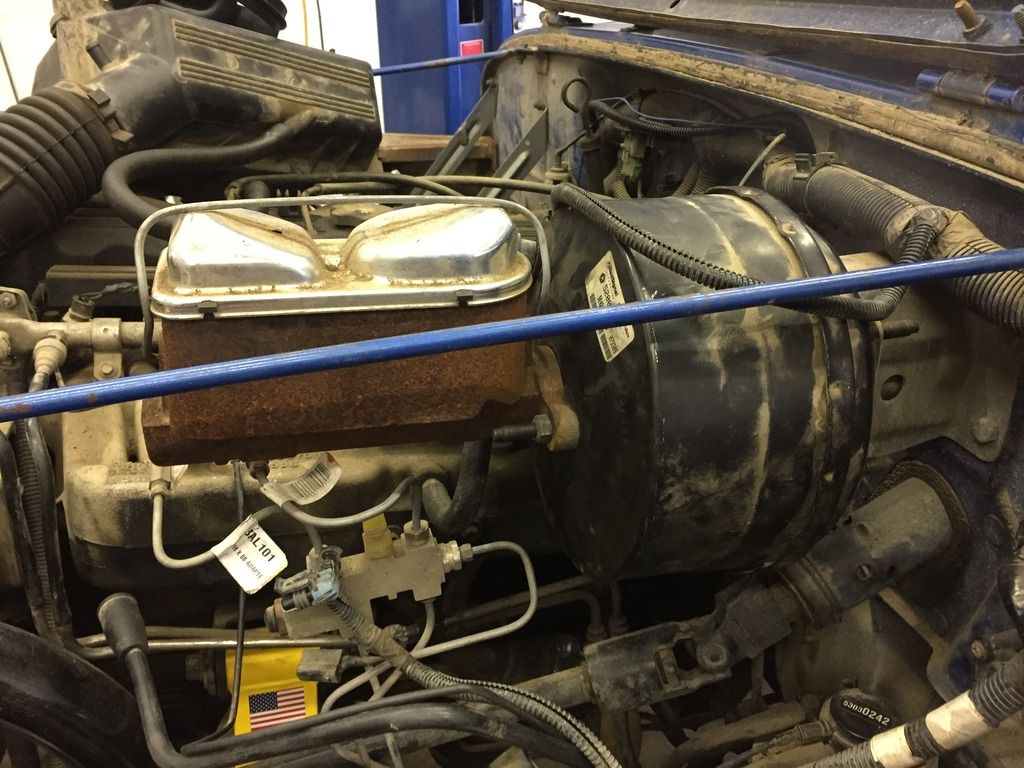
Double diaphragm booster from a cherocar to YJ, yea, didn't quite understand everything on the write-up, but much clearer now.
First, obvious thing, the length to connect the pedal, and connection hole.
Cherocar
YJ
End of the YJ shaft was cut and placed into a sleeve bored from both ends. Yes the YJ shaft is 1/2" vs the cherocar at 3/8"
If you noticed, the cherocar mounting bolts were larger than the YJ's.
Didn't measure but we drilled out to over 3/8" to fit the new booster. That would leave the YJ's in the 5/16" or 8mm range.
The funny part is it's the opposite for the master mount side. Why????
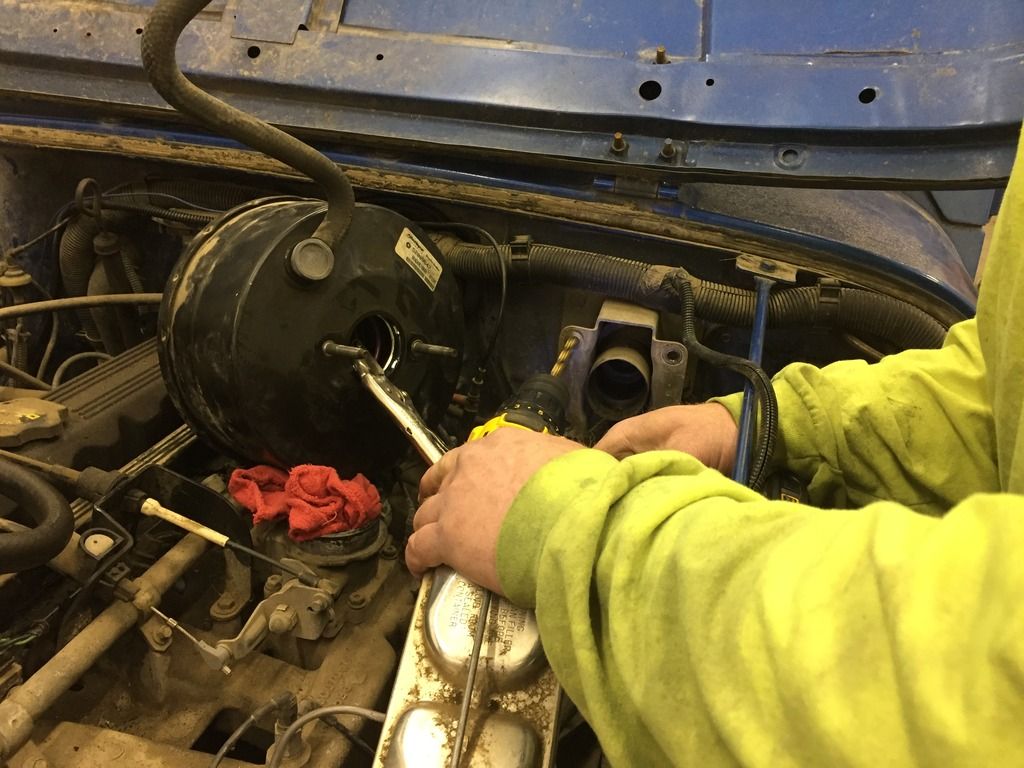
And the next issue, length of booster to master bolt. Didn't have any 1/4-28 bolts so this put a stop to things for the night.
YJ sticks out.
Cherocar is recessed.
Thinking an extra long 1/4-28 bolt with a ground down head should work.
Or a coupler nut and stud, we'll see what shows up at the bolt bin.
First, obvious thing, the length to connect the pedal, and connection hole.

Cherocar

YJ

End of the YJ shaft was cut and placed into a sleeve bored from both ends. Yes the YJ shaft is 1/2" vs the cherocar at 3/8"

If you noticed, the cherocar mounting bolts were larger than the YJ's.
Didn't measure but we drilled out to over 3/8" to fit the new booster. That would leave the YJ's in the 5/16" or 8mm range.
The funny part is it's the opposite for the master mount side. Why????

And the next issue, length of booster to master bolt. Didn't have any 1/4-28 bolts so this put a stop to things for the night.
YJ sticks out.

Cherocar is recessed.

Thinking an extra long 1/4-28 bolt with a ground down head should work.
Or a coupler nut and stud, we'll see what shows up at the bolt bin.
James
'92 YJ with a little something of everything.
'92 YJ with a little something of everything.
Re: YJ mods, an on going thread.
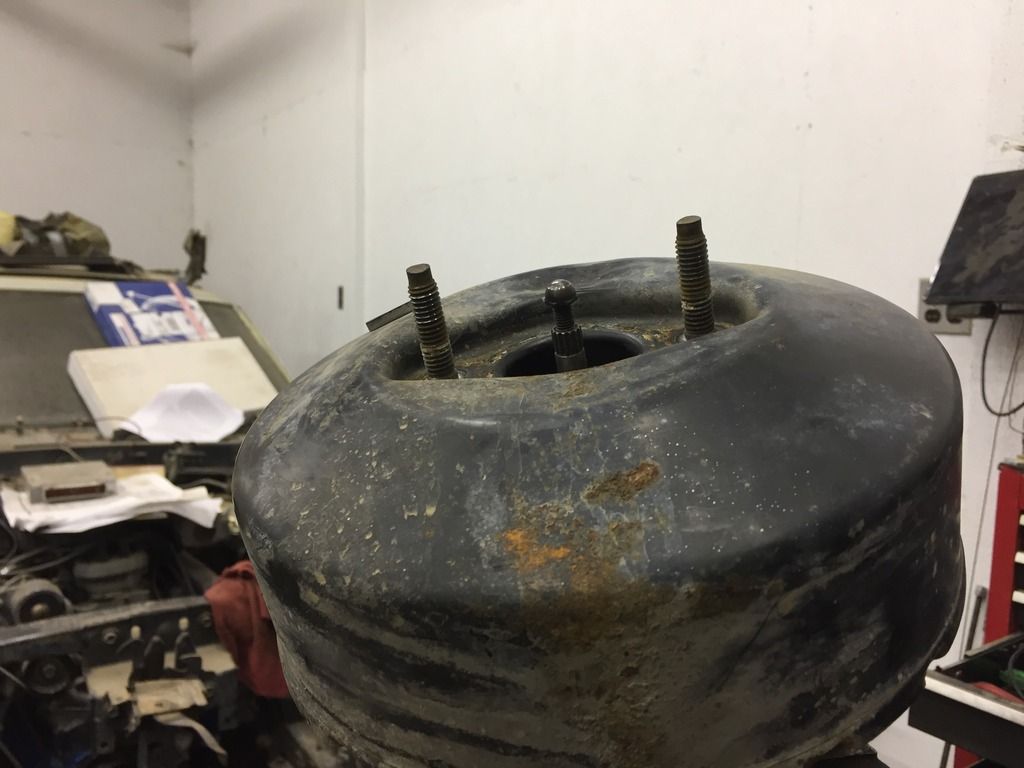
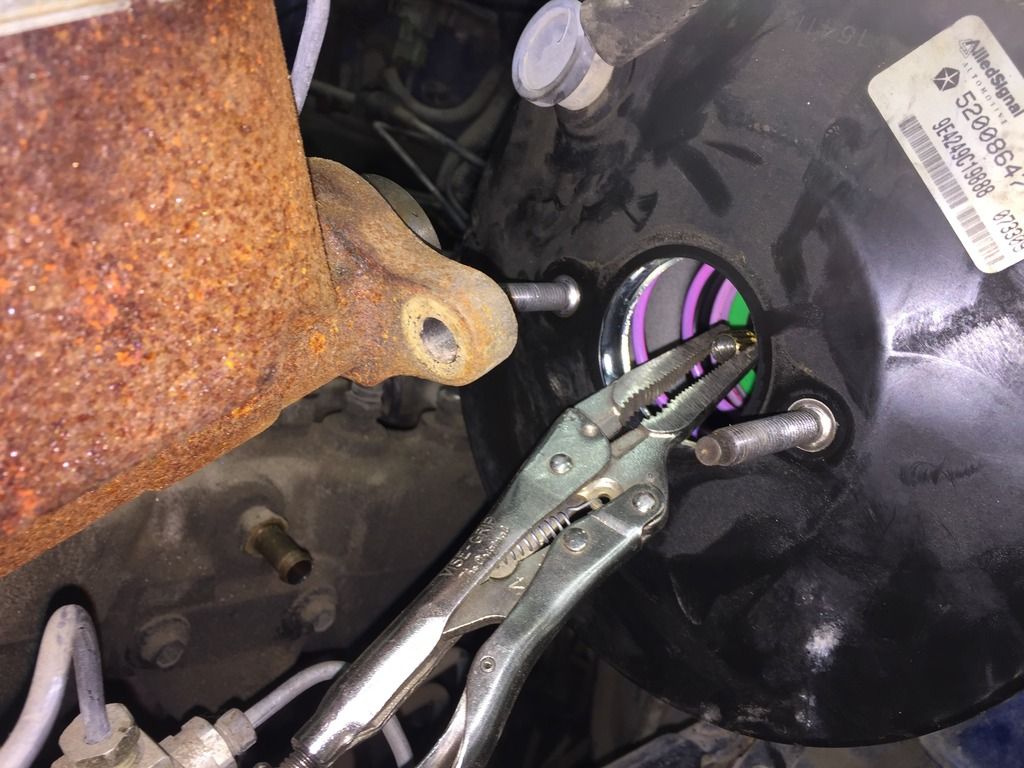
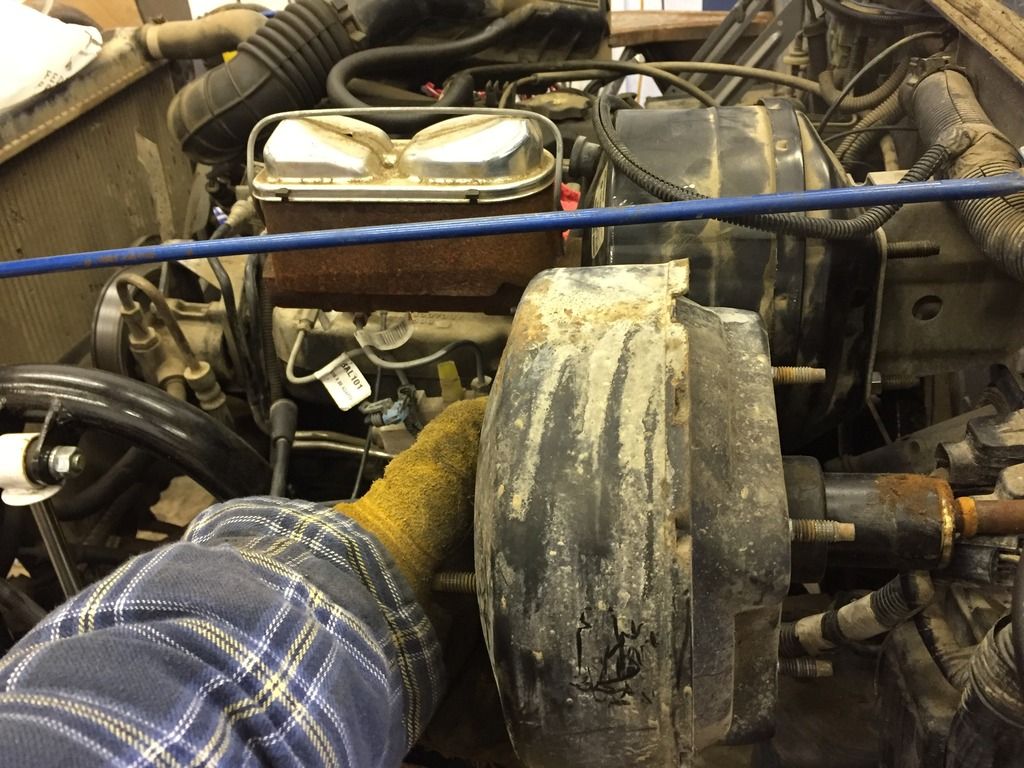
After a little trip to the Ranch & Home, a few options were picked-up.
A 2 1/2" long 1/4-28 bolt with the head ground down did the trick.
A few times on/off with with the master to get a he correct depth and:
Difference in thickness between the single diaphragm YJ and dual diaphragm cherocar.
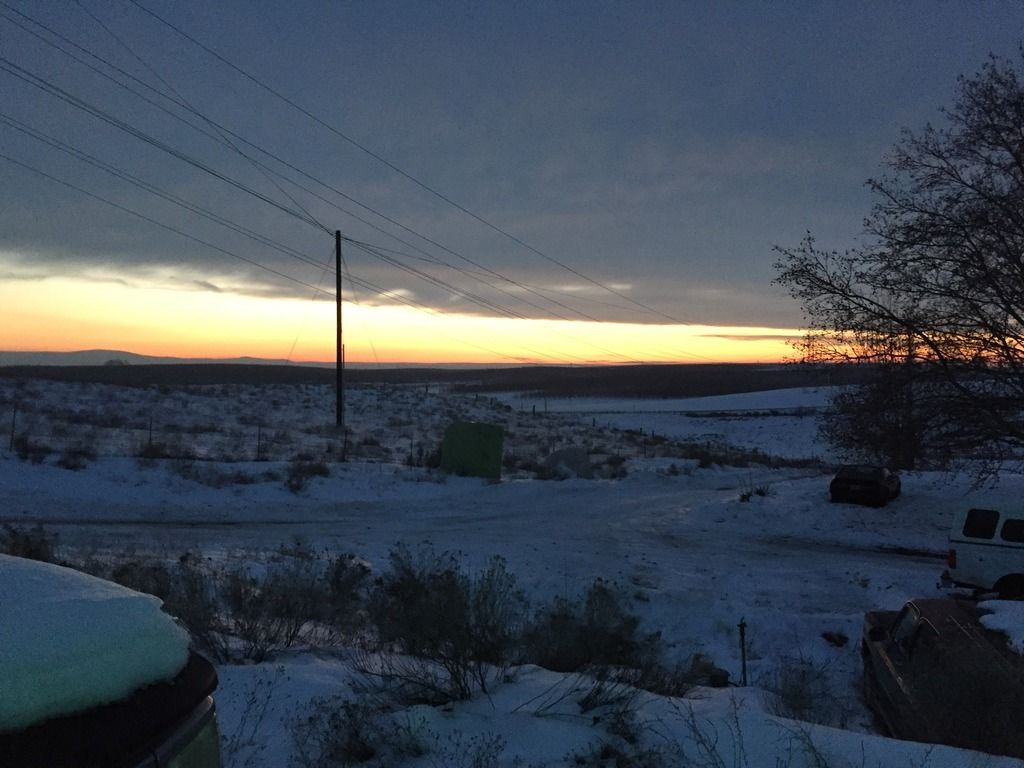
Just a nice picture leaving the Rusty Ranch.
A 2 1/2" long 1/4-28 bolt with the head ground down did the trick.
A few times on/off with with the master to get a he correct depth and:

Difference in thickness between the single diaphragm YJ and dual diaphragm cherocar.

Just a nice picture leaving the Rusty Ranch.

James
'92 YJ with a little something of everything.
'92 YJ with a little something of everything.
Re: YJ mods, an on going thread.
Just for clarification, when you say "gutted proportioning valve" are the front and rear lines open to each other?
Re: YJ mods, an on going thread.
The valve body is still there, but spring, plunger, and whatever else came out is removed.
James
'92 YJ with a little something of everything.
'92 YJ with a little something of everything.
Re: YJ mods, an on going thread.
Right, the valve body there. But with the plunger removed does that let the front circuit and rear circuit to balance preesure? Is it just an open manifold?
Return to “Projects and Build-Ups”
Who is online
Users browsing this forum: No registered users and 11 guests