Jeep Gladiator

Post pics and info of your current projects.
79chevy39.5's
Posts: 1204
Joined: Wed Apr 11, 2007 7:48 pm

Postby 79chevy39.5's » Wed Dec 05, 2012 4:43 pm

mattawajeep wrote:Not even close to the same height. Do a little looking. Without cutting out chunks of frame and even using flat springs I'll gain more than 4 inches.


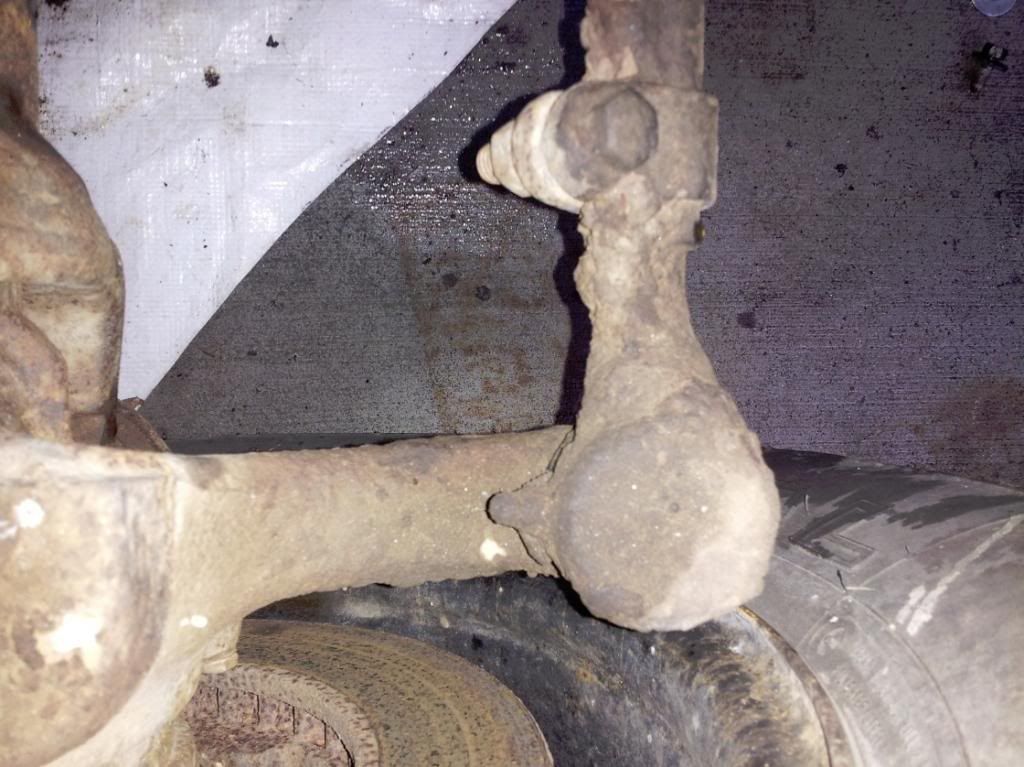
from what i see the front of the front spring is below the frame (about the same amount as a spring hanger and then the rear is in the middle the factory jeep springs seem to be arched (up about 3-4") and then the chevys are tipically flat or negative about an inch, so cutting a hole sleeving it and running a shackle down below the frame would be around 4" down from where is it now on the post mount negating the difference in mounting point with the spring change....but maybe i am missing something

http://www.pirate4x4.com/forum/jeep-non ... build.html

almost like the top wagoneer in that thread but instead of being spring under and arched springs you would be spring over and negative springs

User avatar
mattawajeep
Posts: 1221
Joined: Wed May 19, 2010 6:18 pm
Location: Mattawa, WA

Postby mattawajeep » Wed Dec 05, 2012 5:14 pm

Was curious about axle width so I went out and did some measuring. They Chevy axle adds a full 2" to the wms length - so I'm even less worried about steering radius issues. Especially as I think I could probably find cheap wheels out there that could add .5-1" more room without causing additional wear.

There's a fine line to walk on spending money vs doing work. It's way too easy to just order some new custom springs when there's really nothing wrong with the current suspension system. Especially when they don't even cost that much.

User avatar
mattawajeep
Posts: 1221
Joined: Wed May 19, 2010 6:18 pm
Location: Mattawa, WA

Postby mattawajeep » Sat Dec 08, 2012 7:31 pm

Ughhhh......


Image


Suprisingly pulling an engine is not as much fun as it sounds. :lol:
Think it took 10 hours total to get everthing out. Hopefully the suburban will go quicker.

Now to get it down off the slab, and pull the axles out.


Wrench, heres a few pics of the clutch stuff. This might not help now, but could be useful when you go to put yours in. I'll put up a few more tomorrow or monday before I pull the rest of it, theres a lot more room now to get better pics of the linkage underneath.

Image

Image

Image

Image

79chevy39.5's
Posts: 1204
Joined: Wed Apr 11, 2007 7:48 pm

Postby 79chevy39.5's » Sun Dec 09, 2012 2:21 pm

for the next time on the pre 88 trucks it is easier and much faster to pull the front clip off the vehicle, there are 2 body mounts up front 2 bolts on each side to the cowl and 1 bolt on each side at teh bottom of the fender and radiator hoses all can be unbolted in a few minutes, on the suburban it will be easier to take trans tcase out then the motor seperate the trans can be pulled with the motor but the hood must be taken off and a engine leveler must be used to get the very steep angle it needs to cleat the front......hope that helps

User avatar
mattawajeep
Posts: 1221
Joined: Wed May 19, 2010 6:18 pm
Location: Mattawa, WA

Postby mattawajeep » Mon Dec 10, 2012 10:25 am

Pulling the front off might have made things faster. I removed the hood on the k20, it was 4 bolts and easy to remove.

Getting the engine out with the hoist was actually the easy part probably only took half an hour. I had the back wheels up on a set of ramps (pulled it up with the winch on my tj), and I have an engine leveler. The part that was hard was all the mismatched, frozen, & rounded off bolts holding everything on.

Think with the suburban though, I'll do as you suggested and get the transmission off first, it's probably a good bit longer being an auto.

79chevy39.5's
Posts: 1204
Joined: Wed Apr 11, 2007 7:48 pm

Postby 79chevy39.5's » Mon Dec 10, 2012 10:28 am

the ifs front diff is the real killer

User avatar
mattawajeep
Posts: 1221
Joined: Wed May 19, 2010 6:18 pm
Location: Mattawa, WA

Postby mattawajeep » Wed Dec 12, 2012 4:39 pm

Got a bunch brake parts and bearings coming so that I can overhaul the axles and install disc's in the rear before axles are attached.

While looking at brake parts, I decided to check out steering parts as well. I have a few ideas but would like some input.

Here's the passenger side cross steer setup on the jeep truck:

Image

Image


And here's the chevy:

Image

Image


As you can see, there's no place to attach a crossover style draglink. This leaves me with several options. The knuckle is a flat top, so I could send it in to get machined, buy new arms and either go with cross-steer or high-steer.


The other option would be to purchase one of these:

http://www.ruffstuffspecialties.com/catalog/TREYLINK.html

To do something like this:

http://www.ruffstuffspecialties.com/catalog/YLINK.html

Also, an upside down version for even more clearance:

http://www.partsmike.com/store/store.php?crn=240&rn=1112&action=show_detail


That would give me TJish steering setup, with more spring clearance. It also seems as if it might be cheaper than having milling done, buying new arms/spacers ect... Also, the knuckle arm lengths are pretty close, which might mean I could even keep my current pitman arm (though I may swap out the box for power steering eventually anyway....).

Any reason that a y/t link is a bad idea? I can't seem to find any reasons to not do it on the internet. Some even say that it puts less stress on the passenger knuckle.

User avatar
SPR
Peak Putters Member
Peak Putters Member
Posts: 2345
Joined: Thu Mar 15, 2007 6:31 am
Location: Tri-Cities

Postby SPR » Wed Dec 12, 2012 4:49 pm

Dale,

Have you considered a different (newer) axle with larger brakes and the correct steering arms for a new steering setup?

No, I didn't read through all of the posts to determine what axle you're using.
I don't Text (at least not very well), I eat Blackberrys, and I only Twitter after sex...

User avatar
mattawajeep
Posts: 1221
Joined: Wed May 19, 2010 6:18 pm
Location: Mattawa, WA

Postby mattawajeep » Wed Dec 12, 2012 4:57 pm

SPR wrote:Dale,

Have you considered a different (newer) axle with larger brakes and the correct steering arms for a new steering setup?

No, I didn't read through all of the posts to determine what axle you're using.


Already doing so, that's what I'm asking about. I have an 8 lug 3/4 ton chevy dana 44 that I'm swapping in. Everything about it is great (heavy duty, will match the rear, big brakes) except for the steering arm setup. My question was about what I should do to get the steering I want.

I suppose a different axle is an option, maybe just a knuckle swap?

79chevy39.5's
Posts: 1204
Joined: Wed Apr 11, 2007 7:48 pm

Postby 79chevy39.5's » Wed Dec 12, 2012 5:35 pm

i personally would do a crossover steering, 50 dollar maching and a arm isnt that much money really and you can find them in different lengths so you could keep your pitman arm

Wrench
Peak Putters Member
Peak Putters Member
Posts: 1237
Joined: Sat May 30, 2009 7:23 am
Location: in a van down by the river

Postby Wrench » Wed Dec 12, 2012 5:52 pm

mattawajeep wrote:

Any reason that a y/t link is a bad idea? I can't seem to find any reasons to not do it on the internet. Some even say that it puts less stress on the passenger knuckle.


The Y-link will reduce your overall turning radius because it places the drag link connection further from the pivot point of the wheel. At full lock, your tires will not be turned as far as with the current axle. This is assuming that "full lock" is maxing out the steering gearbox. You can correct this if you put a longer arm on the steering gearbox.

If you go with the high-steer setup like this, you can mimic the stock setup:
Image
Paul
'84 XJ, '19JL

User avatar
mattawajeep
Posts: 1221
Joined: Wed May 19, 2010 6:18 pm
Location: Mattawa, WA

Postby mattawajeep » Wed Dec 12, 2012 6:16 pm

Wrench wrote:The Y-link will reduce your overall turning radius because it places the drag link connection further from the pivot point of the wheel. At full lock, your tires will not be turned as far as with the current axle. This is assuming that "full lock" is maxing out the steering gearbox. You can correct this if you put a longer arm on the steering gearbox.


Hmm, didn't think about it not pushing the tie rod as far. Doesn't seem like it would change the distances that much though, the angle change is slight.

I suppose it's not that much more money to go high steer. Probably only $150 extra and it's better documented.

79chevy39.5's
Posts: 1204
Joined: Wed Apr 11, 2007 7:48 pm

Postby 79chevy39.5's » Wed Dec 12, 2012 6:18 pm

also steering on the tie rod makes the tie rod ends rotate a little, not that it really matters manufactures do it

User avatar
mattawajeep
Posts: 1221
Joined: Wed May 19, 2010 6:18 pm
Location: Mattawa, WA

Postby mattawajeep » Wed Dec 12, 2012 6:35 pm

Any junkyard sources for tie-rods and drag links? My current tie rod might work, gonna have to go measure. I don't think these have to be massive to work well.


Partsmike.com will custom cut and thread tube for $80.... Seems expensive...


There's also this:

http://www.ruffstuffspecialties.com/catalog/XOGMSTE.html


Any opinion on machined threads in the tube vs weld on bungs?


Going with new tubes, 4 tie rod ends, dual hole high steer arms, knuckle machine work, and studs for the knuckle will set me back about $550. Looking at a few other sites, I think I can cut that down by just a bit.

Ouch, steering is expensive. I should just leave holes in the floor and go for flintstones power. :lol:

79chevy39.5's
Posts: 1204
Joined: Wed Apr 11, 2007 7:48 pm

Postby 79chevy39.5's » Wed Dec 12, 2012 7:33 pm

local machine shops can thread tubing...if you use hiems it cuts costs and you can use weld in bungs

User avatar
bobracing
Posts: 750
Joined: Fri Jun 15, 2007 10:20 am

Postby bobracing » Wed Dec 12, 2012 7:44 pm

550 is for a full steering setup?
You only need the pass arm and a new draglink, leave the stock tie rod there and put new ends on it.
Since this is a tow rig, the tie rod will be just fine below.

There was a guy on nw-wheelers that would custom make tie rod/drag links but not sure he still does, believe he went by bunk. WT might chime in.

As for weld in bungs, I personally prefer the threaded tube but really don't have a problem with weld-ins, just make sure it's a good weld. If you go this route, tube can be picked up locally. They also make bungs with the 7/8-18 thread of TREs, might have to search a bit, but I've seen them.
James
'92 YJ with a little something of everything.

User avatar
mattawajeep
Posts: 1221
Joined: Wed May 19, 2010 6:18 pm
Location: Mattawa, WA

Postby mattawajeep » Wed Dec 12, 2012 8:27 pm

79chevy39.5's wrote:local machine shops can thread tubing...if you use hiems it cuts costs and you can use weld in bungs


Looked at using heims, but doesn't seem like they're street legal.


bobracing wrote:550 is for a full steering setup?
You only need the pass arm and a new draglink, leave the stock tie rod there and put new ends on it.
Since this is a tow rig, the tie rod will be just fine below.


Yeah, 550 for all new everything & high steer.

Course, I feel silly now, leaving the stock tie rod is a good idea. I thought adding a passenger side arm and draglink TRE would interfere with the stock arm but it looks like there's room.

These look handy if I go the weld route:

http://www.ruffstuffspecialties.com/catalog/7818TA.html

So...

Tube - $30 (no clue, but $10 per foot sounds like normal....)
Machine work - $55
Knuckle Studs - $34
Passenger Side Arm - $90
TRE's for Draglink - $56
Weld in Bungs - $25
Tie Rod Passenger TRE - $28
Tie Rod Driver TRE - $65.99 (Yikes, looks like it's one really long expensive piece)

Thats $384 - so a good bit better. I'm gonna do some looking and see if it's possible to get a cheaper driver side tie rod end. Silly one piece design....

Might also be cheaper to find a local machine shop that can get me threaded tube and work on the knuckle.

User avatar
bobracing
Posts: 750
Joined: Fri Jun 15, 2007 10:20 am

Postby bobracing » Thu Dec 13, 2012 6:40 am

Might want to check out Sky-Manufacturing.
http://www.sky-manufacturing.com/new/de ... php?id=352
James
'92 YJ with a little something of everything.

User avatar
mattawajeep
Posts: 1221
Joined: Wed May 19, 2010 6:18 pm
Location: Mattawa, WA

Postby mattawajeep » Thu Dec 13, 2012 11:58 am

bobracing wrote:Might want to check out Sky-Manufacturing.
http://www.sky-manufacturing.com/new/de ... php?id=352


Hrmm. Looks like those guys can save me a bit of money - or at least enough to get a whole new tie-rod and come out even. Replacing the stock tie-rod ends is not cheap, a cusom one will be cheaper in the long run (though I don't think TRE's need that much changing out....).

User avatar
mattawajeep
Posts: 1221
Joined: Wed May 19, 2010 6:18 pm
Location: Mattawa, WA

Postby mattawajeep » Thu Dec 13, 2012 9:26 pm

I've spent the last couple of nights working on getting the underside of the cab cleaned up. After a lot of dirty hours I've come to the conclusion that undercoating is the product of satan. :evil:

It works great when it doesn't flake away, the metal is pristine. Where it crumbles however, the rust is far worse than where paint has worn or rusted away. It also seems like it would be pretty much impossible to repair, if anyone would ever bother....

Think I'm gonna hit the underside with some really tough primer and a topcoat of por-15, or whatever is toughest and easy to repair. If I ever get the underside clean.....

User avatar
bobracing
Posts: 750
Joined: Fri Jun 15, 2007 10:20 am

Postby bobracing » Fri Dec 14, 2012 6:51 am

POR-15 should be the first, (p)aint (o)ver (r)ust. Then follow the instructions for painting over it. If you haven't ever used por15, WEAR GLOVES and something you don't care about. If that stuff gets on anything, including skin, it DOES NOT come off.
James
'92 YJ with a little something of everything.

User avatar
mattawajeep
Posts: 1221
Joined: Wed May 19, 2010 6:18 pm
Location: Mattawa, WA

Postby mattawajeep » Fri Dec 14, 2012 10:39 am

bobracing wrote:POR-15 should be the first, (p)aint (o)ver (r)ust. Then follow the instructions for painting over it. If you haven't ever used por15, WEAR GLOVES and something you don't care about. If that stuff gets on anything, including skin, it DOES NOT come off.


Good point, when I was thinking undercoat, there's another product that's similar just even less UV stable. I'll probably go with actual por-15 and do like you said.

Anyplace it can be bought in tri-cities? I'll be in town tomorrow and that's easier than shipping this close to the holidays.

User avatar
bobracing
Posts: 750
Joined: Fri Jun 15, 2007 10:20 am

Postby bobracing » Fri Dec 14, 2012 10:43 am

Believe it's Wesco(?) paint, behind Walkers Funiture on Clearwater in Kennewick.
James
'92 YJ with a little something of everything.

SquirrelCrusher
Posts: 450
Joined: Mon Dec 27, 2010 10:56 pm
Location: Dayton, Wa

Postby SquirrelCrusher » Fri Dec 14, 2012 5:16 pm

Yep Wesco or whatever up on Clearwater for sure. That's where I got mine.
'94 Bronco - Buckstop bumper w/ 12k winch
To many atvs and dirt bikes

For Sale '96 F-250 Powerstroke - 4in lift, 35's, Dana 60 Front end, Tuner
Sold '96 Jeep Cherokee - 4in lift, 35s, Dual Spartans, 4.88s
Sold '80 Camaro Z/28 - T-Tops, auto, 350

User avatar
mattawajeep
Posts: 1221
Joined: Wed May 19, 2010 6:18 pm
Location: Mattawa, WA

Postby mattawajeep » Sun Feb 10, 2013 8:16 pm

Been way too long since I've got anything done. Was all set to finish a bunch of stuff christmas break, but I ended up going on a surprise roadtrip to missouri..... Then work got busy..... The usual excuses.

The last couple of weekends I've been helping my brother with his new project, but I did get a bit done.


Welding sheet metal sucks - but I think things will go smoother on the next panel (largely because the metal is thicker and not nearly as rusty.

Primer added to the supports, I really don't want that stuff to rust out later:

Image

Piece of 16 gauge steel cut to shape, and then repeatedly beat with a framing hammer.

Image

Tacking stuff into place....

Image

Image

Image

Image

And that's as far as I got tonight. Had to help my brother finish rebuilding his carburator. Needs a bit more welding underneath, and then a bunch more grinding to clean stuff up. I'll be welding the other section in this next week, and plug welding the panels to the supports.

Not sure if I'll bother with a flapper wheel or not, the rough edges will be hidden by truck bed liner and the stuff will probably stick better as well.


Return to “Projects and Build-Ups”

Who is online

Users browsing this forum: No registered users and 8 guests