The Bronco build

Post pics and info of your current projects.
User avatar
Lurch
Peak Putters Member
Peak Putters Member
Posts: 2363
Joined: Thu Nov 08, 2007 7:10 am
Location: Pasco

Postby Lurch » Mon Feb 24, 2014 7:43 pm

I plan to use 2x6 3/16 thick tubing for the slides under the doors tied into the frame with 2x2 3/16 tubing. I originally wat going to tie it into the body but figured the flex would cause problems. Especially with the fiberglass door inserts. I plan to have them stick out to the outside of the fender flares if not a little further to help protect the body.
You can follow me.... but it's gonna hurt ;)

User avatar
Lurch
Peak Putters Member
Peak Putters Member
Posts: 2363
Joined: Thu Nov 08, 2007 7:10 am
Location: Pasco

Postby Lurch » Thu Feb 27, 2014 4:08 pm

Wow paint and body supplies are spendy.
You can follow me.... but it's gonna hurt ;)

79chevy39.5's
Posts: 1204
Joined: Wed Apr 11, 2007 7:48 pm

Postby 79chevy39.5's » Thu Feb 27, 2014 4:28 pm

Yes they are

User avatar
SPR
Peak Putters Member
Peak Putters Member
Posts: 2345
Joined: Thu Mar 15, 2007 6:31 am
Location: Tri-Cities

Postby SPR » Thu Feb 27, 2014 4:52 pm

What type of paint and primer system are you getting? Something rubber-based? :lol:
I don't Text (at least not very well), I eat Blackberrys, and I only Twitter after sex...

79chevy39.5's
Posts: 1204
Joined: Wed Apr 11, 2007 7:48 pm

Postby 79chevy39.5's » Thu Feb 27, 2014 5:58 pm

Yes they are

User avatar
Lurch
Peak Putters Member
Peak Putters Member
Posts: 2363
Joined: Thu Nov 08, 2007 7:10 am
Location: Pasco

Postby Lurch » Tue Mar 11, 2014 8:44 pm

Not much new, just paint removal and panel straightening with a little help from wrench.

Image

Image
You can follow me.... but it's gonna hurt ;)

User avatar
tobyw
Posts: 1886
Joined: Wed Mar 14, 2007 10:00 am
Location: Under the hood...

Postby tobyw » Thu Mar 13, 2014 12:07 pm

I see the paint removal, but I don't see the straight part... :lol: :lol: :lol:
Yep, I've wheeled one of those, too...
Image

User avatar
Lurch
Peak Putters Member
Peak Putters Member
Posts: 2363
Joined: Thu Nov 08, 2007 7:10 am
Location: Pasco

Postby Lurch » Thu Mar 13, 2014 12:21 pm

It's coming 8)
You can follow me.... but it's gonna hurt ;)

User avatar
Brier Rose
Peak Putters Member
Peak Putters Member
Posts: 66
Joined: Sun Oct 27, 2013 6:28 pm
Location: Kennewick

Postby Brier Rose » Sun Mar 23, 2014 1:45 pm

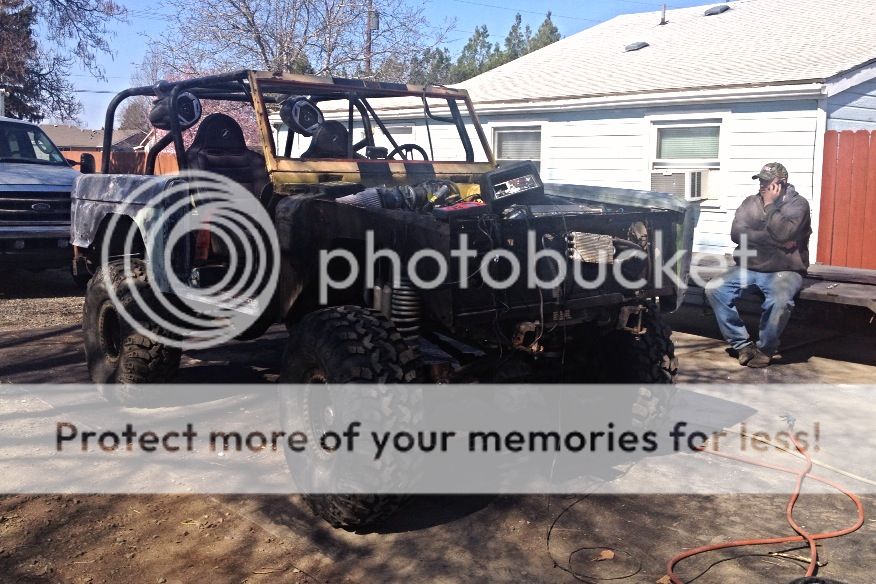
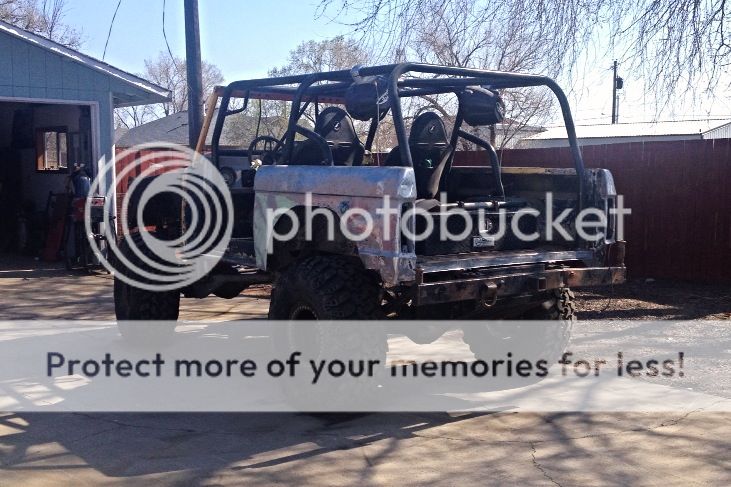
Progress as of today. I did get to help :D

Image

Image

Image

Image

Image

Image

And some scraps that got cut off.
Image
Last edited by Brier Rose on Mon Mar 24, 2014 10:53 am, edited 1 time in total.

User avatar
tobyw
Posts: 1886
Joined: Wed Mar 14, 2007 10:00 am
Location: Under the hood...

Postby tobyw » Sun Mar 23, 2014 3:15 pm

Cool!
Yep, I've wheeled one of those, too...

Image

User avatar
Brier Rose
Peak Putters Member
Peak Putters Member
Posts: 66
Joined: Sun Oct 27, 2013 6:28 pm
Location: Kennewick

Postby Brier Rose » Sun Mar 23, 2014 7:34 pm

Today the Bronco got primer put on. Still needs a lot of work but its getting there. Paul came over to help. Here are some before, during, and after photos.

Image

Image

Image

Image

Image

Image

Image

Image

Image

Image

Image

Image

Image

Image

User avatar
Lurch
Peak Putters Member
Peak Putters Member
Posts: 2363
Joined: Thu Nov 08, 2007 7:10 am
Location: Pasco

Postby Lurch » Mon Mar 24, 2014 7:54 pm

So this thing is no where near ready to paint and yes putting primer on it is a bit early. But I leave for the Oregon coast mid next week so I have to put it back together enough to go play in the big dunes with the rest of the family. Soooo I started reassembly tonight. This is where I am currently. Didn't get as much done as I wanted but you get the idea.

Image

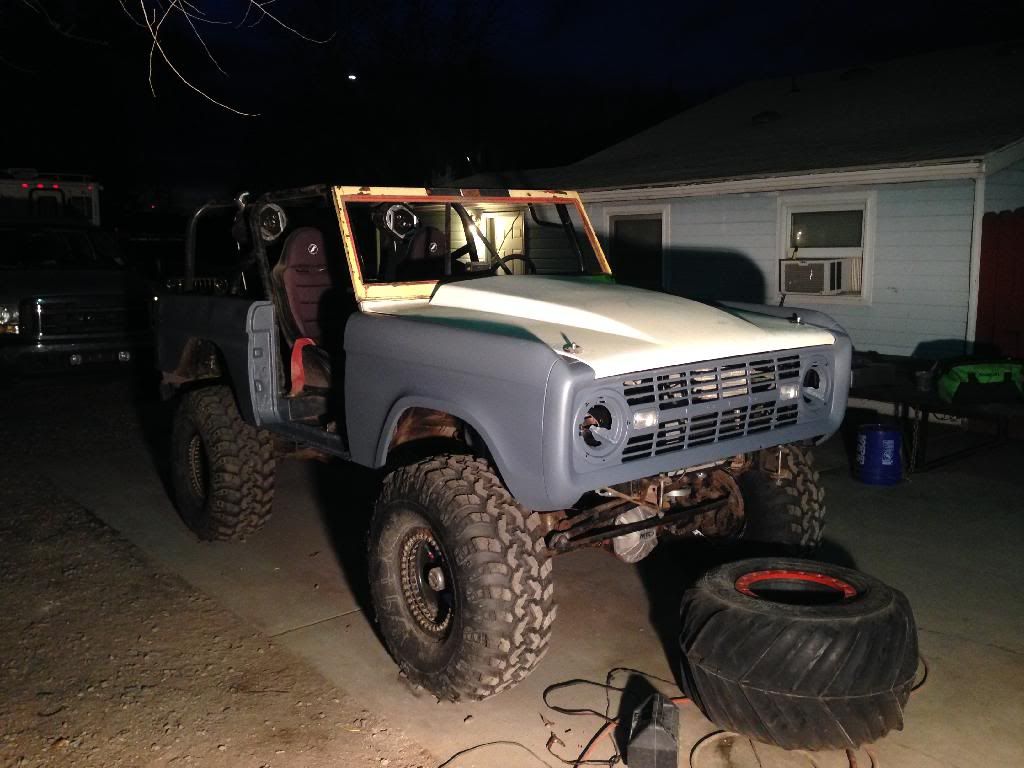
Oh and a side note. Disconnect your battery when your welding on your rig. I fried the PCM on my bronco from welding. And for the record they aren't very easy to find for the application I need.

Image
You can follow me.... but it's gonna hurt ;)

User avatar
Lurch
Peak Putters Member
Peak Putters Member
Posts: 2363
Joined: Thu Nov 08, 2007 7:10 am
Location: Pasco

Postby Lurch » Mon Mar 24, 2014 7:55 pm

Oh and that is 1 of 4 of my sand tires but more on them later ;)
You can follow me.... but it's gonna hurt ;)

User avatar
SPR
Peak Putters Member
Peak Putters Member
Posts: 2345
Joined: Thu Mar 15, 2007 6:31 am
Location: Tri-Cities

Postby SPR » Mon Mar 24, 2014 8:32 pm

Tim, what paint system and primer did you go with?
I don't Text (at least not very well), I eat Blackberrys, and I only Twitter after sex...

User avatar
tobyw
Posts: 1886
Joined: Wed Mar 14, 2007 10:00 am
Location: Under the hood...

Postby tobyw » Tue Mar 25, 2014 6:00 am

I'm so happy that my Jedi mind melting has brought Timmay to finally take on this beautification project!! Now if I can just get him to toss those wakeboard tower speakers :? :lol:

All kidding aside, this is coming along GREAT!!! Going to be a whole new experience not wanting to perform logging operations at Rim Rock :lol:
Yep, I've wheeled one of those, too...

Image

User avatar
Lurch
Peak Putters Member
Peak Putters Member
Posts: 2363
Joined: Thu Nov 08, 2007 7:10 am
Location: Pasco

Postby Lurch » Tue Mar 25, 2014 6:31 am

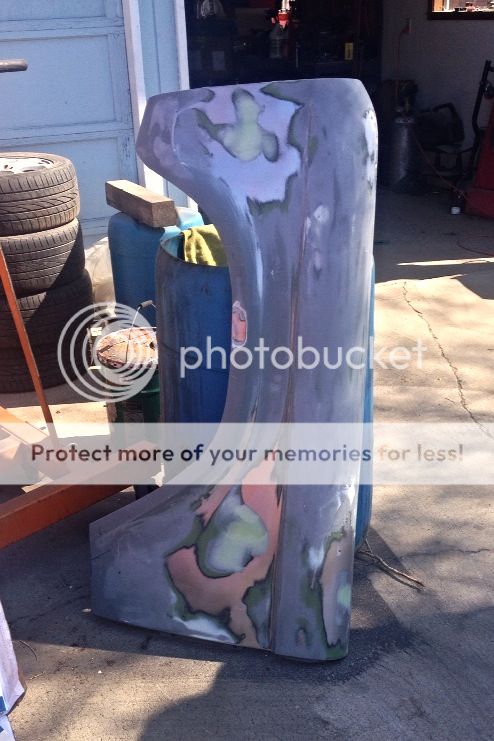
Steve it's a high build self etching primer sealer. It's what the paint shop recomended. I'm also using a base/clear 2 stage paint. The cost difference wasn't bad and the clear will help protect it better and make it easier to buff out scratches.

Toby, the wake tower speakers were free and actually work pretty good other then the flatbiller look lol.
You can follow me.... but it's gonna hurt ;)

User avatar
SPR
Peak Putters Member
Peak Putters Member
Posts: 2345
Joined: Thu Mar 15, 2007 6:31 am
Location: Tri-Cities

Postby SPR » Tue Mar 25, 2014 6:56 am

Good call on the primer. I used an epoxy primer on the yellow truck mainly to seal it up real good for rust protection. Unfortunately paint doesn't stick to it really well unless you quickly lay on the paint before the epoxy is slightly cured. Scuffing curried epoxy and then painting didn't work so great on the floor of the pickup bed.
I don't Text (at least not very well), I eat Blackberrys, and I only Twitter after sex...

User avatar
Danny
Peak Putters Associate
Posts: 1331
Joined: Wed Mar 14, 2007 9:41 pm
Location: Richland, WA

Postby Danny » Tue Mar 25, 2014 8:57 am

Tim, it's looking more and more like a real Bronco every day...congrats on what you've accomplished so far.
Forget your age and live your life!

User avatar
Lurch
Peak Putters Member
Peak Putters Member
Posts: 2363
Joined: Thu Nov 08, 2007 7:10 am
Location: Pasco

Postby Lurch » Wed Mar 26, 2014 8:38 pm

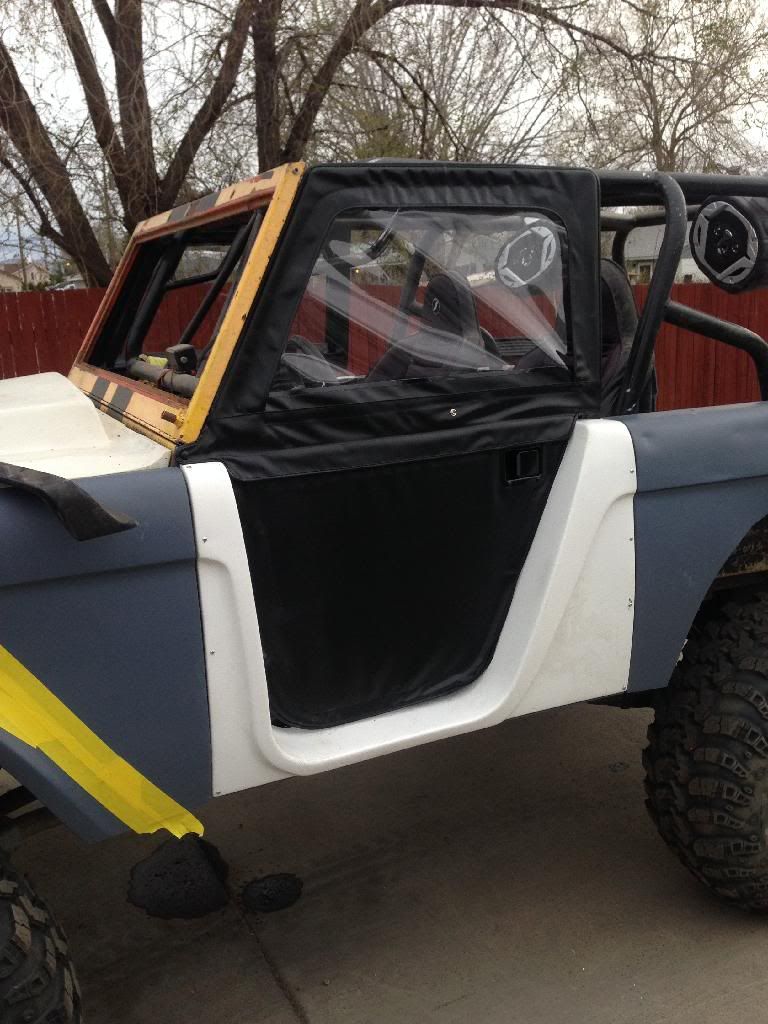
Made some more progress tonight. Finished installing the door inserts then got the soft doors fitted and installed.

Image

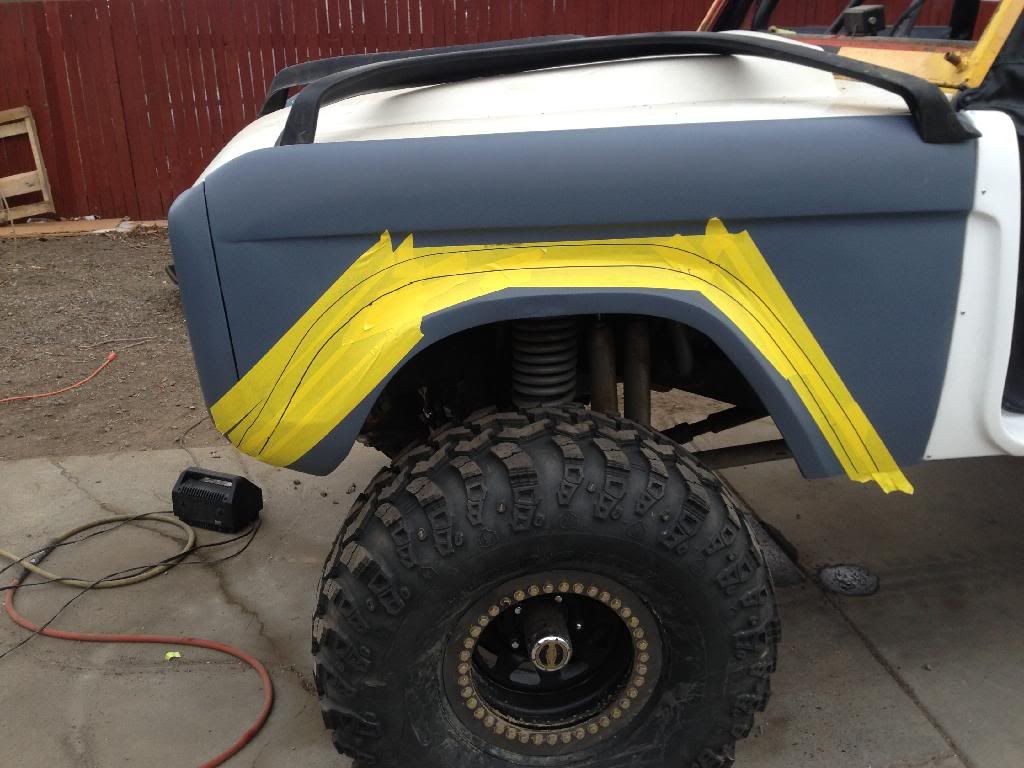
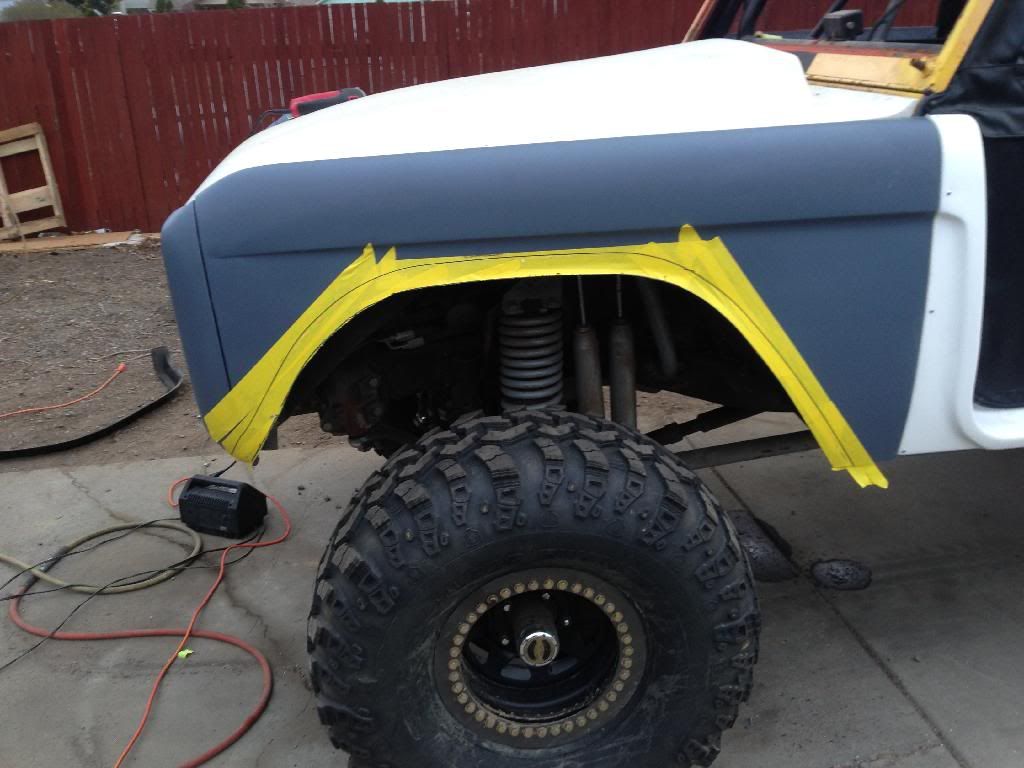
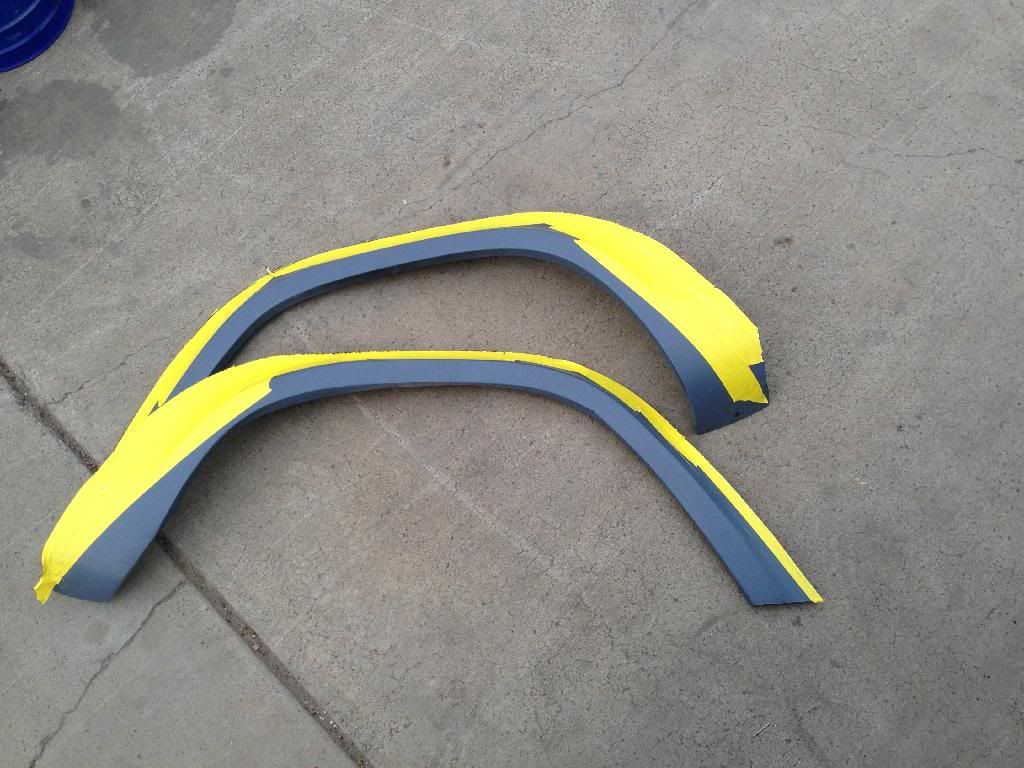
Then I masked off the front fenders and traced the flares. Then I cut the fenders. Since I've moved the front axle forward I had to locate the wheel opening a little farther forward also.

Image

Image

Image
You can follow me.... but it's gonna hurt ;)

User avatar
Chrispy
Posts: 379
Joined: Wed Apr 14, 2010 11:36 am
Location: in the garage

Postby Chrispy » Wed Mar 26, 2014 9:27 pm

did you get new pcm yet?
oh and it looks AWESOME. cant wait to see with final color.
HE TOOK THE BYPASS?? YEAH ITS A JEEP THING.

User avatar
Lurch
Peak Putters Member
Peak Putters Member
Posts: 2363
Joined: Thu Nov 08, 2007 7:10 am
Location: Pasco

Postby Lurch » Thu Mar 27, 2014 6:21 am

No pcm yet, I'm hoping it shows up today. :ange
You can follow me.... but it's gonna hurt ;)

User avatar
Lurch
Peak Putters Member
Peak Putters Member
Posts: 2363
Joined: Thu Nov 08, 2007 7:10 am
Location: Pasco

Postby Lurch » Thu Mar 27, 2014 7:38 pm

Installed the new PCM tonight. Starts and runs as it should again.
You can follow me.... but it's gonna hurt ;)

User avatar
Boyscout
Posts: 74
Joined: Fri Mar 16, 2007 9:44 am
Location: West Richland, WA

Postby Boyscout » Fri Mar 28, 2014 12:52 pm

Looking good. Great door inserts. I hear they rip out quite nicely.
Marc

1997 Jeep Wrangler SE Convertible SUV 2.5L 4-cyl. 4x4 5-speed Manual

User avatar
mattawajeep
Posts: 1221
Joined: Wed May 19, 2010 6:18 pm
Location: Mattawa, WA

Postby mattawajeep » Fri Mar 28, 2014 3:51 pm

What color you going to end up with when it's all done?

User avatar
Lurch
Peak Putters Member
Peak Putters Member
Posts: 2363
Joined: Thu Nov 08, 2007 7:10 am
Location: Pasco

Postby Lurch » Fri Mar 28, 2014 3:58 pm

Don't worry Mark, I've got plans to keep that from happening 8)


It will be a charcoal gray color. Similar to what you see on the newer ford cars and trucks.
You can follow me.... but it's gonna hurt ;)


Return to “Projects and Build-Ups”

Who is online

Users browsing this forum: No registered users and 11 guests