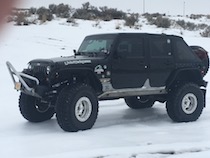
I'm dreaming of a white YJ Christmas...


-
Wrench
- Peak Putters Member

- Posts: 1237
- Joined: Sat May 30, 2009 7:23 am
- Location: in a van down by the river
bobracing wrote:In the back, did you just use the stock upper mounts and new tabs on the axle?
I assume you are referring to the shock mounts? Yes, that is what the previous owner did. In order to use the shocks he had installed (12" travel), I will have to install an outboard shock kit that is frenched into the frame. The way he had them installed, there was barely 2" of chrome showing on the shock at ride height.
Scumby,
I need to shift the engine forward ~2" to eliminate drive shaft binding at full suspension extension.
Other little crap to do:
-locate and install windshield washer fluid bottle/pump
-fix dash wiring (no heater fan response)
-relocate stereo back to dash and remove rats-nest of wiring on passenger side
-figure out how to stretch a soft-top so I can snap/zip it all back in place
-figure out a fix for the shift boots being too stiff and interfering with shifting
-find replacement bolts for the missing ones on the windshield hinge (countersunk torx bolts)
I have ordered my 5.13 gears for the Dana 44's. I'll be prepping them soon for install. I horse-traded for a Spartan in the front, and snagged a full spool for the rear ($40 on Ebay, couldnt pass it up).
Paul
'84 XJ, '19JL
'84 XJ, '19JL
-
Livin4Today
- Posts: 1054
- Joined: Thu Jan 26, 2012 8:23 am
- Location: Kennewick, WA
Wrench wrote:-figure out how to stretch a soft-top so I can snap/zip it all back in place
Heat is the only thing that helps and then a couple of helpers with beer...
That's how we got Lee's Trektop NX on...
Lance
Building a capable off roader is easy, building a street legal one that you can wheel and then drive daily is the challenge...
2007 JKU, 7" RK lift, 40s, ARBs, 5.38s, Headers, Fox Coilovers, etc. http://www.Livin4Today.com
Building a capable off roader is easy, building a street legal one that you can wheel and then drive daily is the challenge...
2007 JKU, 7" RK lift, 40s, ARBs, 5.38s, Headers, Fox Coilovers, etc. http://www.Livin4Today.com
Livin4Today wrote:Wrench wrote:-figure out how to stretch a soft-top so I can snap/zip it all back in place
Heat is the only thing that helps and then a couple of helpers with beer...
That's how we got Lee's Trektop NX on...
...all 3 times.
Okay, we're a little crazy to have a Duramax for a daily driver. But if we go off our meds, we might wind up in a Prius.
If you want to hear God laugh, tell Him your plans.
N7EEL WROD249


If you want to hear God laugh, tell Him your plans.
N7EEL WROD249
-
mattawajeep
- Posts: 1221
- Joined: Wed May 19, 2010 6:18 pm
- Location: Mattawa, WA
-
Wrench
- Peak Putters Member
- Posts: 1237
- Joined: Sat May 30, 2009 7:23 am
- Location: in a van down by the river
Progress:
-shifted the engine and tranny fwd two inches, all drivelines working well through suspension travel.
-fabricated new rear shock mounts for full travel.
-installed stainless countersunk screws in windshield
-washer bottle on order
-found dash wiring hacked for unknown purposes, need to repair
Other little crap to still do:
-install windshield washer fluid bottle/pump
-fix dash wiring (no heater fan response)
-relocate stereo back to dash and remove rats-nest of wiring on passenger side
-stretch soft-top so I can snap/zip it all back in place
-figure out a fix for the shift boots being too stiff and interfering with shifting
-repair spare tire mount
Paul
'84 XJ, '19JL
'84 XJ, '19JL
-
Wrench
- Peak Putters Member
- Posts: 1237
- Joined: Sat May 30, 2009 7:23 am
- Location: in a van down by the river
The wiring has been hacked, it appears the stereo install and aftermarket lighting they had on there was wired by an amateur. The plug on the back of the fan control switch was completely removed and has a cut wire. I pulled the dash face off last night to get a complete evaluation.
As for the shocks:
-I took some 1/4" steel plate and cut strips approximately 2" wide by 8" long. I rounded one end and welded a shock mount bolt in the center of the round. I made two straight cuts across the width half-way through the metal so I could bend it to desired "z" shape, then welded the cuts after bending. I then welded these to the frame inline with the installed shock at ride height, tucking the upper end up as far as it would go without contacting the body, and still leaving just enough clearance for the shock to be removed from the bolt.
Here is the drivers side, which required relocation of the fuel filter. The passenger side fit with no mods.

If you have a body lift, you will have even more room and wont need to lay the shock at so much of an angle. According to my measurements, the shock should bottom out right when the axle mount plate contacts the factory bump stop, though it will be almost horizontal at that point. Not ideal, but gives me full travel. Running the shocks outboard on the rear is not an option for leaf spring setup with stock axle width. There is not enough room for the shock between the spring and wheel.
As for the shocks:
-I took some 1/4" steel plate and cut strips approximately 2" wide by 8" long. I rounded one end and welded a shock mount bolt in the center of the round. I made two straight cuts across the width half-way through the metal so I could bend it to desired "z" shape, then welded the cuts after bending. I then welded these to the frame inline with the installed shock at ride height, tucking the upper end up as far as it would go without contacting the body, and still leaving just enough clearance for the shock to be removed from the bolt.
Here is the drivers side, which required relocation of the fuel filter. The passenger side fit with no mods.
If you have a body lift, you will have even more room and wont need to lay the shock at so much of an angle. According to my measurements, the shock should bottom out right when the axle mount plate contacts the factory bump stop, though it will be almost horizontal at that point. Not ideal, but gives me full travel. Running the shocks outboard on the rear is not an option for leaf spring setup with stock axle width. There is not enough room for the shock between the spring and wheel.
Last edited by Wrench on Thu Jan 08, 2015 7:35 am, edited 1 time in total.
Paul
'84 XJ, '19JL
'84 XJ, '19JL
-
Wrench
- Peak Putters Member
- Posts: 1237
- Joined: Sat May 30, 2009 7:23 am
- Location: in a van down by the river
The shocks have more extension than needed, but the springs limit the flex. At full extension, I am measuring just over 12" between axle and bump stop.
If my measurements are correct, 36" tires will contact the fenders just as the bump stops hit also. I am planning on putting 36" Iroks on it.
If my measurements are correct, 36" tires will contact the fenders just as the bump stops hit also. I am planning on putting 36" Iroks on it.
Last edited by Wrench on Thu Jan 08, 2015 12:10 pm, edited 1 time in total.
Paul
'84 XJ, '19JL
'84 XJ, '19JL
-
Wrench
- Peak Putters Member
- Posts: 1237
- Joined: Sat May 30, 2009 7:23 am
- Location: in a van down by the river
Those have 12" of travel, they came on the Jeep. I suspect a 10" would be ideal, and still net around 12" of axle travel at a little bit less of an angle than I used.
There are commercially made brackets that bolt on that do basically the same thing I did, but a little less shock angle. I suspect they work real well with 10" shocks. I like to build stuff myself, though.
There are commercially made brackets that bolt on that do basically the same thing I did, but a little less shock angle. I suspect they work real well with 10" shocks. I like to build stuff myself, though.
Paul
'84 XJ, '19JL
'84 XJ, '19JL
-
Wrench
- Peak Putters Member
- Posts: 1237
- Joined: Sat May 30, 2009 7:23 am
- Location: in a van down by the river
Well, I repaired the wiring for the fan motor. My test light indicates there is good power and ground to the motor leads now, but still no fan operation. Bummer.
While I have the dash apart, I would like to fix the under-dash / dome light wiring. I was thinking of just getting LED strip lights and splicing them in to replace the under-dash lights. Also, there are no door switches, which may have been removed by the previous owner. How did Jeep wire these originally? How did they disable them if the doors were removed? Any suggestions on cheap LED strip lighting would also be appreciated.
Paul
'84 XJ, '19JL
'84 XJ, '19JL
-
mattawajeep
- Posts: 1221
- Joined: Wed May 19, 2010 6:18 pm
- Location: Mattawa, WA
Wrench wrote::?
Well, I repaired the wiring for the fan motor. My test light indicates there is good power and ground to the motor leads now, but still no fan operation. Bummer.
While I have the dash apart, I would like to fix the under-dash / dome light wiring. I was thinking of just getting LED strip lights and splicing them in to replace the under-dash lights. Also, there are no door switches, which may have been removed by the previous owner. How did Jeep wire these originally? How did they disable them if the doors were removed? Any suggestions on cheap LED strip lighting would also be appreciated.
Try beating the fan motor with a pipe wrench. That's how I got my tj fan going again.
http://www.amazon.com/gp/aw/d/B00JQV6NN ... SY165_QL70
Jafo is correct on the "sans" dome light, but i think most YJ's had door pins. (87's maybe not)
I like to go overbuild/over think (call it what you want) when I build, so my dome light is wired into the dash light dimmer control.
The stock under dash lights didn't work, and are pathetic at best. And LED's weren't readily available at the time so I spent the $20 on a Steel Horse dome light. For old school back-up light technology, the thing rocks! I plan to use the same one when I build the Scrambler. You can buy the SAME light from Schmuck's for about $7 without the fancy "tube adapter" base so you can just zip tie it on to the cage, but this tight wad might splurge since the first one has worked so we for me!
if in fact it did have under dash/dome lights (i thought my 95 did) the door switch completes the NEG side of the circuit when the door is opened. to disable the circuit the wire was simply removed from the back of the switch so it did not provide the ground.
Lightly Lifted and Locked LJ
I'm Scumby Dammit, take it or leave it!
I'm Scumby Dammit, take it or leave it!
-
Wrench
- Peak Putters Member
- Posts: 1237
- Joined: Sat May 30, 2009 7:23 am
- Location: in a van down by the river
scumby wrote:if in fact it did have under dash/dome lights (i thought my 95 did) the door switch completes the NEG side of the circuit when the door is opened. to disable the circuit the wire was simply removed from the back of the switch so it did not provide the ground.
Yep, ground-seeking circuit. It has one light under the dash on the drivers side, a light connector but no light on the passenger side, and another connector on the passenger side that has a spade stuck in it that looks like it broke off a door switch. This connector turns the existing drivers side light on when it touches ground. There are holes in the door frames on both doors where it appears there may have been switches at one time. The hole in the drivers side has a silhouette in the sprayed-on bedliner that looks like there may have been a switch there, but the passenger side hole was filled with bedliner. This is why I was curious about the factory setup.
Paul
'84 XJ, '19JL
'84 XJ, '19JL
Return to “Projects and Build-Ups”
Who is online
Users browsing this forum: No registered users and 3 guests