So there I was... staring at a perfectly good set of 39's just sitting on the shop floor... Next thing you know:

- IMG_5364.JPG (1.2 MiB) Viewed 7185 times

- IMG_5365.JPG (1.18 MiB) Viewed 7185 times
A quick test drive revealed
massive fender contact at pretty much every point imaginable, to nobody's surprise I might add, but I just couldn't sleep knowing how good this
could be...
To make 39's fit, and work, on the LJ was likely going to be a pretty significant undertaking. Just how big I wasn't sure, but I simply had to at least do some investigation and ciphering. The first order of business was to drop the front springs out and cycle the suspension to see just how bad it really was. Turns out, it was pretty bad:

- IMG_5477.JPG (1.28 MiB) Viewed 7185 times

- IMG_5487.JPG (1.29 MiB) Viewed 7185 times

- IMG_5488.JPG (1.33 MiB) Viewed 7185 times
A little bit of up-travel combined with a little bit of turning stuffed the tires directly into the fenders. Hard. So, options... We can add bump stops to prevent the tires from moving up and contacting the fenders; we can replace the fenders with something that allows more clearance; or perhaps some combination of these two things? Well, anyone that knows me is aware of the fact that I'm cheap. Buying aftermarket "hiline" fenders is out of the question. Building a set, however, is tempting... But, as it turns out, I like the looks of a factory TJ flare. What's a girl to do?
Jack up the factory fenders

The rear is pretty simple:

- IMG_5489.JPG (1.33 MiB) Viewed 7185 times

- IMG_5491.JPG (1.32 MiB) Viewed 7185 times

- IMG_5494.JPG (1.16 MiB) Viewed 7185 times
The front, however, is a whole different ball game... But with some patience, a skinny wheel, and a whole lotta barf bags, it's doable:

- IMG_5501.JPG (1.41 MiB) Viewed 7185 times

- IMG_5503.JPG (1.48 MiB) Viewed 7185 times

- IMG_5504.JPG (1.33 MiB) Viewed 7185 times

- IMG_5505.JPG (1.35 MiB) Viewed 7185 times

- IMG_5507.JPG (1.3 MiB) Viewed 7185 times

- IMG_5525.JPG (1.27 MiB) Viewed 7185 times

- IMG_5541.JPG (1.34 MiB) Viewed 7185 times

- IMG_5548.JPG (1.44 MiB) Viewed 7185 times
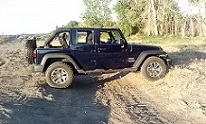
I present to you, an LJ on 39's:

- IMG_5552.JPG (1.31 MiB) Viewed 7185 times
Obviously there is a TON of finish work left to do, but the bones are there