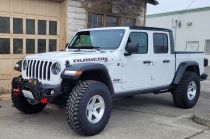

We'll start with the basics; she's a 2023 Gladiator Rubicon with the 3.6L gasser and wonderful 8-speed automatic dressed in Granite Crystal paint. Here was the first test fit in the garage to seal the deal:
- IMG_2276.JPG (1.36 MiB) Viewed 10496 times
With fitment confirmed, it was time to get started on making it mine:
- IMG_2409.JPG (1.34 MiB) Viewed 10496 times
The first order of business was to address the most glaring shortcoming from my previous Gladiator ownership experience: entry and egress. To make it right this time, I went with a set of Rockslide Engineering slider steps:
- IMG_2497.JPG (1.28 MiB) Viewed 10496 times
Next up was a complete Teraflex suspension makeover including their super-trick "extended travel" rear suspension setup which replaces the low-hanging rear swaybar and stupid-long links with a torsion style bar that mounts above the frame. I also opted for the Falcon 3.1 reservoir shocks:
- IMG_2500.JPG (1.3 MiB) Viewed 10496 times
- IMG_2509.JPG (1.4 MiB) Viewed 10496 times
At this point, it was looking as though the poor Gladiator had skipped leg day at the gym, but I was stuck in supply chain purgatory awaiting what was previously unobtainium (more on this later):
- IMG_2510.JPG (1.73 MiB) Viewed 10496 times
With a few hours to kill, I spent the time working up a new front winch bumper:
- IMG_2290.JPG (1.47 MiB) Viewed 10496 times
- IMG_2301.JPG (1.48 MiB) Viewed 10496 times
- IMG_2367.JPG (1.34 MiB) Viewed 10496 times
- IMG_2373.JPG (1.23 MiB) Viewed 10496 times
- IMG_2380.JPG (1.23 MiB) Viewed 10496 times
- IMG_2382.JPG (1.25 MiB) Viewed 10496 times
- IMG_2386.JPG (1.28 MiB) Viewed 10496 times
- IMG_2397.JPG (1.44 MiB) Viewed 10496 times
- IMG_2402.JPG (1.2 MiB) Viewed 10496 times
I still have to bend up the hoop and get it welded out, but the overall idea is there...
And that brought us up to speed as of Mother's Day, as I continued to wait for the previously mentioned unobtainium