CHEEP evolution
-
79chevy39.5's
- Posts: 1204
- Joined: Wed Apr 11, 2007 7:48 pm
-
Wrench
- Peak Putters Member

- Posts: 1237
- Joined: Sat May 30, 2009 7:23 am
- Location: in a van down by the river
Inner fenders relocated 2" closer to frame rails, and entire wheel well radius made larger to fit 36's.
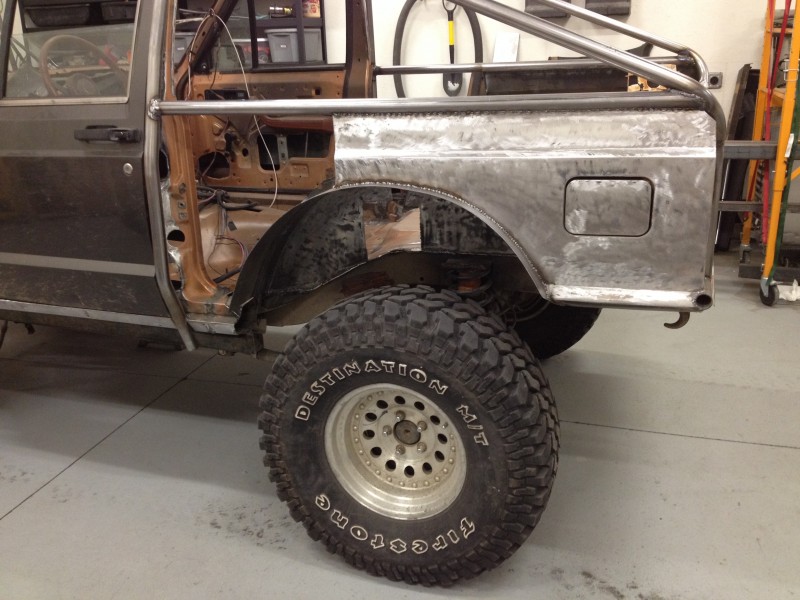

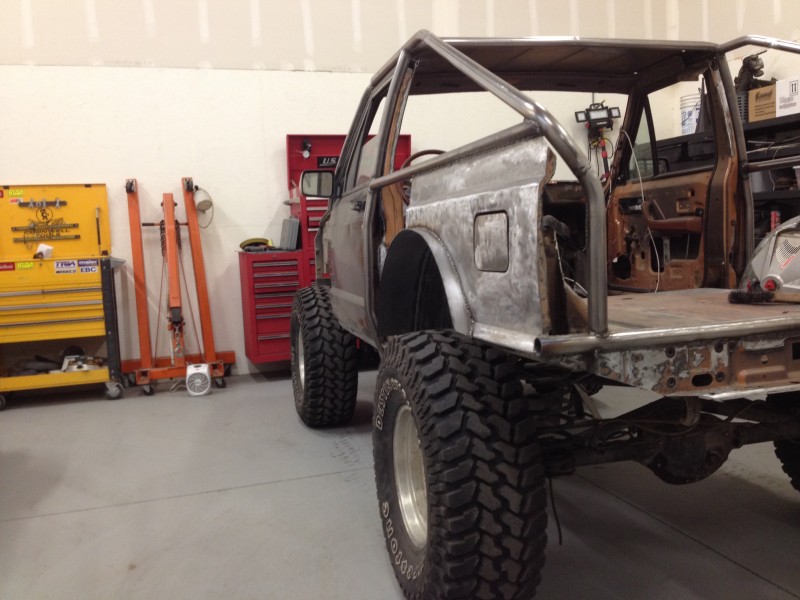
I moved the inner fender wells because I noticed that under extreme flex, the tire on the stuffed side would hit the inner fender well pretty hard at an angle. In fact, it wore all the paint off. I can only imagine that it will be even worse with 36" tires.
If I were to do it again, I would measure it up and have a set of wheel wells made by one of the local sheetmetal vendors.
Large pieces of cardboard make excellent templates!
Last edited by Wrench on Mon Dec 16, 2013 8:03 am, edited 1 time in total.
Paul
'84 XJ, '19JL
'84 XJ, '19JL


-
Wrench
- Peak Putters Member
- Posts: 1237
- Joined: Sat May 30, 2009 7:23 am
- Location: in a van down by the river
bobracing wrote:Still have clearance when the axle is twisted up?
The top will be tilted in more and the axles twisted more with links being different "lengths" at that time.
Yes, that is the plan. That is why the inner wells were moved 4" closer together.
For those interested, here is a free suspension calculator, written on an Excel spreadsheet: http://www.patooyee.com/calculators/calculators.htm
Just pick the link at the bottom of the page.
Paul
'84 XJ, '19JL
'84 XJ, '19JL
-
Wrench
- Peak Putters Member
- Posts: 1237
- Joined: Sat May 30, 2009 7:23 am
- Location: in a van down by the river
First of all, YES, I have been making progress, just havent been posting it.
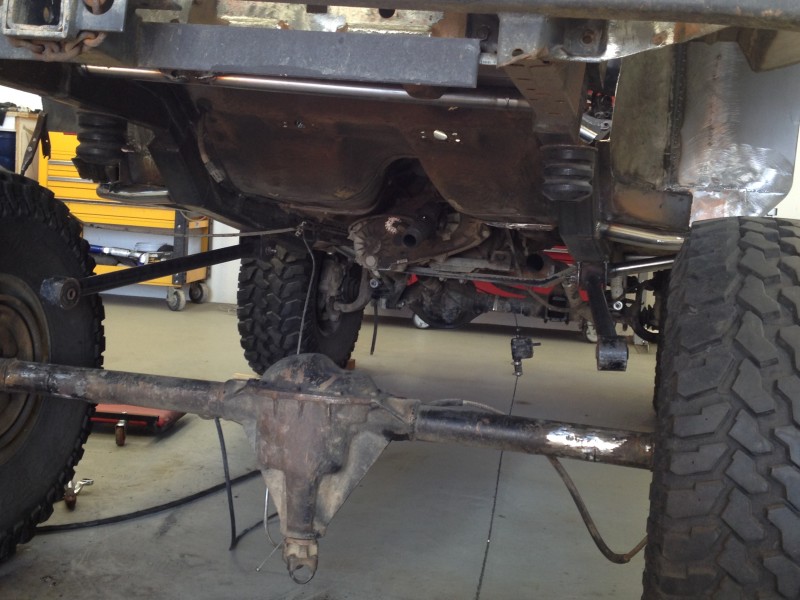
I got both sides of the rear boxed frame sections completed, and cage totally tied together.

I also completed fabrication and installation of the rear lower arms and mounts.

And here is a note for Dale:
This is how I made my "CNC" cut suspension mounts, using a standard plasma cutter and patterns cut from 1/8" plywood:

I am using a contact tip that you can drag right onto the metal as you cut, no need for keeping a gap. Just drag it on the metal and keep it pushed against the wood pattern.
I got both sides of the rear boxed frame sections completed, and cage totally tied together.
I also completed fabrication and installation of the rear lower arms and mounts.
And here is a note for Dale:
This is how I made my "CNC" cut suspension mounts, using a standard plasma cutter and patterns cut from 1/8" plywood:
I am using a contact tip that you can drag right onto the metal as you cut, no need for keeping a gap. Just drag it on the metal and keep it pushed against the wood pattern.
Paul
'84 XJ, '19JL
'84 XJ, '19JL
-
mattawajeep
- Posts: 1221
- Joined: Wed May 19, 2010 6:18 pm
- Location: Mattawa, WA


-
Livin4Today
- Posts: 1054
- Joined: Thu Jan 26, 2012 8:23 am
- Location: Kennewick, WA
Very Nice! Which spreadsheets did you use off the link?
Lance
Building a capable off roader is easy, building a street legal one that you can wheel and then drive daily is the challenge...
2007 JKU, 7" RK lift, 40s, ARBs, 5.38s, Headers, Fox Coilovers, etc. http://www.Livin4Today.com
Building a capable off roader is easy, building a street legal one that you can wheel and then drive daily is the challenge...
2007 JKU, 7" RK lift, 40s, ARBs, 5.38s, Headers, Fox Coilovers, etc. http://www.Livin4Today.com
-
Wrench
- Peak Putters Member
- Posts: 1237
- Joined: Sat May 30, 2009 7:23 am
- Location: in a van down by the river
JK Lance wrote:Very Nice! Which spreadsheets did you use off the link?
"4-link calculator with suspension travel addition"
Very bottom of the page in the link.
It calculates all the really important stuff, including pinion angle change through your selected travel distance.
It has been very informative. I realized that my hillbilly rear setup I had before was actually not all that bad. It also made me understand why I had such a body-roll issue with my front end setup (track bar too low, below the vehicle CG). There is a ton of good info wrapped into that little program.
Paul
'84 XJ, '19JL
'84 XJ, '19JL
-
Wrench
- Peak Putters Member
- Posts: 1237
- Joined: Sat May 30, 2009 7:23 am
- Location: in a van down by the river
Re: CHEEP evolution
OMG, 3 years since I posted here!
Christmas goodies from last year include Fox 2.5 remote-reservoir coil-overs, 14" travel.
This year, I picked up a 35 spline ARB for the rear and Nitro axles. I am sticking with the 3-series carrier and thick-cut gears.
The front axle is getting Nitro chromoly axles, Nitro solid u-joints, and 30 spline Warn hubs.
Last edited by Wrench on Sun Dec 25, 2016 8:17 pm, edited 1 time in total.
Paul
'84 XJ, '19JL
'84 XJ, '19JL
-
Wrench
- Peak Putters Member
- Posts: 1237
- Joined: Sat May 30, 2009 7:23 am
- Location: in a van down by the river
Re: CHEEP evolution
Front axle: ~'90 Wagoneer narrow (~60") low pinion. Already regeared to 5.13, 3-series carrier, Spartan lunchbox locker. 3-series carrier is more desirable, even though it requires the thick cut ring gear. This carrier will support modification to fit JK Dana 44 R&P's down the road if I have a failure. The JK R&P's use a much beefier pinion gear and larger diameter ring gear.
Front axle shaft install:
I gotta say, these shafts are noticeably harder material than the stock stuff, and machined to much better tolerances. The u-joints installed easier and everything lined up great. These joints have no needles at all. They rely completely on grease to lube them, and a coating of some kind on the shaft part. This allows the X to be much beefier. They also use full-circle circlips to retain the caps. They also have grease zerks on every cap, allowing the X to be solid (no grease port down the center) and stronger.
On a side-note, I also discovered I need new hubs. The factory hubs and corresponding outer shafts are 19 spline. The beefier Nitro outers (and RCV outers) are 30 spline, so anyone using those will need to upgrade the hub locks to 30 spline units, like the Warn Heavy Duty sets.
- IMG_20161224_142138374.jpg (1.81 MiB) Viewed 5804 times
- IMG_20161224_142203999.jpg (1.76 MiB) Viewed 5804 times
- IMG_20161224_161044148.jpg (1.68 MiB) Viewed 5804 times
- IMG_20161224_162826214.jpg (1.59 MiB) Viewed 5804 times
Paul
'84 XJ, '19JL
'84 XJ, '19JL
Return to “Projects and Build-Ups”
Who is online
Users browsing this forum: No registered users and 54 guests