Overall I'm extremely happy with the results thus far, but clearly only seat time will the real story...
2005 LJ
Re: 2005 LJ
After a couple of less-than-spirited test drives around the neighbor hood and one final bolt torque check, it was time to put some miles on it see what I'd done... Mercifully, nothing fell off and other than it definitely needing a couple more degrees of caster, it drives out just dandy
I also wanted to cycle the suspension to check for clearance and measure for bumpstops:
Overall I'm extremely happy with the results thus far, but clearly only seat time will the real story...
Yep, I've wheeled one of those, too...


Re: 2005 LJ
While the first wheeling trip was technically a success, the addition of the hard top and full bevvy of tools and spare parts really put the spotlight on just how bad the alignment was. The short road trip from the staging area to the actual trailhead was nothing short of a handful... Back home, using the adjustable UCA's up front I dialed in about 5.5* of total caster and that made a world of difference
Similarly, with all of the extra weight I was a little disappointed in how "soft" the rear-end felt overall, particularly in side-hill situations. To try and remedy the issue, I whipped up a couple of mounting brackets and reinstalled the OEM rear swaybar that was native to the LJ chassis:
The final piece of the current puzzle was rear bumpstops. I didn't like the first attempt for the rear setup, so I spent some time with a frosty beverage and came up with an adjustable base arrangement that should allow for easy fine-tuning, similar to the front:

Similarly, with all of the extra weight I was a little disappointed in how "soft" the rear-end felt overall, particularly in side-hill situations. To try and remedy the issue, I whipped up a couple of mounting brackets and reinstalled the OEM rear swaybar that was native to the LJ chassis:
The final piece of the current puzzle was rear bumpstops. I didn't like the first attempt for the rear setup, so I spent some time with a frosty beverage and came up with an adjustable base arrangement that should allow for easy fine-tuning, similar to the front:
Yep, I've wheeled one of those, too...


Re: 2005 LJ
Hockey pucks for the win! I used them on the TJ. Can't remember if they were still on it when I sold it. 
I am enjoying watching this build.
2018 JLU Rubicon
Tow bar mount
Trailer hitch
Tow bar mount
Trailer hitch
Re: 2005 LJ
After the past 8+ months of wheeling everywhere between Naches, WA and Fordyce, CA, commuting to work, and otherwise sitting around in a filthy dirty shop environment, I realized that this pooch hadn't seen the business end of a wash mitt in what seemed like decades... So I did something about it:

Yep, I've wheeled one of those, too...


Re: 2005 LJ
With the new JLU-R XR (viewtopic.php?f=14&t=7679) wearing the shoes that once belonged to the LJ, decisions had to be made... Clearly the dinky 35's that came from the JLU-R XR would be fine as temporary rollers, but they were not destined for long-term life under the LJ. Instead, I dug back into the mammory banks and recalled a certain set of 38x14.5 MTR's that once adorned the Trail Cow, which is now owned and piloted by our very own Dryside [insert applause track]:
Turns out, Dryside didn't like these for daily driving duty and they found there way back into my storage bin...
Along simular lines, while I probably could have gotten away with using the JLU-R XR wheels, perhaps even converting them to true beadlocks using the MOPAR rings, I again called upon my elephant-esque mammories and regaled in the joy that a set of Raceline beadlocks had brought to my life all those years ago, when they adorned Oscar:
These had been in storage at Rottwheeler's place for the past several years...
After a couple nanoseconds, a plan was hatched to marry these two beauties together for use on the LJ
These things are W-I-D-E and I'm honestly not sure how well the fronts are going to play with my fenders with the current bumpstop setup, but we'll know soon enough.

Turns out, Dryside didn't like these for daily driving duty and they found there way back into my storage bin...
Along simular lines, while I probably could have gotten away with using the JLU-R XR wheels, perhaps even converting them to true beadlocks using the MOPAR rings, I again called upon my elephant-esque mammories and regaled in the joy that a set of Raceline beadlocks had brought to my life all those years ago, when they adorned Oscar:
These had been in storage at Rottwheeler's place for the past several years...
After a couple nanoseconds, a plan was hatched to marry these two beauties together for use on the LJ
These things are W-I-D-E and I'm honestly not sure how well the fronts are going to play with my fenders with the current bumpstop setup, but we'll know soon enough.
Yep, I've wheeled one of those, too...


Re: 2005 LJ
With a couple months of ice-cream run duty and a few wheeling trips on the "new" tire/wheel setup, it's become apparent that things are leaning a touch too far toward trail use only for the LJ
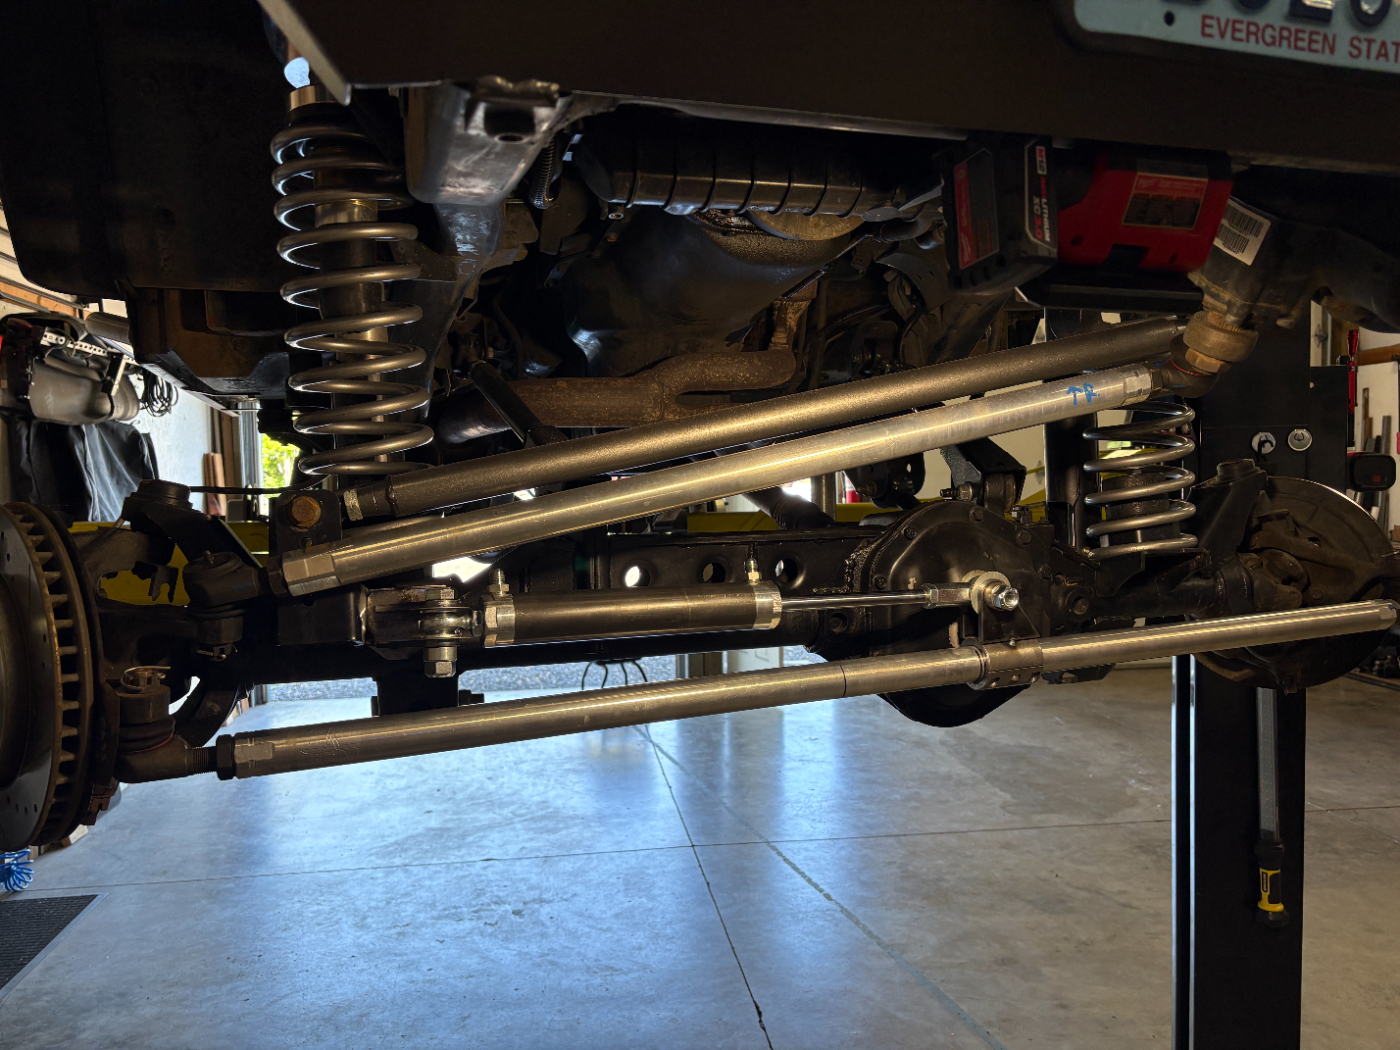
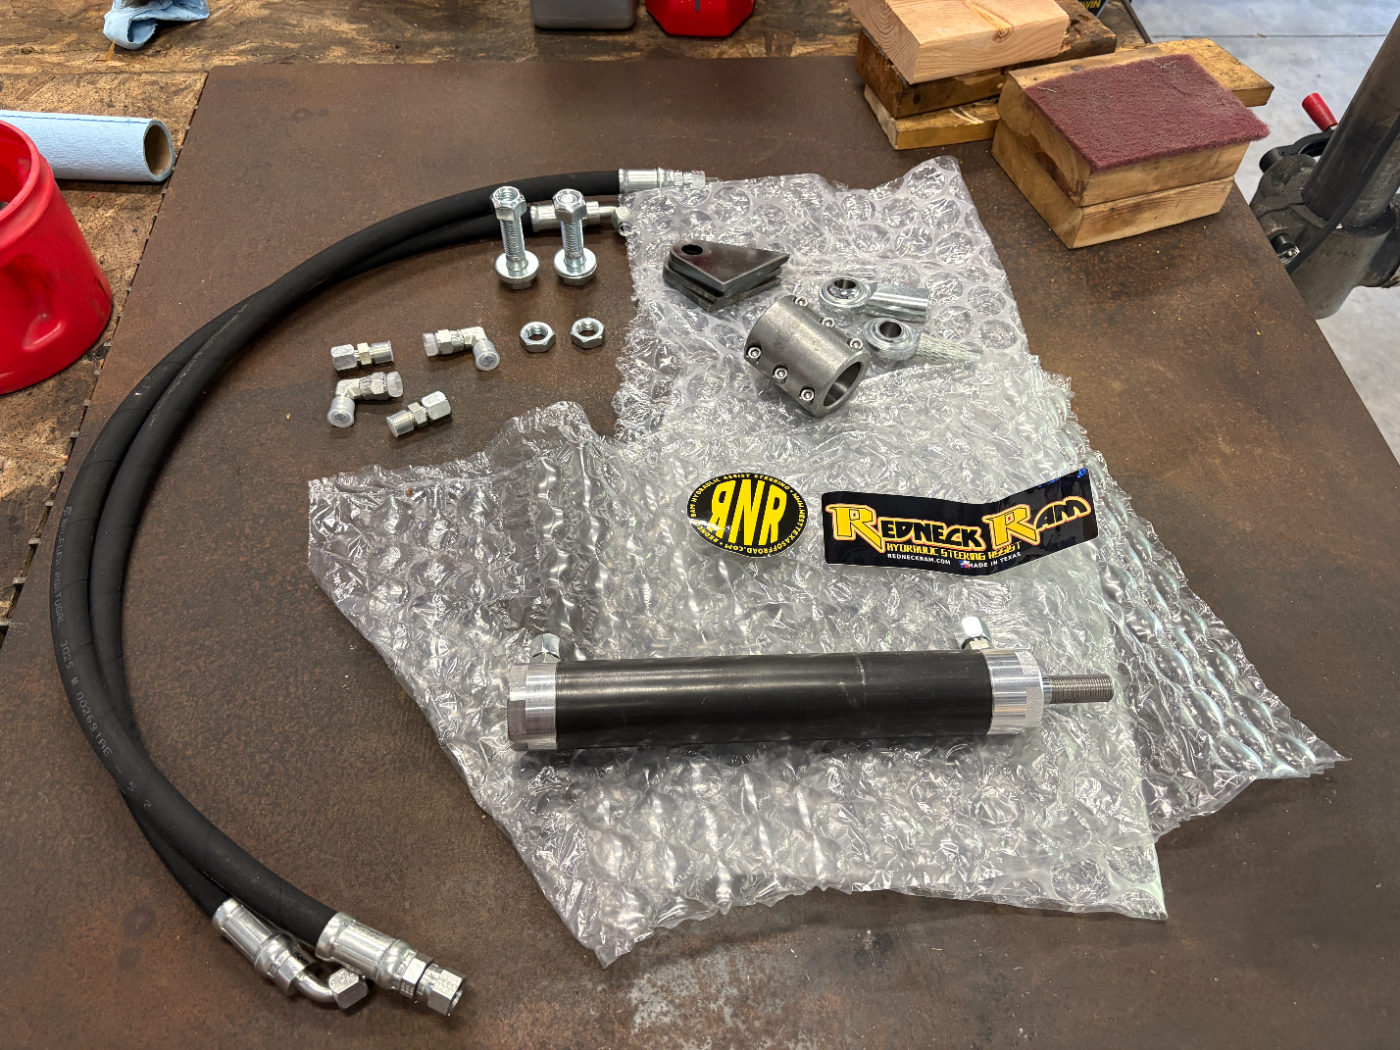
The MTR's are fabulous at single-digit air pressure in the snow, and do what generally any tire does on typical trail surfaces, but once you get them on the street it's borderline miserable. They are simply too wide, following every single rut or groove in the road, and they have a bad habit of inducing death wobble which makes the poor LJ undriveable anywhere above 40mph or so. In an effort to combat this, I contacted my friends at West Texas Off-Road and they sent me one of their Redneck Ram hydro assist cylinder kits:
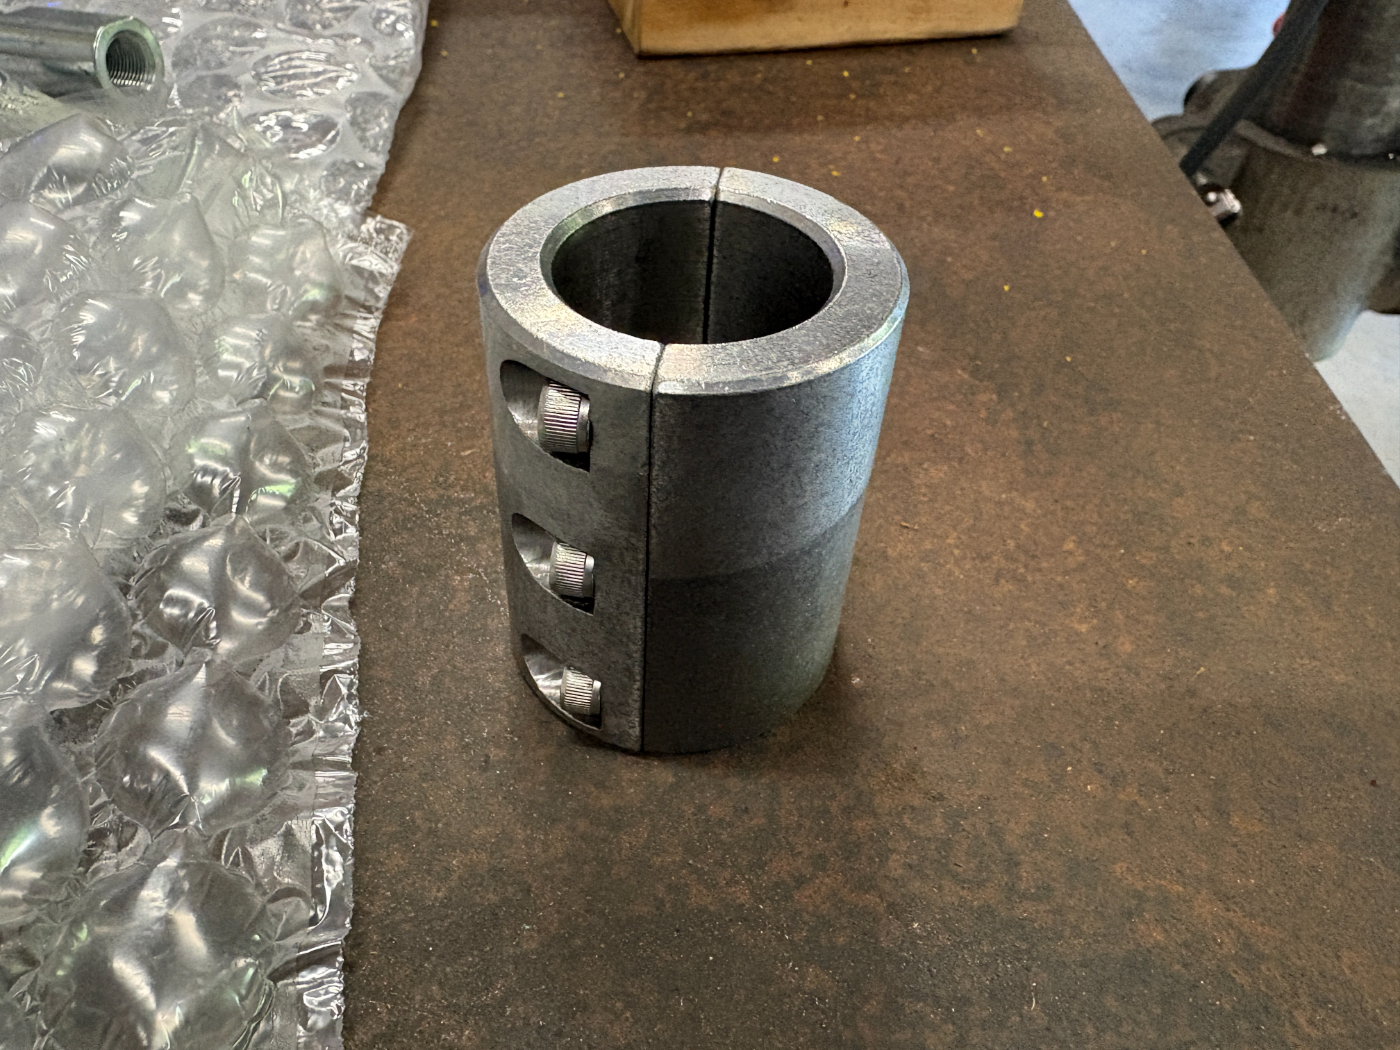
I also ordered a very specific tube clamp to use on the 1-1/2" aluminum tie-rod. You'll note that unlike most tube clamps, this one is not drilled through on the back half of the clamshell, giving more room to place the tabs for the hydraulic cylinder to mount:
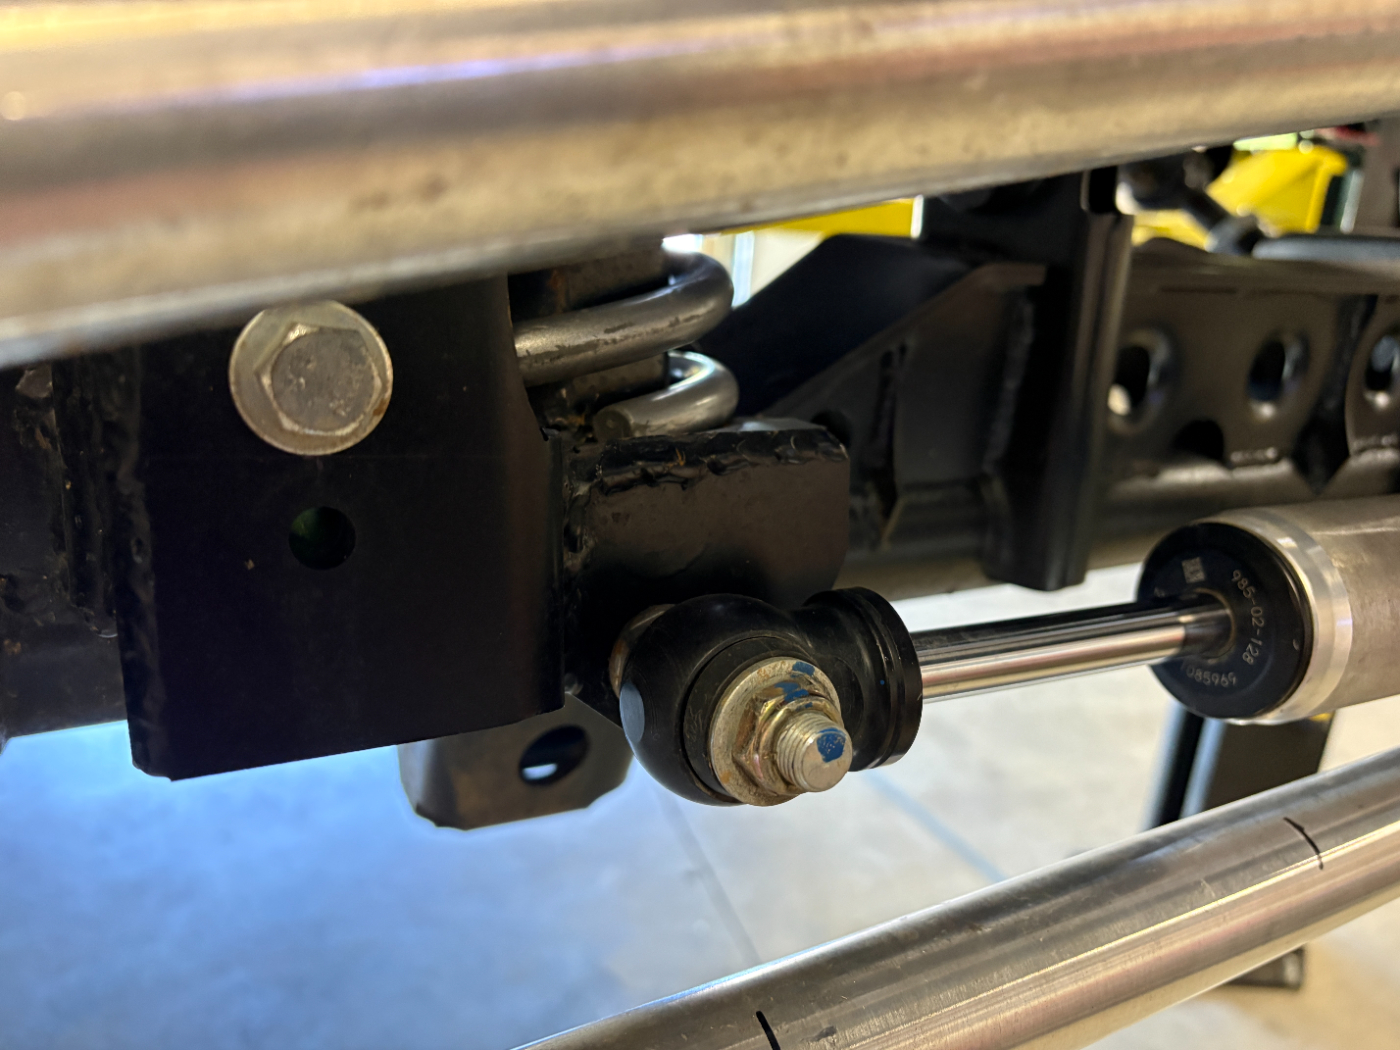
Parts in hand, it was time to get things installt. When I built the JK front axle to put under the LJ, I was able to scab on a simple bracket setup below the coil spring pad to mount the steering stabilizer. Because of the extreme forces involved with a hydraulic cylinder setup, this mounting arrangement wasn't going to cut the mustard so I carved the face of that bracket off and replaced it with a new one that would allow me to place the cylinder mounting tabs in double-shear:
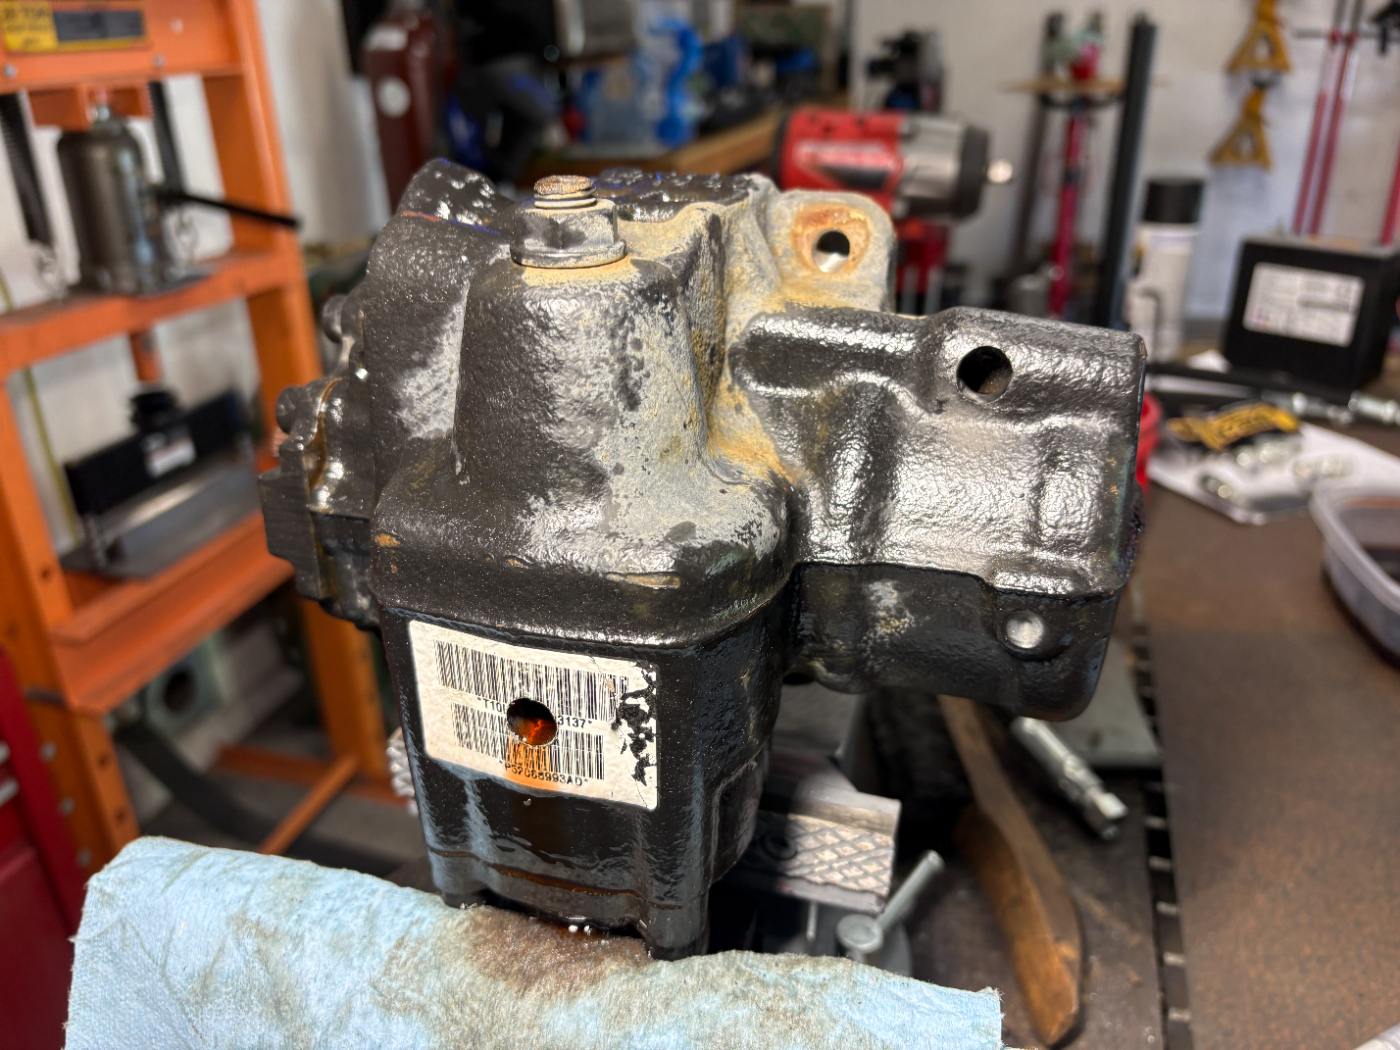
With the cylinder mounting mocked up, it was time to deal with the hydraulic portion of the program. The 2003+ TJ platform utilizes a Mercedes-sourced steering gearbox, and unlike the more common Saginaw units used on just about everything else, there just isn't a ton of information out there on tapping them for hydro assist. I was able to scare up some old forum posts from Pirate back in the 2010 era, and poked some holes in the box accordingly:
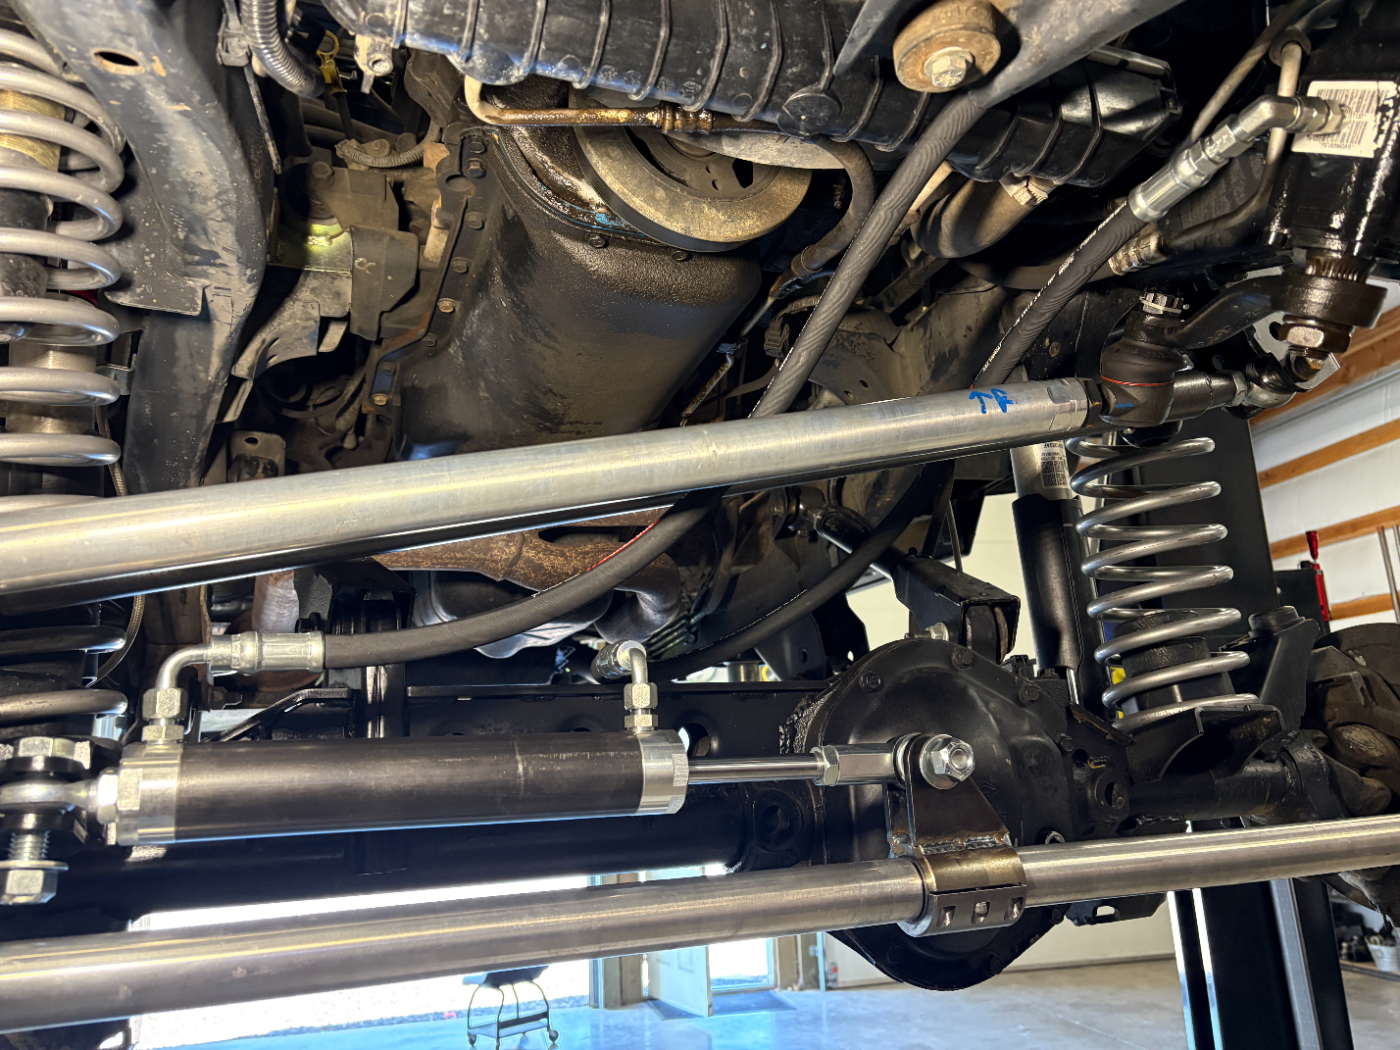
Then it came down to running the pressure lines, and bleeding the system:
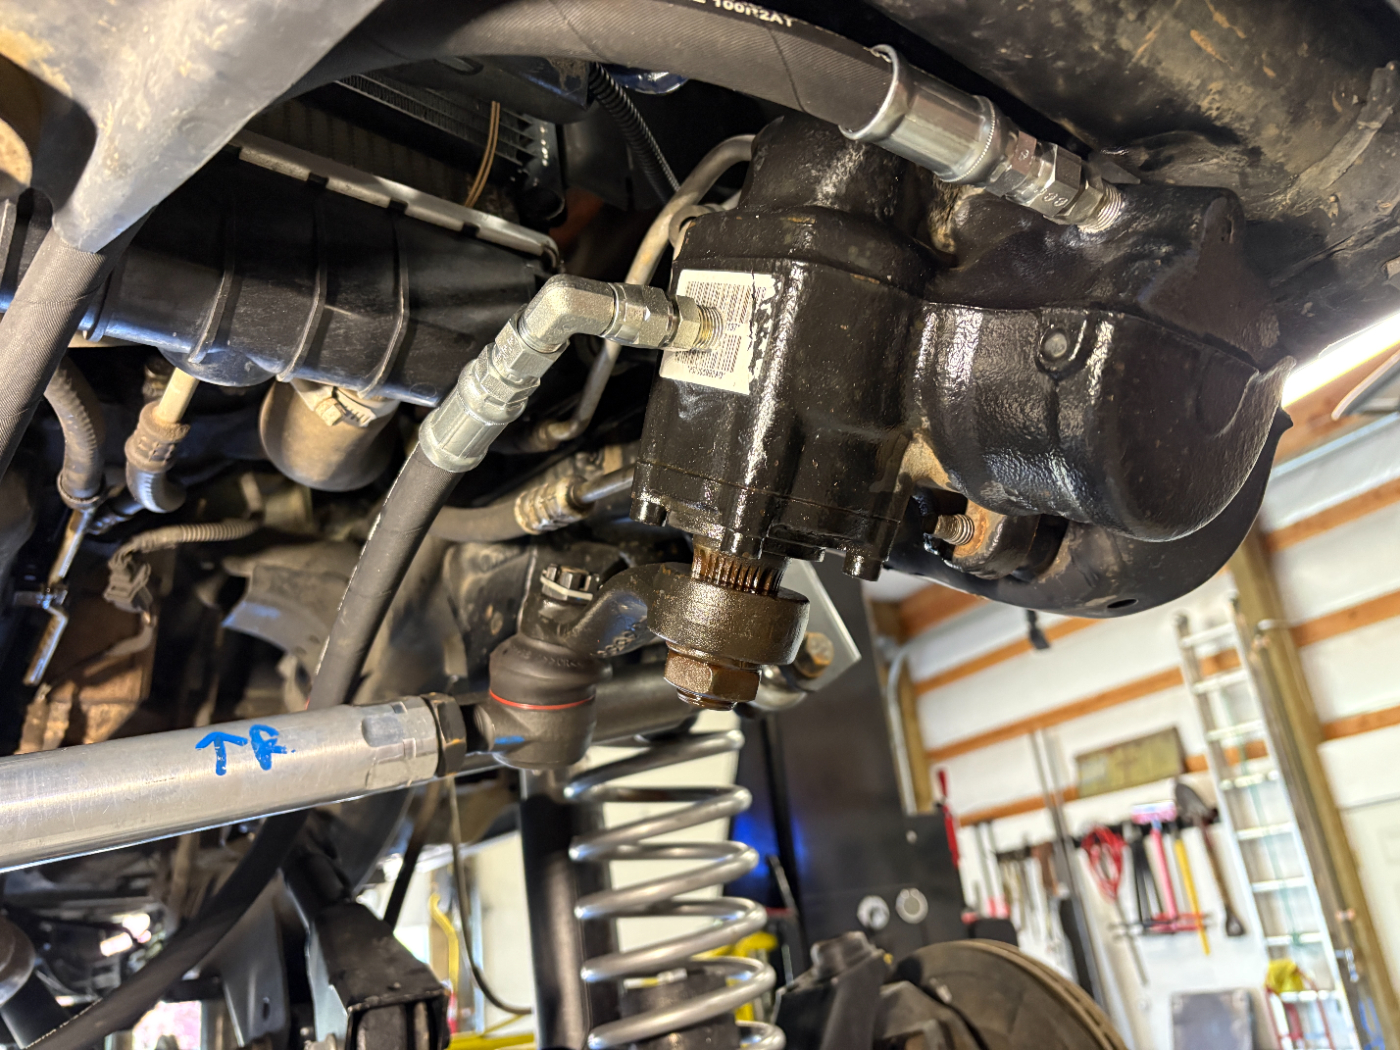
Unfortunately I had the lines reversed, so the above photo does not represent the final product and I got to go through the bleeding process twice
... Similarly, I'm still fighting a leak around the threads on the forward fitting on the gearbox, so the saga continues. However, overall the installation was a success as the drivability of the LJ on the street is markedly better. There is still a tendency for very slight shimmy/wobble if conditions are just right, but it's not an every-time situation like it once was and I may be able to dial in just a touch more caster to continue to push it out of the system. In the meantime, we'll continue to hit the Baskin Robbins with everything she's got 
I also ordered a very specific tube clamp to use on the 1-1/2" aluminum tie-rod. You'll note that unlike most tube clamps, this one is not drilled through on the back half of the clamshell, giving more room to place the tabs for the hydraulic cylinder to mount:
Parts in hand, it was time to get things installt. When I built the JK front axle to put under the LJ, I was able to scab on a simple bracket setup below the coil spring pad to mount the steering stabilizer. Because of the extreme forces involved with a hydraulic cylinder setup, this mounting arrangement wasn't going to cut the mustard so I carved the face of that bracket off and replaced it with a new one that would allow me to place the cylinder mounting tabs in double-shear:
With the cylinder mounting mocked up, it was time to deal with the hydraulic portion of the program. The 2003+ TJ platform utilizes a Mercedes-sourced steering gearbox, and unlike the more common Saginaw units used on just about everything else, there just isn't a ton of information out there on tapping them for hydro assist. I was able to scare up some old forum posts from Pirate back in the 2010 era, and poked some holes in the box accordingly:
Then it came down to running the pressure lines, and bleeding the system:
Unfortunately I had the lines reversed, so the above photo does not represent the final product and I got to go through the bleeding process twice
Yep, I've wheeled one of those, too...


Return to “Projects and Build-Ups”
Who is online
Users browsing this forum: No registered users and 3 guests